Balduran
Terrarian
Note - This guide is presented as is and will not be maintained/updated.
Preface
Having recently seen some people try out pixel art here on the forums, I wanted to give them some links to a few tutorials. Alas, much to my surprise, I've discovered that... In essence, there are none.
Oh, of course, there are lots and lots of helpful guides out in the internet, but from what I've seen, they were either much too basic, only dealt with a very specific subject (MCF, for reasons beyond me, ended up having only terrain tutorials), or were much too advanced for a complete newbie and pertained to general pixel art.
As for Terraria specific guides, I only found 3 on Terraria Online, and while they do offer some good insight, I don't feel they're exhaustive enough.
This guide will be fairly long and picture heavy, so be warned.
Table of Contents
Tools of the Trade
First, I strongly advise against using MS Paint. Why settle for a sub-par tool, when something better can do the job more easily?
In general, any image editing software can probably pull it off, but you should get either Paint.Net or Gimp, both of which are free. There are tons of other programs, but I've never tried them, and either of the aforementioned are enough, for completion's sake however, I'm including a link to a list at the end.
In general, I am going to refer specifically to GIMP in this guide, as it's my software of choice.
Also - Use a PC. You will not become a good pixel artist if you insist on spriting solely on your iPad or whatever.
Here are some Pros and Cons of the most popular programs:
You can use MS Paint to make a scene of some kind, but if you really want to get into pixel art, you really need a proper program.
My personal recommendation is either the aforementioned Paint.Net or GIMP.
The choice comes down to whether or not you want to do other things with it besides spriting.
So if you want a free Photoshop alternative that can do pixel art, go with Gimp. If you just want to sprite with a simple program and nothing else, use Paint.net.
There are many other pixel-art oriented programs, but I've never tried them myself. Links below.
Getting Started
Before I move to the more specific tips, we need to set up our workspace:

This is your GIMP window. For spriting, you are going to use the PENCIL tool (1), which works identically to its MS Paint counterpart. By default, the ERASER tool (2) is geared toward normal use, ie digital art or photomanipulation, which is why you need to tick the HARD EDGE option (4) so that it erases everything, and pick a smaller BRUSH (3), specifically "Circle (01)".
I seem to recall that by default, every new picture in Gimp has a white background. We don't want that.
In order to rectify it, make sure you pick "Transparency" in the FILL WITH (5) option.
Gimp should remember this setting, so there's a good chance there will be no need to do it every time.
Regardless of program, never use an opaque background unless it's just a preview.
The ingame sprites are actually double-sized, which means that every pixel is in fact 2x2 pixels!
A lot of people seem to suggest using a 2x2 brush to emulate that, but I think that's an atrocious waste of time and effort. Instead, what you should do is start with a smaller sprite, and then simply upscale it to 200%. More on that later.
Also, when You are ready to save your sprite, make sure you save it as a PNG file. JPG files are lower quality, and do not support transparency, which is important.
Terraria Specific Issues
a) Size:
Now that we have our program open, we need to make a new image. The key here, is to remember that Terraria's sprites are actually very small, so you're going to need a lot of practice to emulate the style properly.
Not counting unused items, the largest sprite is 30x20. As you can guess, that's not a lot of space.
Better still, most item icons are even smaller, going to as small as 8x8 pixels (Ores, blocks).
That is why, contrary to popular belief, if you want to make it look right, you will have to learn to work in low resolution.
One problem with Terraria is that, unlike Minecraft, a lot of sprites have different sizes. This can be both a blessing and a curse because it gives you more freedom, but at the same time working without a specific size can be frustrating when something turns out to be much too big.
Further along the road, you should extract some textures with an XNB exporter (Link below) and check the sizes for reference.
Once you're done, simply scale your sprite to 200% and call it a day.

Remember to set the Interpolation to "None"!
In Paint.net, "Interpolation: None" is called "Resampling: Nearest Neighbor"
b) Style:
One thing you may or may not have noticed, is that (With but a few exceptions) everything in Terraria has a dark outline.
I cannot stress enough how important they are to the style, please observe:

While this is not necessarily a bad thing, and it works fine in Minecraft or Risk of Rain, in Terraria this is a big no-no.
There is an exception to this, in the form of burning/glowing objects:

However, do note that they still have a slightly darker outline. For the moment, focus on having darker outlines, until you gain some proficiency.
Another exception from this rule are 1x1 tile flowers and other such tiny flora, which lacks outlines simply because there's no place to add them
As a final note regarding outlines - Never, ever make them black. Always use a much darker color, but never pure black. More on that later.
Another important thing to keep in mind, is contrast.
Pixel art in general requires strong contrast, but in this game in particular it's doubly important.
What you don't know, is that a sprite opened in Gimp (Or otherwise) will look/feel different than it would in a colorful game environment, or against a different (Ie non neutral) background.
Why do I mention this? Because a sprite that might look fine in your editing software, might blend in too much ingame. I used to have this problem a lot in the past.
Here's an example:

They look fine on their own, but the moment I've loaded them into Minecraft, it turned out the shades blended with each other far too much to look good. Unfortunately, at that point it meant remaking the entire texture pack, so I've lost motivation and abandoned it.
The final thing to keep in mind, is that the weapons are oriented towards the right side. This means that the sprite gets swung to the right, and not the left like in Minecraft. Of course, Terraria rotates the sprite when the character is going left. So don't make the same mistake I did in this tutorial, and make sure your weapon is pointing to the right side
c) Armor:
Much like in Minecraft, armors have separate files for their inventory icons, and their ingame appearance (Unlike tools and weapons, whose in-game appearance is taken straight from the sprite).
If you're planning on using your newly sprited armor in a mod, you will have to animate every single frame of it - Jumping, standing idly and so forth. This is very common in games that use 2D sprites, and usually there's no way around it - You have to draw every frame, especially with more complex objects like fire or a multi-limbed mob.
The majority of artists here, Yours truly included, don't animate their character sprites, so they can't actually be used ingame without anexcessive additional amount of work.
Creating this kind of stop motion animation is a tedious, and often frustrating process, personally I dislike animating anything because I'm just not good at it, so I avoid it like fire.
d) Tiles:

Every object in Terraria is divided into parts, so that the game knows how big a thing is.
Each of these cells is 8x8 pixels, and equals one block in the game.
So you first have to chop up your piece of furniture into parts, like so:

And then the game will put it back together when you load a world. You can either start by making something on the grid, or (Like me), begin with the object in question, and then cut it into pieces.
For the record - The player character takes up a 2x3 block space.
Guide Proper
Not to get to the meat of the issue - The spriting itself. I'll mostly focus on items here, but the same techniques will be applied to mobs, tiles or otherwise.
1) Shape Definition:
First and foremost, You need to define your shape. You can start with whatever color you have selected and just start drawing the overall silhouette: (You can, and will, adjust it as you go)

Et Voila! A generic battleaxe of some kind. Keep in mind that the object will need to have an outline, which is best added after You've got some basic shading laid out. If the item takes up your entire image, you can always increase the canvas size by 1 pixel and draw the outline.
Alternatively, you can simply start with the outline, and then fill it with color, like in AaronC's guide (Link below). It's really up to you.
As with shading, the shape can make or break your sprite.
(Do not that I kinda forgot that weapons in Terraria face right when I was making that axe)
2) (Basic) Shading:
The second order of business, is to establish where the light source is and then use that. The majority of artists just default to placing the light source in the upper left corner, and that's fine (I do that too).
There are two ways you can approach shading. If you're a complete beginner with shading, you could start by making it grayscale to get the light right, and then replacing it with color once you're comfortable with how it looks like. This has the advantage of not having to worry about how colors interact with each other and having a bad hue ruin the effect from the ground up.
When you're more advanced, you're just going to skip this and go straight for colors and adjust them as necessary.
Of course, the choice of method is yours. I simply found it easier to focus on just the shading when I was a beginner.

At it's most basic, shading requires 3 colors - Shadows, Highlights and the Main Color.
Of course, one should strive to use more than that, but at the same time - Don't overdo it.
In general, you want to keep the color count low relatively low. This will help if you want to use the same palette for several different items, or something that's animated, like armors.
As a counter example, animating this would be a pain in the :
:

But the color count is fine for a static piece (I hope).
3) Tweaking:
Notice that I used the iron color for the entirety of the axe, haft and all. Unless it's an early weapon/tool that is colored by the game to imitate a different material (Every Copper to Gold tool does that), you're probably going to want more colors than that.

There, much better isn't it? This is still a very simple sprite, utilizing a total of 8 colors.
Notice how I used a different outline color for the haft, this will help your sprite looking much more aesthetically pleasing.
One important thing to keep in mind - Even though your light is most likely shining from the upper left corner, always make the cutting edges bright to show that they're sharp. This is especially crucial with single-edged weapons like swords or sabers.
This Palladium Sword perfectly illustrates what I mean here:

At this point, you're pretty much done.
But let's make it even more exciting with the magic of Hue Shifting:

See? It still has the exact same amount of colors, but it looks more fancy. I wrote a more in-depth explanation of hue shifting in the next section.
4) Misc Advice:
With all forms of creative media, it helps to have a general idea of what your goal is. In other words - If you're completely out of ideas at the moment, you're just not going to make an awesome sprite. If that's the case, you should probably just give it a rest and come back when inspiration hits you.
Reference pictures and knowing what you're trying to do can help a lot. For example, I have a lot of expertise in ancient armaments, so it's easy for me to make a believable sword or armor that would allow movement without tripping over.
That being said, there's no need to be an expert - Just use photos for reference or inspiration.
For example, I'm ignorant in regards to firearms, but I can produce nice looking guns:

Another thing every artist should do is observe others. Either analyze other people's sprites up close, or better yet, extract Terraria's textures and see how they look, how big they are etc.
With regards to armors or outfits, you don't want to start from scratch, lest you get the size wrong.
Just get a player template, like one of those:


And just draw over it. Just remember that if you plan on animating it, You'll have to save each part separately. Interestingly, in-game the legs are on top, the torso is in the middle, and the helmet/hair/head is behind it all.
5) Guns (Suggested by SunnyTheHated)
While on the topic of guns, it does appear that they're not as easy to make.
Of course, every weapon is different, so you'll need to have a least a vague idea of what you're aiming for - Futuristic, modern, pistol, rifle, organic alien design?
Unlike melee weapons, ranged weapons need to be horizontally oriented and facing right (As opposed to being diagonal and being swung towards the right side).
Much like with all items, a nice, varied shape is very important. Don't just settle for a long, flat barrel, try to add to it.

That being said, keep in mind that there are supposed to be colors inside that outline.

See? Even if the overall shape is rather simple, you can still add variation within the border.
Notice how I did the handle. It's not necessary to make it identically to that one, but in general a firearm handle is going to be a flavor of that shape.
With some added shading, it could look something like this:

It's pretty much done, but you can keep adding to it. Say you want a sub-machine gun and not a shotgun?

Don't get discouraged if your firearms look dull at first, you'll learn to give them all sort of crazy shapes in due time.
6) Basics of Animation
I won't lie to you - Animating sprites is hard. However, if you can learn it, it's very rewarding.
Terraria's animations use a .png sheet with every frame drawn separately, rather than a .gif file.
Let's take a look at an example:

As you can see, this is the vanilla zombie. It's a relatively simple mob that uses only 3 frames for walking.
Since a lot of NPCs don't have a dedicated attack animation, there are some generalizations we can use:
The player characters have the most complex animations (imho). Within the same armor file, you have animation frames for standing still, swinging a weapon, jumping and running.
Luckily, since the player is split between 3 separate files for chest, head and legs, the game will use the same swinging animation regardless of whether you're standing, running or falling down a shaft (Do note - The armor is layered. As far as I can tell, the torso will be the top layer, with the head and leg layer being behind it).
While on the topic of separate armor animations - Even though most helmets/hair/heads are not animated (The fishbowl is the only exception I can think of), a helmet file still needs the same amount of frames as the other files. If you fail to do this by either leaving the rest of the frames blank or making the head file size different, it will not display properly ingame. The helmet can be animated, but it will only be animated in motion.
Here are the player animation files (Plus a humanoid NPC animation sheet):


One thing I've discovered when I started working with modders, is that armor sprites also need an 'arm' sprite, presumably for rendering reasons. This means that for every chestplate you animate, you'll have to make an extra sprite with just the right hand.
Notice that (For some reason) NPCs are always facing left, while the player armor is always facing right.
In general, to save time first make a static armor sprite, and then split it on the animation sheets.
You may have noticed that the torso and head never moves - Only the hands are animated, so you can just copy the torso throughout the sheet and then add the hands. It REALLY helps to work with layers here so you can keep the template underneath to trace it.
Some frames are also identical, so you can shave off even more time by just copying them.
Here's an example non-standard NPC animation sprite that I made (With descriptions):
It's an burrowing, explosive spider mine.

Frame #1 and #2 - Idle standing animation (The robot bobs on it's legs in place)
Frame #3 - Burrowed state
Frame #4 - Burrowing. Transition frame between the burrowed state and #1 (Standing). In other words, when it's digging itself into the ground, the game would play frames #1, #4 and #3.
Frames #5 through #10 - Walk cycle.
Frame #11 - Preparing to jump.
Frame #12 - In-flight frame. The robot has its legs extended, and is elevated 1 pixel so that the animation looks more natural.
I don't know exactly how Terraria works code wise, but I surmise that it could be even simpler - The walk cycle could be dropped to just 4 frames, and the last one replaced by frame #1.
Game ready sheet:
 Here's an animated gif of how it would look like:

Notice how I kept the color count low to make creating new frames easier.
7) Shading Spheres
And round objects in general. Basically, all you have to do is remember that the sprited object has a 3d shapes, despite being 2 dimensional.
For orbs of all kind, this means that they'll have a different light falloff than a flat wooden board.
To illustrate:

All this means, is that you need to remember that a sphere is protruded towards the viewer, so it reflects light differently than a flat surface.
9) Dithering
(Note - While this method isn't used that much in Terraria, I feel that it's an important technique to know nonetheless)
Dithering is a form of shading used on larger areas of color to make the light falloff smoother. It's a very old technique dating back to when color count was low and colors had to be reused, so dithering was used to lower the amount of shades needed to shade a sprite.
It's still used, because it's great for larger areas, or when you don't want to bloat your color count.
So what is Dithering exactly? Dithering is made by making a sort of a checkerboard pattern over the desired transition area between two colors:

The image to the left has 5 colors (Including outline), the one to the right has... Lots.
As you can see, with using the same amount of color, we managed to achieve a smoother shade than the middle image. Of course, it all depends on what you're trying to achieve, but in general dithering is great for smooth transitions.
However, as with all things in life - Don't overdo it. Dithering is not always necessary because we no longer have to worry about a limited palette, but you can always use it a little bit in between regular shading.
One important thing to keep in mind about dithering, is that the dithered pixels should NOT touch, or else the effect is lost. Always make sure that the dithered pixels connect only diagonally.
Whew, that's about the gist of it. In closing words - The most important piece of advice I can offer you, is to practice, experiment, and above all - have fun.
And that's it. This guide can point you on your way, but the real work will be done by you.
Common Beginner Mistakes
a) Grayscale:
Similarly, if you want to have a gray cowl or hood, use a desaturated red or different color.

See? The left one has a red tint, the right one blue and the middle one is 100% grayscale.
Depending on the color you picked, the mood of it changes. The reason this is important, because 1) It looks better, 2) In real life, nothing is ever purely one color, everything is a mixture of light, texture and other factors.
Admittedly, this might not be the best example, but you should notice the difference when you make a nice gun texture with a grayscale barrel. It just won't feel right.
For a different example, go back up and look at the battleaxe process. With the exception of the initial black shape, it was never grayscale!
b) Hue-Shifting, or lack thereof
But what is Hue-Shifting? Allow me to present an example:

This is a space helmet that I did for Minecraft ages ago. Most of you will likely agree that the left version looks much better. That's because I changed the color ever so slightly with every shade, whereas the version to the right is using yellow only.
On the topic of yellow - It's a very difficult color to shade, so hue shifting is a must.
So, in Layman's Terms, Hue Shifting is changing the color between shades to move it towards an opposite color:

Of course, if you're using just 3 shades on a tiny item, you probably shouldn't go overboard, but the color wheel is something to keep in mind with larger projects.
In general, when making a sword (For instance), your shadow should come from navy blue, and your highlight be cyan. That's what I did for the battleaxe from the previous section, remember?
Similarly, the haft goes from deep purple, through red to orange.
But again, be responsible or you'll end up with a rainbow pattern when you wanted a stout broadsword.
c) Pillow Shading
Pillow shading is, in essence, ignoring the light source.
Personally, I'm not as bothered by it as some, but I believe it's fair to point it out.
In it's most extreme version, pillow shading would look like the orb to the right, whereas the left one has proper shading.:

It would work if it were brighter and was supposed to be glowing, but for most objects you want to avoid disregarding light sources.
The gist of it, is to always establish a light source, even if it's always in the upper left corner.
d) Gradients
Remember this picture?
I noticed that beginners use gradients in their shading. While it's not necessarily a bad thing, I find that using too many colors doesn't look very good.
Gradients are great for big backgrounds in scenes (The sky in Terraria uses a simple gradient), but for game items you should probably stick to regular shading, unless the game's artstyle outright uses gradients in them as well.
In general people use gradients when they're not sure how to do hue-shifting yet.
e) Banding (Suggested by Angelina, help by TheCraziestFox)
This is something I'm guilty of committing myself on occasion.
Banding is when your stack your colors like bricks no matter what. What you want to do, is to add small patches of secondary color to smoothen the transition between the base color and the highlight:

This makes the edges drown in excess color and loose definition. It also divides the picture into gradient ribbons (Or bands) rather than keeping it unified.
I'm not telling you to never follow the outlines or make lines, it's just that you need to use it wisely.
Do note that both examples are pillow-shaded, Ie. there's no discernable light source.
f) Of Gold and Fire
Yellow is such a horrible color. Few people look good in it, and it's a pain to shade, even when you're advanced.
Unfortunately for everyone, two very common elements - Fire and Gold utilize yellow.
So how do we go about shading them?
For fire and all sorts of magical flames, the key is to use very bright, vibrant and saturated colors. By bright, however, you have to remember that just raising the gamma/value of a hue is not enough, you need to use a color that is visually brighter:

You want to avoid that washed white or muddy color in your flaming objects, no matter if the fire is yellow, blue, green or otherwise.
Unless the flame is intentionally dark, don't pick dark colors. And even when you're making a black flame, the same principles are going to apply, even with such colors.
As a closing note about fire, remember that it's the brightest (Hottest) at the base, and goes darker (Colder) the further away from the fuel source.
A similar principle can be applied to gold. Do note that this is personal preference, and a lot of people can disagree, but it's what always worked for me and I'm the one writing this.
Look back up to the picture. The objects to the right are gold sceptres. This is tied with Hue-Shading, but it's worth repeating:
The rightmost sceptre uses only shades of yellow, which in my opinion makes it look like brass more than anything, and not like gold at all.
The one to the left uses the exact same palette as its companion torch. Gold needs to look fancy, that's we still use it for anything besides medical tech, hence why I like to give it a nice, vibrant feel to make it look special.
It has been pointed out to me once that the way I shade gold makes it appear as if it's lit by a flame rather than yellow/white sunlight. That's probably true, but honestly? Outside of specific scenes, I've yet to see external light color taken into account when the game already has its own light engine.
g) Jaggies
Similarly to banding, when making lines of any kind, you want to avoid sharp, sudden breaks in them.

When a line is supposed to be smooth or straight, make sure you draw it that way.
Afterword
This guide will expand as I get input and think of new things that need mentioning, so stay tuned.
Links
Gimp 2.6.7 (I advocate against the use of the newer versions, because they are grossly user unfriendly)
Paint.net
A detailed comparison of Gimp and Paint.net features
Terraria Custom Content Loader (For seeing your sprites in-game)
XNB Exporter and Data IDs
Infraynor's short spriting guide (Video)
Pixel Lantern's guide to Terraria spriting
AaronC's MS Paint basic spriting guide
An explanation on why to avoid pure black
Color Theory Basics
List of Pixel Art software
What to avoid in Pixel Art (Very detailed)
More advanced tutorials for intermediates (General Pixel Art)
Preface
Having recently seen some people try out pixel art here on the forums, I wanted to give them some links to a few tutorials. Alas, much to my surprise, I've discovered that... In essence, there are none.
Oh, of course, there are lots and lots of helpful guides out in the internet, but from what I've seen, they were either much too basic, only dealt with a very specific subject (MCF, for reasons beyond me, ended up having only terrain tutorials), or were much too advanced for a complete newbie and pertained to general pixel art.
As for Terraria specific guides, I only found 3 on Terraria Online, and while they do offer some good insight, I don't feel they're exhaustive enough.
This guide will be fairly long and picture heavy, so be warned.
Table of Contents
- Tools of the Trade:
- Graphics software comparison
- Getting Started:
- A few things you should know beforehand
- Terraria Specific Issues
- Size
- Style (Contrast, Outlines, Orientation)
- Armor in Terraria
- Tile Grid
- Guide Proper
- Defining the Shape
- Shading
- Additional Advice
- Animation Basics
- Addendum: Guns
- Addendum: Spheres
- Common Beginner Mistakes
- Links
Tools of the Trade
First, I strongly advise against using MS Paint. Why settle for a sub-par tool, when something better can do the job more easily?
In general, any image editing software can probably pull it off, but you should get either Paint.Net or Gimp, both of which are free. There are tons of other programs, but I've never tried them, and either of the aforementioned are enough, for completion's sake however, I'm including a link to a list at the end.
In general, I am going to refer specifically to GIMP in this guide, as it's my software of choice.
Also - Use a PC. You will not become a good pixel artist if you insist on spriting solely on your iPad or whatever.
Here are some Pros and Cons of the most popular programs:
GIMP
-Free
-Doesn't strain the computer
-Mostly designed for image editing and painting, but can do Pixel Art just fine
-Very user unfriendly
Paint.Net
-Easy to use
-Free
-Doesn't strain the computer
-Supports transparency and layers
-The developers aren't jerks
-Very simple - Lacks advanced image editing features (However it can be extended with plugins)
Photoshop
-Very powerful and can do other things
-Has the most tutorials, plugins and all
-Forcing it to do Pixel Art can get frustrating
-Expensive
-The interface is rather complicated
MS Paint
-It comes with Microsoft Windows
-Requires no setting up to start spriting
-Not very hard to figure out
-No transparency
-No layers
-No (proper) resizing
-No advanced features of any kind
-Free
-Doesn't strain the computer
-Mostly designed for image editing and painting, but can do Pixel Art just fine
-Very user unfriendly
Paint.Net
-Easy to use
-Free
-Doesn't strain the computer
-Supports transparency and layers
-The developers aren't jerks
-Very simple - Lacks advanced image editing features (However it can be extended with plugins)
Photoshop
-Very powerful and can do other things
-Has the most tutorials, plugins and all
-Forcing it to do Pixel Art can get frustrating
-Expensive
-The interface is rather complicated
MS Paint
-It comes with Microsoft Windows
-Requires no setting up to start spriting
-Not very hard to figure out
-No transparency
-No layers
-No (proper) resizing
-No advanced features of any kind
My personal recommendation is either the aforementioned Paint.Net or GIMP.
The choice comes down to whether or not you want to do other things with it besides spriting.
So if you want a free Photoshop alternative that can do pixel art, go with Gimp. If you just want to sprite with a simple program and nothing else, use Paint.net.
There are many other pixel-art oriented programs, but I've never tried them myself. Links below.
Getting Started
Before I move to the more specific tips, we need to set up our workspace:
This is your GIMP window. For spriting, you are going to use the PENCIL tool (1), which works identically to its MS Paint counterpart. By default, the ERASER tool (2) is geared toward normal use, ie digital art or photomanipulation, which is why you need to tick the HARD EDGE option (4) so that it erases everything, and pick a smaller BRUSH (3), specifically "Circle (01)".
I seem to recall that by default, every new picture in Gimp has a white background. We don't want that.
In order to rectify it, make sure you pick "Transparency" in the FILL WITH (5) option.
Gimp should remember this setting, so there's a good chance there will be no need to do it every time.
Regardless of program, never use an opaque background unless it's just a preview.
Before I move on, there is one very important, Terraria-specific info that every spriter-to-be must know:The ingame sprites are actually double-sized, which means that every pixel is in fact 2x2 pixels!
A lot of people seem to suggest using a 2x2 brush to emulate that, but I think that's an atrocious waste of time and effort. Instead, what you should do is start with a smaller sprite, and then simply upscale it to 200%. More on that later.
Also, when You are ready to save your sprite, make sure you save it as a PNG file. JPG files are lower quality, and do not support transparency, which is important.
Terraria Specific Issues
a) Size:
Now that we have our program open, we need to make a new image. The key here, is to remember that Terraria's sprites are actually very small, so you're going to need a lot of practice to emulate the style properly.
Not counting unused items, the largest sprite is 30x20. As you can guess, that's not a lot of space.
Better still, most item icons are even smaller, going to as small as 8x8 pixels (Ores, blocks).
That is why, contrary to popular belief, if you want to make it look right, you will have to learn to work in low resolution.
One problem with Terraria is that, unlike Minecraft, a lot of sprites have different sizes. This can be both a blessing and a curse because it gives you more freedom, but at the same time working without a specific size can be frustrating when something turns out to be much too big.
Further along the road, you should extract some textures with an XNB exporter (Link below) and check the sizes for reference.
A list of common sizes:
Ore Icon: 8x8
Bars: 15x22
Early Tools and Weapons: 16x16
Pistols: 22x15
Accessories: 14x14
Generally, a higher-end diagonal weapon will be about 24x24, guns/drills will be around 30x15, and mobs... Mobs are even crazier (The player sprite is around 20x27)
But again - The sizes vary from item to item. That being said, try to keep the size the same or close to the original sprites, as the game won't scale them to fit everything else (So if you make a massive, detailed sword, the game won't shrink it down to be the same size as other swords).
Remember to set the Interpolation to "None"!
In Paint.net, "Interpolation: None" is called "Resampling: Nearest Neighbor"
b) Style:
One thing you may or may not have noticed, is that (With but a few exceptions) everything in Terraria has a dark outline.
I cannot stress enough how important they are to the style, please observe:
To the left we have an Iron Sword, to the right the same sword without a separate border.While this is not necessarily a bad thing, and it works fine in Minecraft or Risk of Rain, in Terraria this is a big no-no.
There is an exception to this, in the form of burning/glowing objects:
However, do note that they still have a slightly darker outline. For the moment, focus on having darker outlines, until you gain some proficiency.
Another exception from this rule are 1x1 tile flowers and other such tiny flora, which lacks outlines simply because there's no place to add them
As a final note regarding outlines - Never, ever make them black. Always use a much darker color, but never pure black. More on that later.
Another important thing to keep in mind, is contrast.
Pixel art in general requires strong contrast, but in this game in particular it's doubly important.
What you don't know, is that a sprite opened in Gimp (Or otherwise) will look/feel different than it would in a colorful game environment, or against a different (Ie non neutral) background.
Why do I mention this? Because a sprite that might look fine in your editing software, might blend in too much ingame. I used to have this problem a lot in the past.
Here's an example:
They look fine on their own, but the moment I've loaded them into Minecraft, it turned out the shades blended with each other far too much to look good. Unfortunately, at that point it meant remaking the entire texture pack, so I've lost motivation and abandoned it.
The final thing to keep in mind, is that the weapons are oriented towards the right side. This means that the sprite gets swung to the right, and not the left like in Minecraft. Of course, Terraria rotates the sprite when the character is going left. So don't make the same mistake I did in this tutorial, and make sure your weapon is pointing to the right side
c) Armor:
Much like in Minecraft, armors have separate files for their inventory icons, and their ingame appearance (Unlike tools and weapons, whose in-game appearance is taken straight from the sprite).
If you're planning on using your newly sprited armor in a mod, you will have to animate every single frame of it - Jumping, standing idly and so forth. This is very common in games that use 2D sprites, and usually there's no way around it - You have to draw every frame, especially with more complex objects like fire or a multi-limbed mob.
The majority of artists here, Yours truly included, don't animate their character sprites, so they can't actually be used ingame without an
Creating this kind of stop motion animation is a tedious, and often frustrating process, personally I dislike animating anything because I'm just not good at it, so I avoid it like fire.
d) Tiles:
Now, making background tiles and furniture can be a bit tricky. You can't really just open a file and get down to it, you need to keep in mind the grid:
Every object in Terraria is divided into parts, so that the game knows how big a thing is.
Each of these cells is 8x8 pixels, and equals one block in the game.
So you first have to chop up your piece of furniture into parts, like so:
And then the game will put it back together when you load a world. You can either start by making something on the grid, or (Like me), begin with the object in question, and then cut it into pieces.
For the record - The player character takes up a 2x3 block space.
Guide Proper
Not to get to the meat of the issue - The spriting itself. I'll mostly focus on items here, but the same techniques will be applied to mobs, tiles or otherwise.
1) Shape Definition:
First and foremost, You need to define your shape. You can start with whatever color you have selected and just start drawing the overall silhouette: (You can, and will, adjust it as you go)
Et Voila! A generic battleaxe of some kind. Keep in mind that the object will need to have an outline, which is best added after You've got some basic shading laid out. If the item takes up your entire image, you can always increase the canvas size by 1 pixel and draw the outline.
Alternatively, you can simply start with the outline, and then fill it with color, like in AaronC's guide (Link below). It's really up to you.
As with shading, the shape can make or break your sprite.
(Do not that I kinda forgot that weapons in Terraria face right when I was making that axe)
2) (Basic) Shading:
The second order of business, is to establish where the light source is and then use that. The majority of artists just default to placing the light source in the upper left corner, and that's fine (I do that too).
There are two ways you can approach shading. If you're a complete beginner with shading, you could start by making it grayscale to get the light right, and then replacing it with color once you're comfortable with how it looks like. This has the advantage of not having to worry about how colors interact with each other and having a bad hue ruin the effect from the ground up.
When you're more advanced, you're just going to skip this and go straight for colors and adjust them as necessary.
Of course, the choice of method is yours. I simply found it easier to focus on just the shading when I was a beginner.
*Ahem*
At it's most basic, shading requires 3 colors - Shadows, Highlights and the Main Color.
Of course, one should strive to use more than that, but at the same time - Don't overdo it.
In general, you want to keep the color count low relatively low. This will help if you want to use the same palette for several different items, or something that's animated, like armors.
As a counter example, animating this would be a pain in the
:
But the color count is fine for a static piece (I hope).
3) Tweaking:
Notice that I used the iron color for the entirety of the axe, haft and all. Unless it's an early weapon/tool that is colored by the game to imitate a different material (Every Copper to Gold tool does that), you're probably going to want more colors than that.
There, much better isn't it? This is still a very simple sprite, utilizing a total of 8 colors.
Notice how I used a different outline color for the haft, this will help your sprite looking much more aesthetically pleasing.
One important thing to keep in mind - Even though your light is most likely shining from the upper left corner, always make the cutting edges bright to show that they're sharp. This is especially crucial with single-edged weapons like swords or sabers.
This Palladium Sword perfectly illustrates what I mean here:
To reiterate - Even when your light is shining from the opposite direction, always add highlights to the sharp part of the weapon.At this point, you're pretty much done.
But let's make it even more exciting with the magic of Hue Shifting:
See? It still has the exact same amount of colors, but it looks more fancy. I wrote a more in-depth explanation of hue shifting in the next section.
4) Misc Advice:
With all forms of creative media, it helps to have a general idea of what your goal is. In other words - If you're completely out of ideas at the moment, you're just not going to make an awesome sprite. If that's the case, you should probably just give it a rest and come back when inspiration hits you.
Reference pictures and knowing what you're trying to do can help a lot. For example, I have a lot of expertise in ancient armaments, so it's easy for me to make a believable sword or armor that would allow movement without tripping over.
That being said, there's no need to be an expert - Just use photos for reference or inspiration.
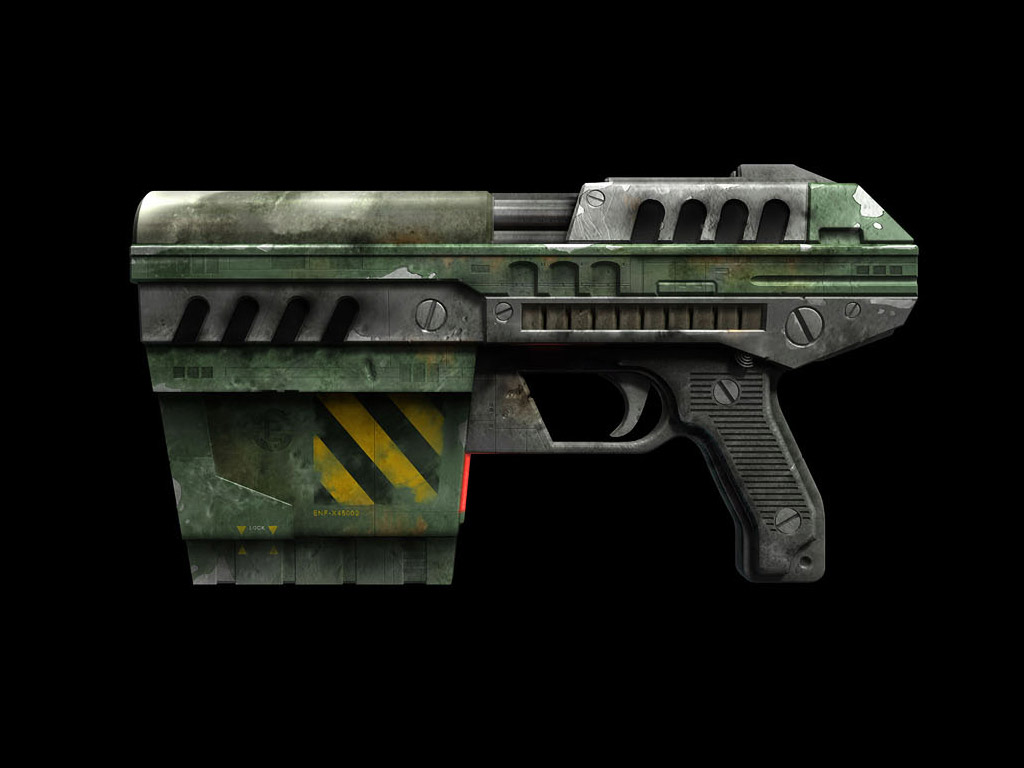
For example, I'm ignorant in regards to firearms, but I can produce nice looking guns:
Reference:
Of course, you don't have to use a reference. If you have a specific idea, just go for it.Another thing every artist should do is observe others. Either analyze other people's sprites up close, or better yet, extract Terraria's textures and see how they look, how big they are etc.
With regards to armors or outfits, you don't want to start from scratch, lest you get the size wrong.
Just get a player template, like one of those:
And just draw over it. Just remember that if you plan on animating it, You'll have to save each part separately. Interestingly, in-game the legs are on top, the torso is in the middle, and the helmet/hair/head is behind it all.
5) Guns (Suggested by SunnyTheHated)
While on the topic of guns, it does appear that they're not as easy to make.
Of course, every weapon is different, so you'll need to have a least a vague idea of what you're aiming for - Futuristic, modern, pistol, rifle, organic alien design?
Unlike melee weapons, ranged weapons need to be horizontally oriented and facing right (As opposed to being diagonal and being swung towards the right side).
Much like with all items, a nice, varied shape is very important. Don't just settle for a long, flat barrel, try to add to it.
That being said, keep in mind that there are supposed to be colors inside that outline.
See? Even if the overall shape is rather simple, you can still add variation within the border.
Notice how I did the handle. It's not necessary to make it identically to that one, but in general a firearm handle is going to be a flavor of that shape.
With some added shading, it could look something like this:
It's pretty much done, but you can keep adding to it. Say you want a sub-machine gun and not a shotgun?
Don't get discouraged if your firearms look dull at first, you'll learn to give them all sort of crazy shapes in due time.
6) Basics of Animation
I won't lie to you - Animating sprites is hard. However, if you can learn it, it's very rewarding.
Terraria's animations use a .png sheet with every frame drawn separately, rather than a .gif file.
Let's take a look at an example:
As you can see, this is the vanilla zombie. It's a relatively simple mob that uses only 3 frames for walking.
Since a lot of NPCs don't have a dedicated attack animation, there are some generalizations we can use:
- Animation chains ALWAYS play from the top
- Where applicable, the topmost frame will almost always be the default/idle stance (Unicorns, bunnies, zombies etc) - This is the case only with NPCs that have a walking animation! (The Chaos Elemental is one exception here, not sure if there are others)
- Most, if not all flying NPCs' (Harpies, Bats) idle state is the entire animation sheet. Ie they don't have a still standing frame
- More complex creatures have several animations chains or states that use different animations, which are not always played. Example - Plantera has two stages, both with separate idle animations that exist within the same file. Similarly, the Unicorn has two movement speeds, that depend on its velocity
- Important note - The animations depend entirely on the mob, so you need to analyze them on a case-by-case basis. This might be helpful, as it means that if you're making a completely new mob, You're not bound by fixed rules.
The player characters have the most complex animations (imho). Within the same armor file, you have animation frames for standing still, swinging a weapon, jumping and running.
Luckily, since the player is split between 3 separate files for chest, head and legs, the game will use the same swinging animation regardless of whether you're standing, running or falling down a shaft (Do note - The armor is layered. As far as I can tell, the torso will be the top layer, with the head and leg layer being behind it).
While on the topic of separate armor animations - Even though most helmets/hair/heads are not animated (The fishbowl is the only exception I can think of), a helmet file still needs the same amount of frames as the other files. If you fail to do this by either leaving the rest of the frames blank or making the head file size different, it will not display properly ingame. The helmet can be animated, but it will only be animated in motion.
Here are the player animation files (Plus a humanoid NPC animation sheet):
One thing I've discovered when I started working with modders, is that armor sprites also need an 'arm' sprite, presumably for rendering reasons. This means that for every chestplate you animate, you'll have to make an extra sprite with just the right hand.
In general, to save time first make a static armor sprite, and then split it on the animation sheets.
You may have noticed that the torso and head never moves - Only the hands are animated, so you can just copy the torso throughout the sheet and then add the hands. It REALLY helps to work with layers here so you can keep the template underneath to trace it.
Some frames are also identical, so you can shave off even more time by just copying them.
Here's an example non-standard NPC animation sprite that I made (With descriptions):
It's an burrowing, explosive spider mine.
Frame #1 and #2 - Idle standing animation (The robot bobs on it's legs in place)
Frame #3 - Burrowed state
Frame #4 - Burrowing. Transition frame between the burrowed state and #1 (Standing). In other words, when it's digging itself into the ground, the game would play frames #1, #4 and #3.
Frames #5 through #10 - Walk cycle.
Frame #11 - Preparing to jump.
Frame #12 - In-flight frame. The robot has its legs extended, and is elevated 1 pixel so that the animation looks more natural.
I don't know exactly how Terraria works code wise, but I surmise that it could be even simpler - The walk cycle could be dropped to just 4 frames, and the last one replaced by frame #1.
Game ready sheet:
Notice how I kept the color count low to make creating new frames easier.
7) Shading Spheres
And round objects in general. Basically, all you have to do is remember that the sprited object has a 3d shapes, despite being 2 dimensional.
For orbs of all kind, this means that they'll have a different light falloff than a flat wooden board.
To illustrate:
All this means, is that you need to remember that a sphere is protruded towards the viewer, so it reflects light differently than a flat surface.
9) Dithering
(Note - While this method isn't used that much in Terraria, I feel that it's an important technique to know nonetheless)
Dithering is a form of shading used on larger areas of color to make the light falloff smoother. It's a very old technique dating back to when color count was low and colors had to be reused, so dithering was used to lower the amount of shades needed to shade a sprite.
It's still used, because it's great for larger areas, or when you don't want to bloat your color count.
So what is Dithering exactly? Dithering is made by making a sort of a checkerboard pattern over the desired transition area between two colors:
The image to the left has 5 colors (Including outline), the one to the right has... Lots.
As you can see, with using the same amount of color, we managed to achieve a smoother shade than the middle image. Of course, it all depends on what you're trying to achieve, but in general dithering is great for smooth transitions.
However, as with all things in life - Don't overdo it. Dithering is not always necessary because we no longer have to worry about a limited palette, but you can always use it a little bit in between regular shading.
One important thing to keep in mind about dithering, is that the dithered pixels should NOT touch, or else the effect is lost. Always make sure that the dithered pixels connect only diagonally.
Whew, that's about the gist of it. In closing words - The most important piece of advice I can offer you, is to practice, experiment, and above all - have fun.
And that's it. This guide can point you on your way, but the real work will be done by you.
Common Beginner Mistakes
a) Grayscale:
A lot of newbies, regardless of medium, mix grayscale with colors. Unless you know what you're doing (Tip: You don't), avoid this at all costs. If you want to imitate steel or a different metal, try a dark, very desaturated shade of light blue instead.Similarly, if you want to have a gray cowl or hood, use a desaturated red or different color.
See? The left one has a red tint, the right one blue and the middle one is 100% grayscale.
Depending on the color you picked, the mood of it changes. The reason this is important, because 1) It looks better, 2) In real life, nothing is ever purely one color, everything is a mixture of light, texture and other factors.
Admittedly, this might not be the best example, but you should notice the difference when you make a nice gun texture with a grayscale barrel. It just won't feel right.
For a different example, go back up and look at the battleaxe process. With the exception of the initial black shape, it was never grayscale!
b) Hue-Shifting, or lack thereof
At first, you don't really need to worry about hue-shifting, but if you want your sprites to look better, you should use it.But what is Hue-Shifting? Allow me to present an example:
This is a space helmet that I did for Minecraft ages ago. Most of you will likely agree that the left version looks much better. That's because I changed the color ever so slightly with every shade, whereas the version to the right is using yellow only.
On the topic of yellow - It's a very difficult color to shade, so hue shifting is a must.
So, in Layman's Terms, Hue Shifting is changing the color between shades to move it towards an opposite color:
Of course, if you're using just 3 shades on a tiny item, you probably shouldn't go overboard, but the color wheel is something to keep in mind with larger projects.
In general, when making a sword (For instance), your shadow should come from navy blue, and your highlight be cyan. That's what I did for the battleaxe from the previous section, remember?
Similarly, the haft goes from deep purple, through red to orange.
But again, be responsible or you'll end up with a rainbow pattern when you wanted a stout broadsword.
c) Pillow Shading
Pillow shading is, in essence, ignoring the light source.
Personally, I'm not as bothered by it as some, but I believe it's fair to point it out.
In it's most extreme version, pillow shading would look like the orb to the right, whereas the left one has proper shading.:
It would work if it were brighter and was supposed to be glowing, but for most objects you want to avoid disregarding light sources.
The gist of it, is to always establish a light source, even if it's always in the upper left corner.
d) Gradients
Remember this picture?
I noticed that beginners use gradients in their shading. While it's not necessarily a bad thing, I find that using too many colors doesn't look very good.
Gradients are great for big backgrounds in scenes (The sky in Terraria uses a simple gradient), but for game items you should probably stick to regular shading, unless the game's artstyle outright uses gradients in them as well.
In general people use gradients when they're not sure how to do hue-shifting yet.
e) Banding (Suggested by Angelina, help by TheCraziestFox)
This is something I'm guilty of committing myself on occasion.
Banding is when your stack your colors like bricks no matter what. What you want to do, is to add small patches of secondary color to smoothen the transition between the base color and the highlight:
This makes the edges drown in excess color and loose definition. It also divides the picture into gradient ribbons (Or bands) rather than keeping it unified.
I'm not telling you to never follow the outlines or make lines, it's just that you need to use it wisely.
Do note that both examples are pillow-shaded, Ie. there's no discernable light source.
f) Of Gold and Fire
Yellow is such a horrible color. Few people look good in it, and it's a pain to shade, even when you're advanced.
Unfortunately for everyone, two very common elements - Fire and Gold utilize yellow.
So how do we go about shading them?
For fire and all sorts of magical flames, the key is to use very bright, vibrant and saturated colors. By bright, however, you have to remember that just raising the gamma/value of a hue is not enough, you need to use a color that is visually brighter:
You want to avoid that washed white or muddy color in your flaming objects, no matter if the fire is yellow, blue, green or otherwise.
Unless the flame is intentionally dark, don't pick dark colors. And even when you're making a black flame, the same principles are going to apply, even with such colors.
As a closing note about fire, remember that it's the brightest (Hottest) at the base, and goes darker (Colder) the further away from the fuel source.
A similar principle can be applied to gold. Do note that this is personal preference, and a lot of people can disagree, but it's what always worked for me and I'm the one writing this.
Look back up to the picture. The objects to the right are gold sceptres. This is tied with Hue-Shading, but it's worth repeating:
The rightmost sceptre uses only shades of yellow, which in my opinion makes it look like brass more than anything, and not like gold at all.
The one to the left uses the exact same palette as its companion torch. Gold needs to look fancy, that's we still use it for anything besides medical tech, hence why I like to give it a nice, vibrant feel to make it look special.
It has been pointed out to me once that the way I shade gold makes it appear as if it's lit by a flame rather than yellow/white sunlight. That's probably true, but honestly? Outside of specific scenes, I've yet to see external light color taken into account when the game already has its own light engine.
g) Jaggies
Similarly to banding, when making lines of any kind, you want to avoid sharp, sudden breaks in them.
When a line is supposed to be smooth or straight, make sure you draw it that way.
Afterword
This guide will expand as I get input and think of new things that need mentioning, so stay tuned.
Links
Gimp 2.6.7 (I advocate against the use of the newer versions, because they are grossly user unfriendly)
Paint.net
A detailed comparison of Gimp and Paint.net features
Terraria Custom Content Loader (For seeing your sprites in-game)
XNB Exporter and Data IDs
Infraynor's short spriting guide (Video)
Pixel Lantern's guide to Terraria spriting
AaronC's MS Paint basic spriting guide
An explanation on why to avoid pure black
Color Theory Basics
List of Pixel Art software
What to avoid in Pixel Art (Very detailed)
More advanced tutorials for intermediates (General Pixel Art)
Last edited:

")

