Terry N. Muse
Terrarian
You know what grinds my gears? Tutorials that don't actually teach me anything about the subject, especially ones that simply tell me to build some sort of contraption to cheese a boss and hope for the best. "Hide in a box with the Nurse and let your Stardust Dragon deal with it," that sort of guide. And sure, that's a valid way to play the game, but if or rather when something goes wrong, what am I actually supposed to do? What does my opponent do? How can I dodge? How can I fight? How can I improve?
I'm not going to pretend I've never cheesed bosses. We've all cheesed bosses. The Moon Lord can't do anything if you're sitting on his hand, using it as an invincibility machine on a nice long railway with a skybridge on top. Bless his poor soul for trying. But eventually, the day comes when putting all the work into the preparation bleeds out all the thrill of the fight itself, and I find myself desiring the ability to take on the Moon Lord fair and square. No gimmicks, and no mechanisms - just me, him, and a wide open arena. But when I start searching for guides to truly understand the Moon Lord's attack cycle inside and out, I can find class builds and tank setups and automatic AFK grinders - and yet so little insight on the battle itself. Where's the guide not about how to prepare for the Moon Lord, but about the Moon Lord?
Stacks upon stacks of Celestial Sigils later, after countless hours dancing with death, I bring you the Moon Lord In-Depth.
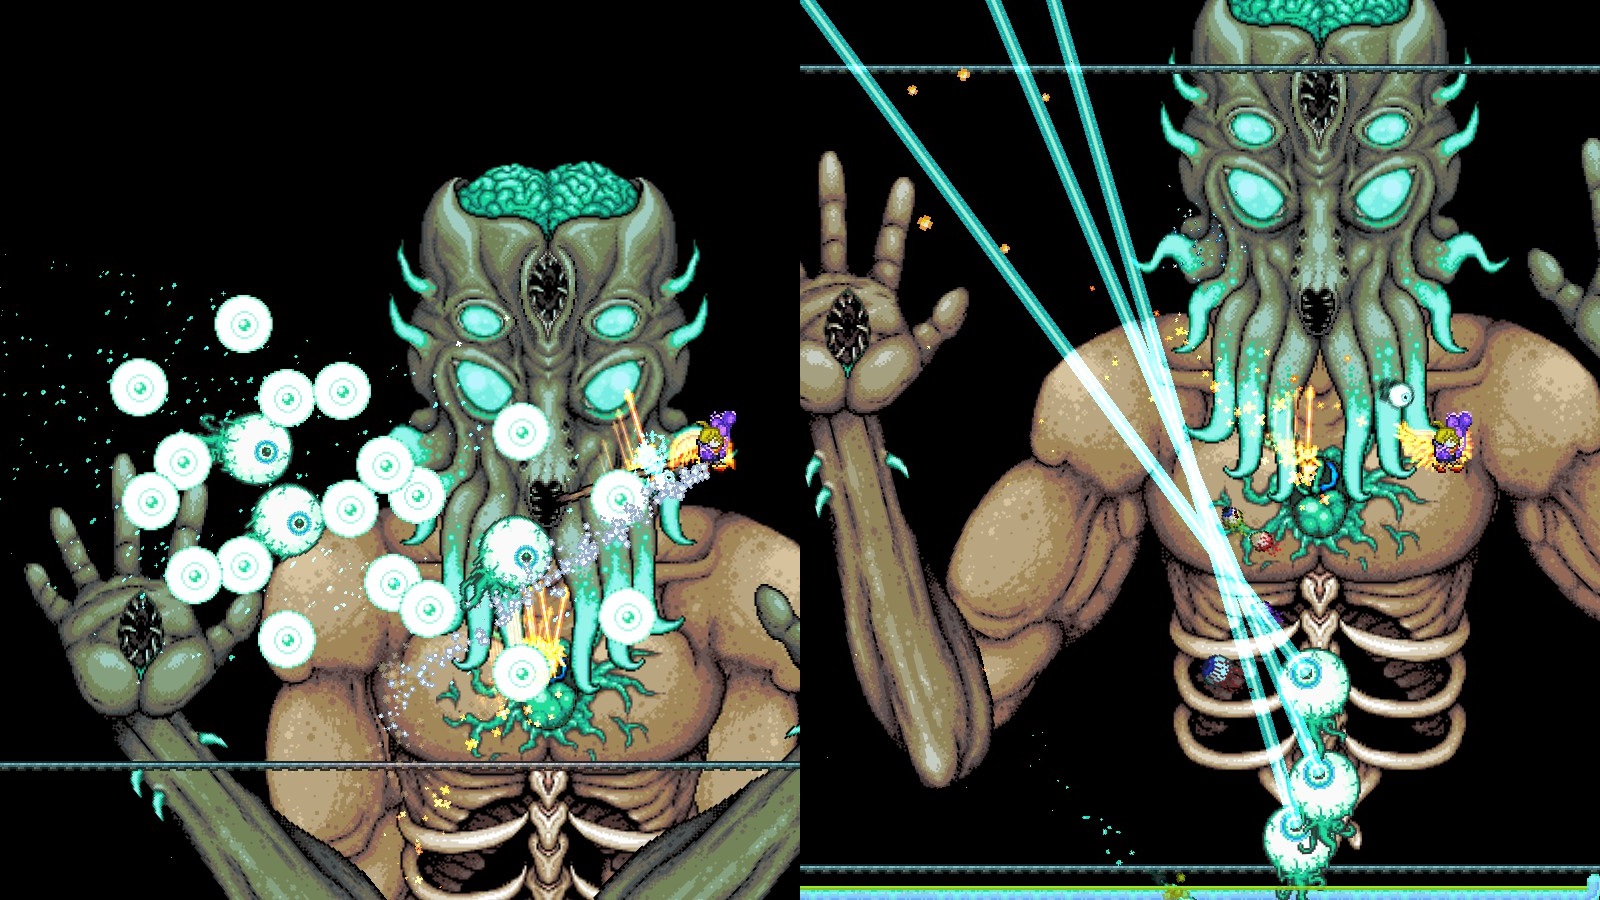
Basics & Preparation
Again, I won't tell you exactly what build to bring and what weapons to use. Your class, your accessories, your buffs - that's all up to you. I will simply say that in general, all classes will benefit most from accessories that either have all Warding modifiers for defense or Lucky modifiers for DPS. Yes, Lucky provides better DPS than Menacing, with the sole exception of summoners, who should use Menacing accessories while summoning their minions and then switch to Warding for the fight itself. Wings are obviously mandatory, but don't bother with a Cosmic Car Key. Like Duke Fishron, burst movement is once again necessary, so use a Cloud in a Bottle or derivatives; a Bundle of Balloons is optimal. If you want horizontal burst movement (it's not necessary), then use a Tabi/Master Ninja Gear over the Shield of Cthulhu to avoid bonking on his eyes. High regeneration is extremely beneficial; Valhalla Knight's Breasplate is an excellent choice for melee and summoner builds alike.
However, note that summoners may struggle to accomplish the strategy laid out by this guide. This includes anyone using minions at all, due to requiring careful management of the Moon Lord's health; one stray pellet from a Stardust Cell or an overzealous Stardust Dragon can easily destroy the entire plan.
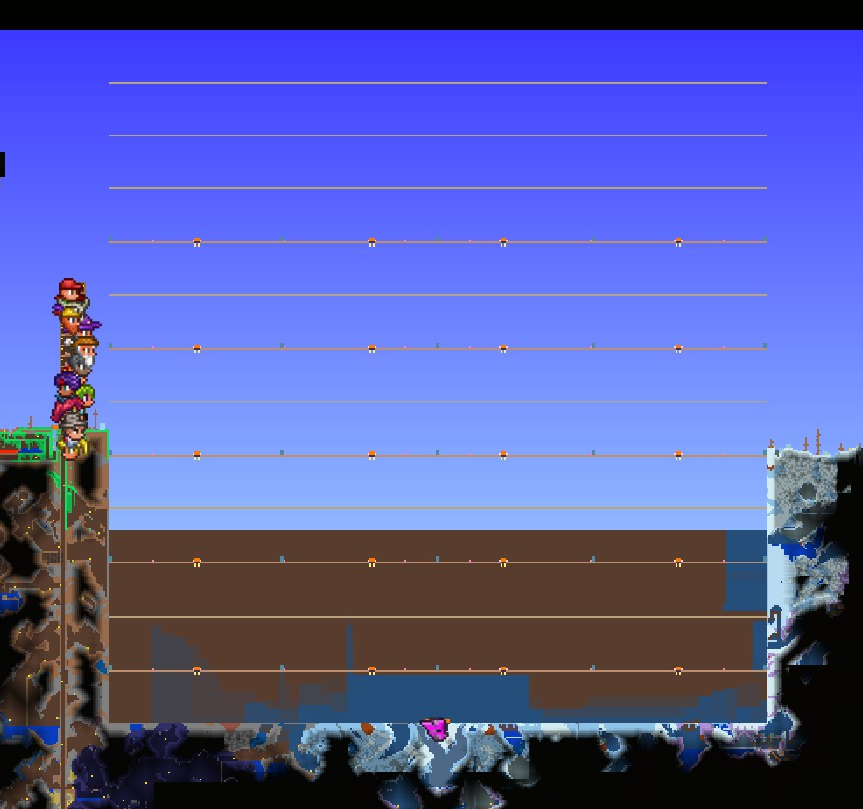
An arena is inevitable. However, you must make an extremely large arena both horizontally and vertically to guarantee a smooth battle. Note that this was built in a small world; you likely won't need to carve out the ground as much as I did in a medium or large world. Platforms should be placed a substantial distance apart; I personally use Ice Rod to plant a block as high as my screen goes, fly up to it, plant another block at the top of my screen, and build from there. This equally spaces each of my platforms one full screen's height apart (I use 1600x900 resolution, so you may want to adjust on smaller resolutions). Railways every half screen are an optional luxury, but useful with a grappling hook for instant velocity and refreshing flight. A house and bed at the base of the arena can help.
Campfires and Heart Lanterns can also be distributed about one screen apart to maximize coverage. This will likely be the extent of your regeneration setup. Add honey dips if you feel like it, but don't bother watching the buff timer and keeping it on at all times; the distraction may prove fatal. Only actively try to refresh your honey buff when there's a lull in the action.
You've probably heard stuff like this a million times, but these basics can't be overlooked here. Now that we've got them out of the way, let's get to the meat of it.
Part 1: One Eye, Two Eyes, Green Eye, Phantasmal Deathray
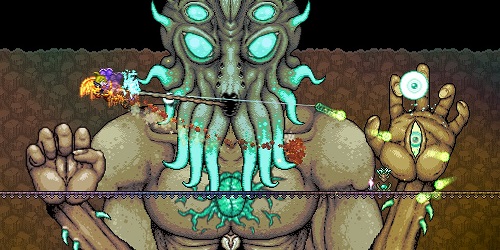
We'll start from scratch. The Moon Lord has three weak points in the form of his eyes and four types of attacks between them. The first is his Phantasmal Eyes - the attack he begins the fight with. When he spawns, both hands will release a spray of small eyes that randomly float upwards and then suddenly turn to shoot towards your location at once. This attack has frighteningly good tracking and follows your position very closely. It locks down huge amounts of airspace and forces you to move (seriously, don't try to dodge between them - move), but it has a major weakness: it can only move down once it begins homing in on you. The Moon Lord's hands will always use this attack immediately before summoning Phantasmal Spheres. His third eye will never use this attack.
You can dodge this attack by flying up out of their reach when they begin tracking you, or by moving far enough away to one side that they can't reach your location without falling below you.
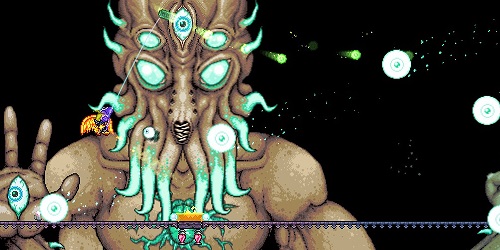
The Moon Lord's hands can generate Phantasmal Spheres - replicas of the eyes that stay in position until he closes his hand and commands them to fly at you. If his hand's eye is destroyed before the Spheres fire, they will take a while to despawn and remain in the same spot until then. His hands are most vulnerable while performing this attack due to being open for the entirety of it. This is one of the strongest attacks in the Moon Lord's arsenal, so take care to avoid it.
I've seen a lot of people say this move "can only fire downwards" when it absolutely doesn't. It normally fires downwards, but under circumstances I haven't completely pinned down yet, they can fly in whatever direction they want. I haven't had a peek at the code, so only anecdotal evidence backs this next statement, but I believe the Moon Lord tracks your rough location while summoning his Spheres, forming a general area encompassing your movements. When he actually fires them, he fires as close to you as he can within that area. As a result, if you're far above the Moon Lord the entire time he's summoning the Spheres, he'll throw them upwards, but if you stand in place and then fly straight up to a higher platform just before they fire, his Spheres will still shoot downward.
This attack is relatively easy to dodge by moving to a higher platform or running away from them, similar to handling his Phantasmal Eyes. Keep in mind that because of how the Moon Lord moves his arms while tracking you, all the Spheres can end up in a big clump or extremely spread out depending on how you moved.
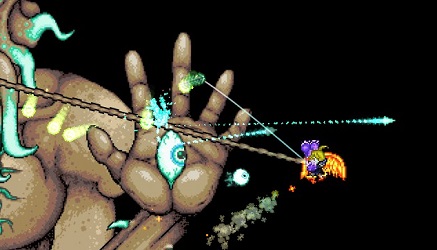
All three of his eyes can fire Phantasmal Bolts - always two shots in rapid succession. The Moon Lord leads his shots with the flawless precision of a computer; if you're moving in a straight line at a constant velocity, he will hit you without fail. His hands will perform this attack periodically. His third eye will always perform this attack after firing his Deathray.
You can dodge this attack using burst movement - rapid acceleration and deceleration. Because of how fast the Bolts move, waiting for them to fire and then double jumping/dashing to dodge is extremely difficult without significant distance. The Moon Lord will likely be right on top of you for most of this phase. However, that burst movement also throws off his aim; if you double jump just before he fires, he notices your velocity in that instant and fires a Bolt into your path - but as you slow down, it overshoots and flies past right in front of you. His eyes will always stare at you, perfectly following your movements for a moment before firing their Phantasmal Bolts, which you can use as a timing cue.
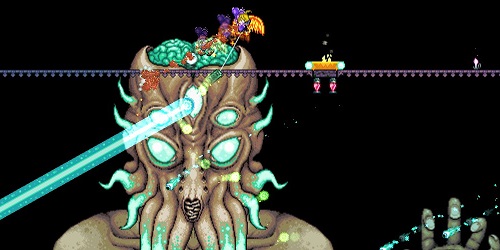
Finally, his third eye will periodically open and charge for several seconds before firing the Phantasmal Deathray, his single most powerful attack. He will always try to sweep this from below your feet, forcing you into the air. Recovering from getting hit by this is possible, but it will instantly put you at a massive disadvantage. Because this move forces you to fly up and you also have to outpace the Moon Lord (whose movement constantly tries to put his head above your location), being caught out with no more flight time can easily turn disastrous. When he fires, grapple to the platform/rail above you and immediately release to refresh your flight time. Mash jump if you have to, and then dash over his head as soon as you can.
Part 2: Your Maneuvers and Game Plan
Generally speaking, you'll move up throughout this fight because of how easily it lets you dodge everything but his Phantasmal Bolts. Once you've flown past the highest platform, it may be a good idea to Magic Mirror to the bed at the bottom of the arena so you can keep climbing. That said, you don't have to drop everything and climb whenever the Moon Lord fires his Phantasmal Eyes. Remember, these attacks have a diagonal trajectory; if you simply move to one side far enough, they won't be able to reach you because they've dropped below your platform. When one hand releases the Phantasmal Eyes, you run away from it. If both hands release Eyes at once or the arena ends in front of you, dash towards his hand and climb; the Moon Lord will move with you and keep his hand out of your way. If you happen to outpace the Moon Lord, make sure to go under (not above!) the hand in front of you if it's summoning Phantasmal Spheres.
When dealing with Phantasmal Spheres, your best option is to simply fly up just before he fires them and then drop back down. However, his hands always release Phantasmal Eyes before this attack, so you need to move to one side as the Phantasmal Spheres appear. Depending on your situation, you may want to either fly up between the Spheres or keep running to one side before they fire.

Individually, none of the Moon Lord's components are really that intimidating. However, his attack cycle ensures his hands are almost always out of rhythm with each other, staggering his attacks and forcing you to dodge multiple different attack types at once. If you let this continue into his second phase, the Moon Lord will absolutely cut you down... but as it happens, when and where you kill the Moon Lord's eyes is entirely up to you. In the first phase, try to whittle down every eye's health as much as you can; you want to spend as little time as possible in the following transitory phase. Your ultimate goal is to have all three True Eyes of Cthulhu making the same attacks at the same time, hugely reducing the amount of variables you need to keep track of. However, do not - do not - do not try to kill all three eyes at once. Ever. No, Yrimir did not do it right. The Moon Leech Clots all but exist for the sole purpose of foiling that strategy. It will not work.
Eventually, you will whittle away at the Moon Lord's health, taking all three eyes lower and lower. Whether you want to kill off the Clots as well is up to you; the battle already has a lot for you to keep track of. If you have to pick an eye to kill first, choose a hand over the third eye; a Moon Lord with a third eye and a hand is far more manageable than a Moon Lord with no third eye and two hands. No matter which one you kill, a True Eye of Cthulhu will be released, and the hardest part of the entire battle will begin.
Part 3: Synchronization
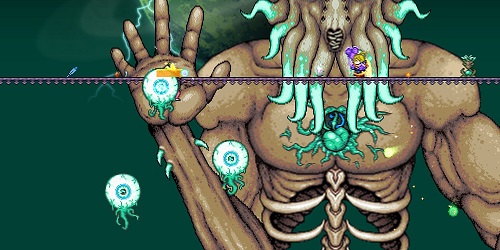
Aww, aren't they cute? Regardless of how adorable they are and how much I want a plush toy of one, these precious little eyeball friends can and will tear you a new one if you fumble this part of the fight. All four of the Moon Lord's attacks are represented again by the True Eyes of Cthulhu; because their exact attack cycle is critical information, I'll go through it step by step.
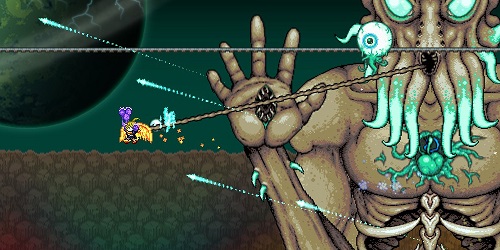
When a True Eye is released, the very first thing it will do is focus on you and fire two Phantasmal Bolts in quick succession. No different from when the Moon Lord used it, so use your burst movement to dodge all the same. Odds are, the fight will pick up a much more frenetic pace; since the True Eye stops whenever it attacks, you'll likely have enough distance to simply dash on reaction instead of having to throw off its aim. As a side note, this is probably the hardest attack to dodge when all three True Eyes are out; unless they're truly synchronized within a few frames of each other, their Bolts will be desynced enough to make it a huge pain. Thankfully, it's still much less hellish than if the True Eyes were completely out of sync.

After firing their Bolts, the True Eye will summon six Phantasmal Spheres around itself and then make a short charge at you, flinging the Spheres the rest of the way. This attack does even more damage than when the hands did it, but it's far easier to dodge thanks to simply being a clump of projectiles thrown at your current location. So long as you know it's coming, you should be able to dodge this with ease.
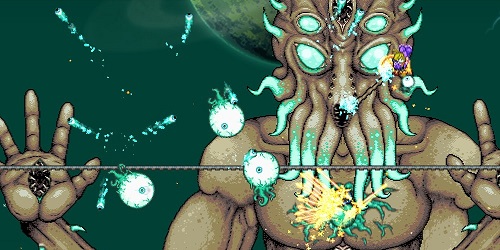
The True Eye's pupil will contract, and then it will spin in a circle while releasing Phantasmal Eyes. This is more or less identical to when the hands used it - but this time you must begin climbing to a higher level diagonally as soon as possible to prepare for the next attack. If possible, you should fly to a higher location out of the Phantasmal Eyes' reach and wait for the True Eyes to catch up; you'll want to be in close proximity.
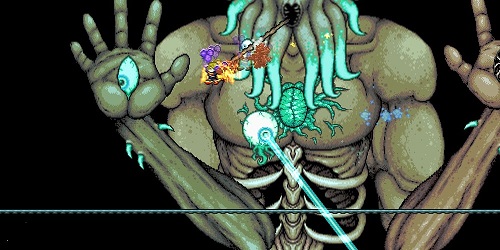
Yes, the Phantasmal Deathray. Fortunately, it's much weaker than when the Moon Lord used it, merely inflicting a measly 200 damage. The True Eyes' Phantasmal Spheres hit for 220. Dodge it anyway.
Because the True Eyes stop in place when attacking, this is far easier to dodge than the Moon Lord, since he's constantly moving to position his third eye above you. Simply wait for the Deathray to fire and casually stroll on over to the other side. However, as you release more True Eyes, try to make sure that all of them have fired before you cross them up; since they always sweep their laser from below to above you, two Deathrays rotating in different directions will absolutely pincer you in between. An alternative solution is to wait below and to one side of the True Eyes, giving yourself more room and time before you move to their other side - but beware of the Phantasmal Eyes coming down as you get into position.
After the Deathray, the True Eye will throw another volley of Phantasmal Spheres at you. This is your golden opportunity, because the True Eye's attack cycle restarts after this. They make a distinct noise as they throw the Spheres; if you release another True Eye right as the existing ones perform this attack, you've synchronized them. Of course, they'll proceed to show you exactly how precise your synchronization was mere seconds later, so don't slack off just yet.

When only one True Eye is free, the battle is at its toughest - not just because you need to contend with the True Eye throwing its attacks into the mix and complicating the Moon Lord's patterns, but because synchronization must be achieved at all costs. You cannot release the True Eyes out of sync. Since the attack cycle uses Phantasmal Spheres twice, you need to be confident the True Eyes used a Deathray before the Spheres. Aim to release the remaining hand for the second True Eye, and then kill the third eye last; that the third eye is almost always closed encourages this nonetheless.
If you failed to synchronize the True Eyes, the battle is hardly lost right then and there. However, it will be countless times more difficult than if they were synchronized. For this reason, you must be patient and willing to let opportunities go. Moon Leech Clots may appear right as the True Eye fires its Deathray, preventing you from killing the Moon Lord's eye in time. The third eye may close right as the True Eyes launch their Spheres, forcing you to wait for another cycle. Even if an eye can be killed, you must accept it if you cannot synchronize it, and you must wait until the True Eye actually throws its Phantasmal Spheres before you kill the Moon Lord's eye; a mere one or two second gap between True Eye attack cycles is more than enough to complicate the fight by a huge margin. Mouse over the Moon Lord's eyes whenever you can and make sure you're confident how much health it has before going in for the kill. It's very easy to mistake 200 health for 2000 in the heat of battle.
Stay calm and collected. Don't let your frustration lead you into a critical mistake at the final, most crucial juncture. When you finally succeed and officially enter the Moon Lord's second phase, with the True Eyes of Cthulhu synchronized, you can finally kick back, relax, and call the Moon Lord a joke to his face. You've earned it at that point.
Part 4: Equip Suspicious Looking Tentacle to Pay Respects
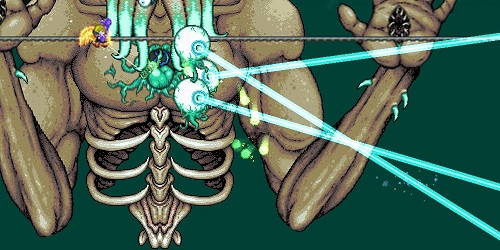
By the time the Moon Lord's Core is exposed, you should absolutely have no issue finishing the job if you made it this far with the True Eyes synchronized. All of their attacks were covered in the previous section, and if they're attacking in sync, it really won't be much different from simply handling one. In fact, because the only things you have to worry about are the True Eyes of Cthulhu, this is the easiest part of the entire fight - no hands to spray Eyes or hurl Spheres, no third eyes to blast huge sweeping fields of three-hit-kill death murder zones. Just remember to watch what the True Eyes are doing, dodge accordingly, and put the poor thing out of its misery already. He doesn't even have legs.
Of course, this is hardly the only way to kill the Moon Lord. Aside from cheese and machines, there may be techniques or maneuvers I'm not aware of, so as always, I'm open to discussion below (and maybe post your screenshots of synchronized True Eyes while you're at it). Of course, you won't become a master overnight; it'll take practice and effort to build the muscle memory and skill, but the journey is oh so worth it.
So thanks for reading, and happy hunting.
I'm not going to pretend I've never cheesed bosses. We've all cheesed bosses. The Moon Lord can't do anything if you're sitting on his hand, using it as an invincibility machine on a nice long railway with a skybridge on top. Bless his poor soul for trying. But eventually, the day comes when putting all the work into the preparation bleeds out all the thrill of the fight itself, and I find myself desiring the ability to take on the Moon Lord fair and square. No gimmicks, and no mechanisms - just me, him, and a wide open arena. But when I start searching for guides to truly understand the Moon Lord's attack cycle inside and out, I can find class builds and tank setups and automatic AFK grinders - and yet so little insight on the battle itself. Where's the guide not about how to prepare for the Moon Lord, but about the Moon Lord?
Stacks upon stacks of Celestial Sigils later, after countless hours dancing with death, I bring you the Moon Lord In-Depth.
Basics & Preparation
Again, I won't tell you exactly what build to bring and what weapons to use. Your class, your accessories, your buffs - that's all up to you. I will simply say that in general, all classes will benefit most from accessories that either have all Warding modifiers for defense or Lucky modifiers for DPS. Yes, Lucky provides better DPS than Menacing, with the sole exception of summoners, who should use Menacing accessories while summoning their minions and then switch to Warding for the fight itself. Wings are obviously mandatory, but don't bother with a Cosmic Car Key. Like Duke Fishron, burst movement is once again necessary, so use a Cloud in a Bottle or derivatives; a Bundle of Balloons is optimal. If you want horizontal burst movement (it's not necessary), then use a Tabi/Master Ninja Gear over the Shield of Cthulhu to avoid bonking on his eyes. High regeneration is extremely beneficial; Valhalla Knight's Breasplate is an excellent choice for melee and summoner builds alike.
However, note that summoners may struggle to accomplish the strategy laid out by this guide. This includes anyone using minions at all, due to requiring careful management of the Moon Lord's health; one stray pellet from a Stardust Cell or an overzealous Stardust Dragon can easily destroy the entire plan.
An arena is inevitable. However, you must make an extremely large arena both horizontally and vertically to guarantee a smooth battle. Note that this was built in a small world; you likely won't need to carve out the ground as much as I did in a medium or large world. Platforms should be placed a substantial distance apart; I personally use Ice Rod to plant a block as high as my screen goes, fly up to it, plant another block at the top of my screen, and build from there. This equally spaces each of my platforms one full screen's height apart (I use 1600x900 resolution, so you may want to adjust on smaller resolutions). Railways every half screen are an optional luxury, but useful with a grappling hook for instant velocity and refreshing flight. A house and bed at the base of the arena can help.
Campfires and Heart Lanterns can also be distributed about one screen apart to maximize coverage. This will likely be the extent of your regeneration setup. Add honey dips if you feel like it, but don't bother watching the buff timer and keeping it on at all times; the distraction may prove fatal. Only actively try to refresh your honey buff when there's a lull in the action.
You've probably heard stuff like this a million times, but these basics can't be overlooked here. Now that we've got them out of the way, let's get to the meat of it.
Part 1: One Eye, Two Eyes, Green Eye, Phantasmal Deathray
We'll start from scratch. The Moon Lord has three weak points in the form of his eyes and four types of attacks between them. The first is his Phantasmal Eyes - the attack he begins the fight with. When he spawns, both hands will release a spray of small eyes that randomly float upwards and then suddenly turn to shoot towards your location at once. This attack has frighteningly good tracking and follows your position very closely. It locks down huge amounts of airspace and forces you to move (seriously, don't try to dodge between them - move), but it has a major weakness: it can only move down once it begins homing in on you. The Moon Lord's hands will always use this attack immediately before summoning Phantasmal Spheres. His third eye will never use this attack.
You can dodge this attack by flying up out of their reach when they begin tracking you, or by moving far enough away to one side that they can't reach your location without falling below you.
The Moon Lord's hands can generate Phantasmal Spheres - replicas of the eyes that stay in position until he closes his hand and commands them to fly at you. If his hand's eye is destroyed before the Spheres fire, they will take a while to despawn and remain in the same spot until then. His hands are most vulnerable while performing this attack due to being open for the entirety of it. This is one of the strongest attacks in the Moon Lord's arsenal, so take care to avoid it.
I've seen a lot of people say this move "can only fire downwards" when it absolutely doesn't. It normally fires downwards, but under circumstances I haven't completely pinned down yet, they can fly in whatever direction they want. I haven't had a peek at the code, so only anecdotal evidence backs this next statement, but I believe the Moon Lord tracks your rough location while summoning his Spheres, forming a general area encompassing your movements. When he actually fires them, he fires as close to you as he can within that area. As a result, if you're far above the Moon Lord the entire time he's summoning the Spheres, he'll throw them upwards, but if you stand in place and then fly straight up to a higher platform just before they fire, his Spheres will still shoot downward.
This attack is relatively easy to dodge by moving to a higher platform or running away from them, similar to handling his Phantasmal Eyes. Keep in mind that because of how the Moon Lord moves his arms while tracking you, all the Spheres can end up in a big clump or extremely spread out depending on how you moved.
All three of his eyes can fire Phantasmal Bolts - always two shots in rapid succession. The Moon Lord leads his shots with the flawless precision of a computer; if you're moving in a straight line at a constant velocity, he will hit you without fail. His hands will perform this attack periodically. His third eye will always perform this attack after firing his Deathray.
You can dodge this attack using burst movement - rapid acceleration and deceleration. Because of how fast the Bolts move, waiting for them to fire and then double jumping/dashing to dodge is extremely difficult without significant distance. The Moon Lord will likely be right on top of you for most of this phase. However, that burst movement also throws off his aim; if you double jump just before he fires, he notices your velocity in that instant and fires a Bolt into your path - but as you slow down, it overshoots and flies past right in front of you. His eyes will always stare at you, perfectly following your movements for a moment before firing their Phantasmal Bolts, which you can use as a timing cue.
Finally, his third eye will periodically open and charge for several seconds before firing the Phantasmal Deathray, his single most powerful attack. He will always try to sweep this from below your feet, forcing you into the air. Recovering from getting hit by this is possible, but it will instantly put you at a massive disadvantage. Because this move forces you to fly up and you also have to outpace the Moon Lord (whose movement constantly tries to put his head above your location), being caught out with no more flight time can easily turn disastrous. When he fires, grapple to the platform/rail above you and immediately release to refresh your flight time. Mash jump if you have to, and then dash over his head as soon as you can.
Part 2: Your Maneuvers and Game Plan
Generally speaking, you'll move up throughout this fight because of how easily it lets you dodge everything but his Phantasmal Bolts. Once you've flown past the highest platform, it may be a good idea to Magic Mirror to the bed at the bottom of the arena so you can keep climbing. That said, you don't have to drop everything and climb whenever the Moon Lord fires his Phantasmal Eyes. Remember, these attacks have a diagonal trajectory; if you simply move to one side far enough, they won't be able to reach you because they've dropped below your platform. When one hand releases the Phantasmal Eyes, you run away from it. If both hands release Eyes at once or the arena ends in front of you, dash towards his hand and climb; the Moon Lord will move with you and keep his hand out of your way. If you happen to outpace the Moon Lord, make sure to go under (not above!) the hand in front of you if it's summoning Phantasmal Spheres.
When dealing with Phantasmal Spheres, your best option is to simply fly up just before he fires them and then drop back down. However, his hands always release Phantasmal Eyes before this attack, so you need to move to one side as the Phantasmal Spheres appear. Depending on your situation, you may want to either fly up between the Spheres or keep running to one side before they fire.
Individually, none of the Moon Lord's components are really that intimidating. However, his attack cycle ensures his hands are almost always out of rhythm with each other, staggering his attacks and forcing you to dodge multiple different attack types at once. If you let this continue into his second phase, the Moon Lord will absolutely cut you down... but as it happens, when and where you kill the Moon Lord's eyes is entirely up to you. In the first phase, try to whittle down every eye's health as much as you can; you want to spend as little time as possible in the following transitory phase. Your ultimate goal is to have all three True Eyes of Cthulhu making the same attacks at the same time, hugely reducing the amount of variables you need to keep track of. However, do not - do not - do not try to kill all three eyes at once. Ever. No, Yrimir did not do it right. The Moon Leech Clots all but exist for the sole purpose of foiling that strategy. It will not work.
Eventually, you will whittle away at the Moon Lord's health, taking all three eyes lower and lower. Whether you want to kill off the Clots as well is up to you; the battle already has a lot for you to keep track of. If you have to pick an eye to kill first, choose a hand over the third eye; a Moon Lord with a third eye and a hand is far more manageable than a Moon Lord with no third eye and two hands. No matter which one you kill, a True Eye of Cthulhu will be released, and the hardest part of the entire battle will begin.
Part 3: Synchronization
Aww, aren't they cute? Regardless of how adorable they are and how much I want a plush toy of one, these precious little eyeball friends can and will tear you a new one if you fumble this part of the fight. All four of the Moon Lord's attacks are represented again by the True Eyes of Cthulhu; because their exact attack cycle is critical information, I'll go through it step by step.
When a True Eye is released, the very first thing it will do is focus on you and fire two Phantasmal Bolts in quick succession. No different from when the Moon Lord used it, so use your burst movement to dodge all the same. Odds are, the fight will pick up a much more frenetic pace; since the True Eye stops whenever it attacks, you'll likely have enough distance to simply dash on reaction instead of having to throw off its aim. As a side note, this is probably the hardest attack to dodge when all three True Eyes are out; unless they're truly synchronized within a few frames of each other, their Bolts will be desynced enough to make it a huge pain. Thankfully, it's still much less hellish than if the True Eyes were completely out of sync.
After firing their Bolts, the True Eye will summon six Phantasmal Spheres around itself and then make a short charge at you, flinging the Spheres the rest of the way. This attack does even more damage than when the hands did it, but it's far easier to dodge thanks to simply being a clump of projectiles thrown at your current location. So long as you know it's coming, you should be able to dodge this with ease.
The True Eye's pupil will contract, and then it will spin in a circle while releasing Phantasmal Eyes. This is more or less identical to when the hands used it - but this time you must begin climbing to a higher level diagonally as soon as possible to prepare for the next attack. If possible, you should fly to a higher location out of the Phantasmal Eyes' reach and wait for the True Eyes to catch up; you'll want to be in close proximity.
Yes, the Phantasmal Deathray. Fortunately, it's much weaker than when the Moon Lord used it, merely inflicting a measly 200 damage. The True Eyes' Phantasmal Spheres hit for 220. Dodge it anyway.
Because the True Eyes stop in place when attacking, this is far easier to dodge than the Moon Lord, since he's constantly moving to position his third eye above you. Simply wait for the Deathray to fire and casually stroll on over to the other side. However, as you release more True Eyes, try to make sure that all of them have fired before you cross them up; since they always sweep their laser from below to above you, two Deathrays rotating in different directions will absolutely pincer you in between. An alternative solution is to wait below and to one side of the True Eyes, giving yourself more room and time before you move to their other side - but beware of the Phantasmal Eyes coming down as you get into position.
After the Deathray, the True Eye will throw another volley of Phantasmal Spheres at you. This is your golden opportunity, because the True Eye's attack cycle restarts after this. They make a distinct noise as they throw the Spheres; if you release another True Eye right as the existing ones perform this attack, you've synchronized them. Of course, they'll proceed to show you exactly how precise your synchronization was mere seconds later, so don't slack off just yet.
When only one True Eye is free, the battle is at its toughest - not just because you need to contend with the True Eye throwing its attacks into the mix and complicating the Moon Lord's patterns, but because synchronization must be achieved at all costs. You cannot release the True Eyes out of sync. Since the attack cycle uses Phantasmal Spheres twice, you need to be confident the True Eyes used a Deathray before the Spheres. Aim to release the remaining hand for the second True Eye, and then kill the third eye last; that the third eye is almost always closed encourages this nonetheless.
If you failed to synchronize the True Eyes, the battle is hardly lost right then and there. However, it will be countless times more difficult than if they were synchronized. For this reason, you must be patient and willing to let opportunities go. Moon Leech Clots may appear right as the True Eye fires its Deathray, preventing you from killing the Moon Lord's eye in time. The third eye may close right as the True Eyes launch their Spheres, forcing you to wait for another cycle. Even if an eye can be killed, you must accept it if you cannot synchronize it, and you must wait until the True Eye actually throws its Phantasmal Spheres before you kill the Moon Lord's eye; a mere one or two second gap between True Eye attack cycles is more than enough to complicate the fight by a huge margin. Mouse over the Moon Lord's eyes whenever you can and make sure you're confident how much health it has before going in for the kill. It's very easy to mistake 200 health for 2000 in the heat of battle.
Stay calm and collected. Don't let your frustration lead you into a critical mistake at the final, most crucial juncture. When you finally succeed and officially enter the Moon Lord's second phase, with the True Eyes of Cthulhu synchronized, you can finally kick back, relax, and call the Moon Lord a joke to his face. You've earned it at that point.
Part 4: Equip Suspicious Looking Tentacle to Pay Respects
By the time the Moon Lord's Core is exposed, you should absolutely have no issue finishing the job if you made it this far with the True Eyes synchronized. All of their attacks were covered in the previous section, and if they're attacking in sync, it really won't be much different from simply handling one. In fact, because the only things you have to worry about are the True Eyes of Cthulhu, this is the easiest part of the entire fight - no hands to spray Eyes or hurl Spheres, no third eyes to blast huge sweeping fields of three-hit-kill death murder zones. Just remember to watch what the True Eyes are doing, dodge accordingly, and put the poor thing out of its misery already. He doesn't even have legs.
Of course, this is hardly the only way to kill the Moon Lord. Aside from cheese and machines, there may be techniques or maneuvers I'm not aware of, so as always, I'm open to discussion below (and maybe post your screenshots of synchronized True Eyes while you're at it). Of course, you won't become a master overnight; it'll take practice and effort to build the muscle memory and skill, but the journey is oh so worth it.
So thanks for reading, and happy hunting.
Last edited:
