Hi there.
As many of you know, I used to have a workshop where I made Terraria Styled Logos. However, it was too much work and I had to close it. I learnt to make logos using a guide on Terraria Online by DevilBro. Now that TO is no longer a website, I have decided to repost his tutorial here, so that it can be easily accessed by members of the community. Enjoy.
You can utilise waybackmachine to view the original thread.


Good day fellow terrarians like I promised in the past I started to work on a tutorial how to make the Terraria-Logo like Signatures you might have already noticed on the forum. For the beginning:
I am german so forgive me if my English is not the best
The program I use is Adobe Photoshop CS4 as you will notice further in the Tutorial
This thread is not meant as request thread, further request should still be posted on my profile or in my chatbox, it is difficult to follow which request I already answered in a thread and which not
Feel free to ask questions, but please try your best to answer them yourself, I do not like to answer the same question over and over again
Everything I do in Photoshop should also be possible in freeware softwares like GimP or Paint.net
This is a method I created myself and which I perfected while working with it, i do not expect anyone to understand this fully the first time you read it
Also i never worked with GimP or other freeware programs so please don't ask me how they work or where you can find special features. Use google if you have to there are many forums where people can help you.
This is really important never save files as jpeg files. Jpeg seriously lowers the quality of pictures and even makes pixel sprites blurry. I recommend you to save everything you make in .png files.
0.0 Contents
1.0 The Letters
1.1 How to create new letters
1.2 Adding extra blocks into your letters
2.0 The Word
2.1 How to create a simple Word
2.2 How to make Signatures in different biomes
3.0 Extra Tutorials
3.1 Sprite Extracting
3.2 Sprite Templates
3.3 Resizing
4.0 Downloads
1.0 The Letters
I created nearly every letter myself by editing the letters of the original Terraria Logo or by drawing them myself. I will provide all the letters I made in the past in a picture, feel free to use them.
1.1 How to create new letters
I will now explain you how to create new letters. We will now create the letter "o" in dirt block surrounded by grass. We start by drawing the letter with a normal circle brush (for normal letters I recommend a 5 or 6 pixel brush and for capitalised letters a 8 or 9 pixel brush). If you got problems drawing the the letter without it looking deformed I suggest you to write the letter in Comic Sand MS in the size 50 pt to follow the form with your pencil. We should get something like:
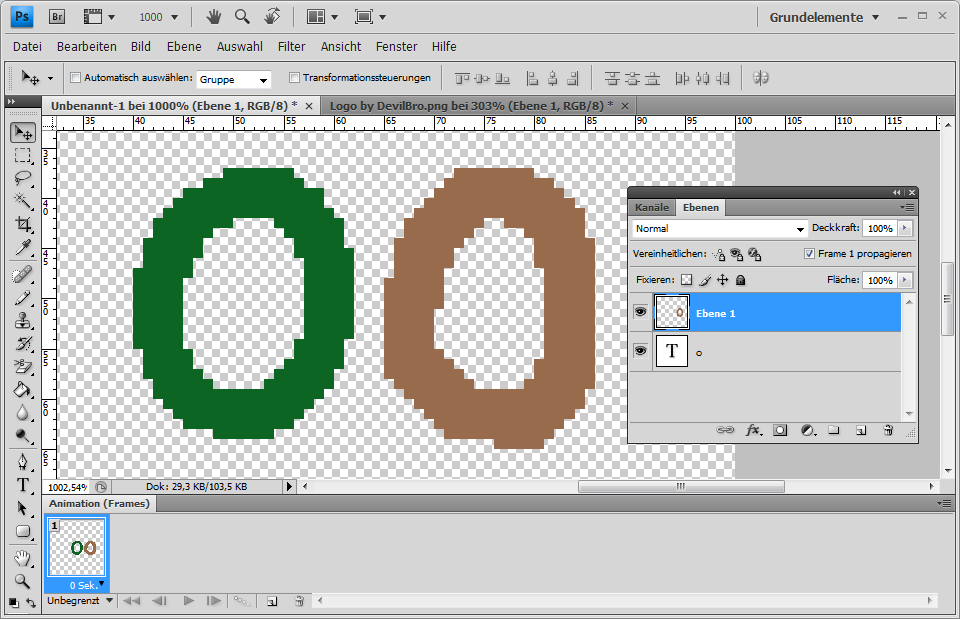
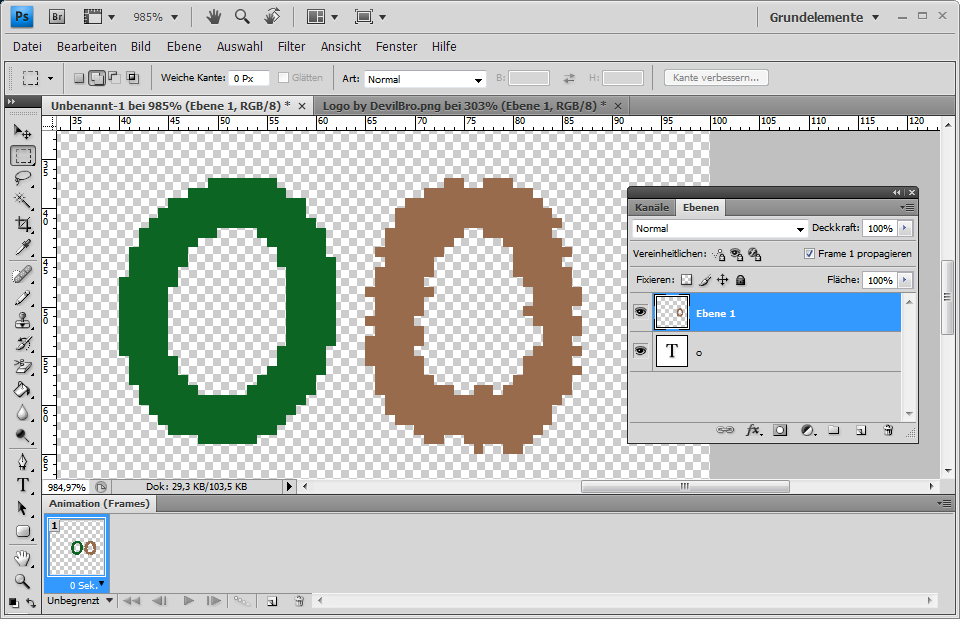
The green letter being the Comic Sans MS letter and the brown being our Logo letter. Remember that it doesn't have to look perfect at the end it is dirt surrounded by grass . To make our "o" look more like an organic block we have to deform it a bit. Sounds difficult but it's really easy. Just move parts of the letter one pixel to one side. It will look the best if you don't move more than 3 lines a time. You can also use an eraser tool or the pencil to delete pixels or add some. Our "o" should look like:
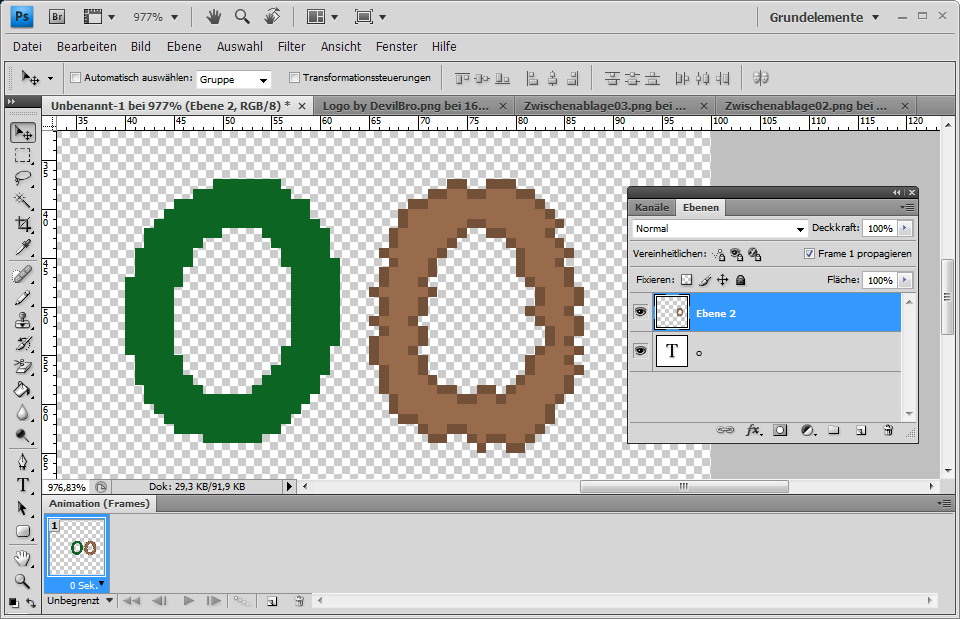
Nearly finished. Now we have to add a darker outline. To get the right colors look at the game sprites adn jsut copy them. Depending on your program this can either be a 5 second job or a minute job if you have to place every pixel by hand. I won't explain you the easy way because you need Photoshop and some expierence with the program. So we will have to place every pixel by ourselves -sadface-. The "o" should now look like this:
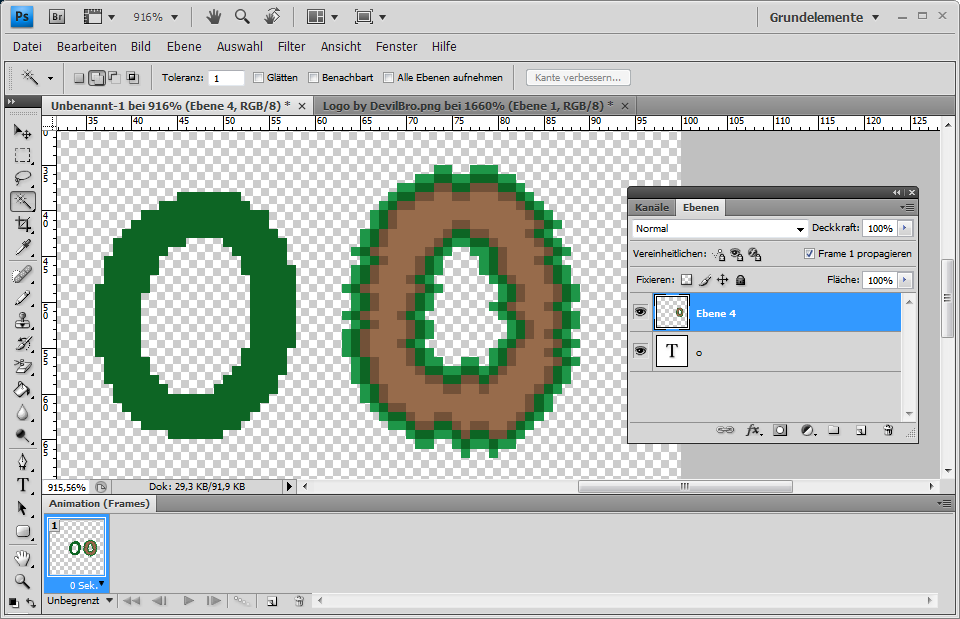
Now we will add the two grass outlines arround the "o". Again with Photoshop it takes some seconds but we will have to place them by hand. The two color are the two shadow colors of the grass sprite, of course youc an sue your own colors if you want. Now the "o" looks like this:
Awesome guys we are nearly finished (with one letter... lol). We will now add the black outline which conects the letters and we will fill the inside with the light grass color. Try to follow the form of the letter when drawing the outlines. Also don't draw too long straight parts. It will make the outline look unorganic. There should be 2-3 pixels between the grassoutlines and the black outline. This is the only part i also have to do by hand because I couldn't find an easier way yet. The "o" itself is finished now and should look like:

We will now add details based on the kind of block and biome. Meaning we will add grass and dirt spots. Great our letter is now finished and should like this:
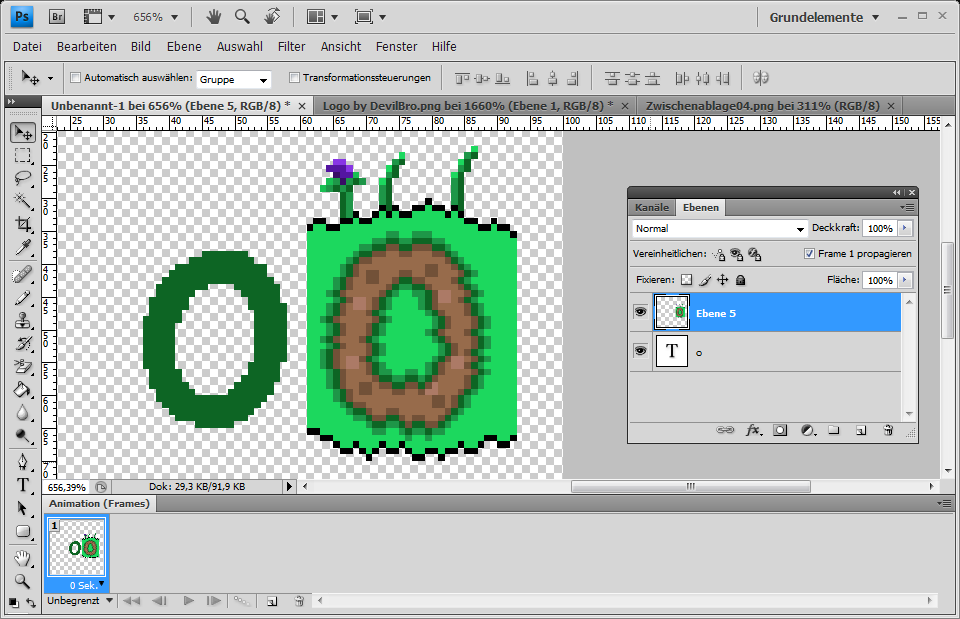
Good job, guys.
1.2 Adding extra blocks into your letters
In this part you will learn how to add extra blocks into your letters. To fit the biome we will add stone into our "o". We will start with marking off the part of the letter that will be stone and erase the dirt from it.

We will now outline the deleted area with a dark color. The color is based on the kind of block you want to use. I use black for most blocks, but for stone i will use a dark grey. We will also cut off the dirt parts from the stone aprts with the same dark brown used to cut off the irt from the grass.
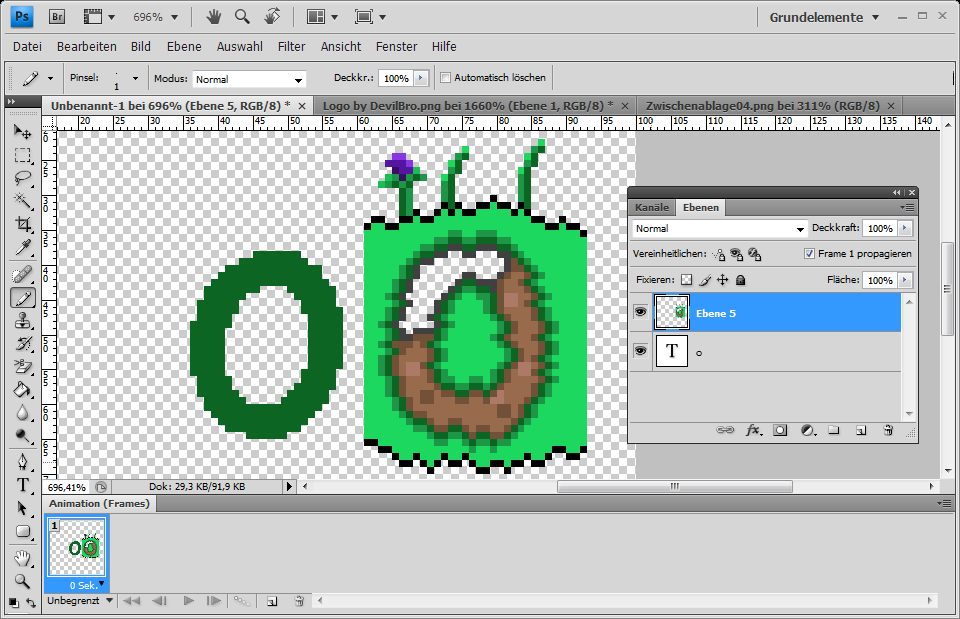
To add the actual stone I will use a sprite template I created beforehand. I will explain in a later part how to create those templates. So just bear with the simple explaination for now. You lay the template under the letter and mark everything that is covered by the gap in the letter. Eras eevrythign that is not within the gap. The "o" should now look like this and is completely finished. AWESOME!
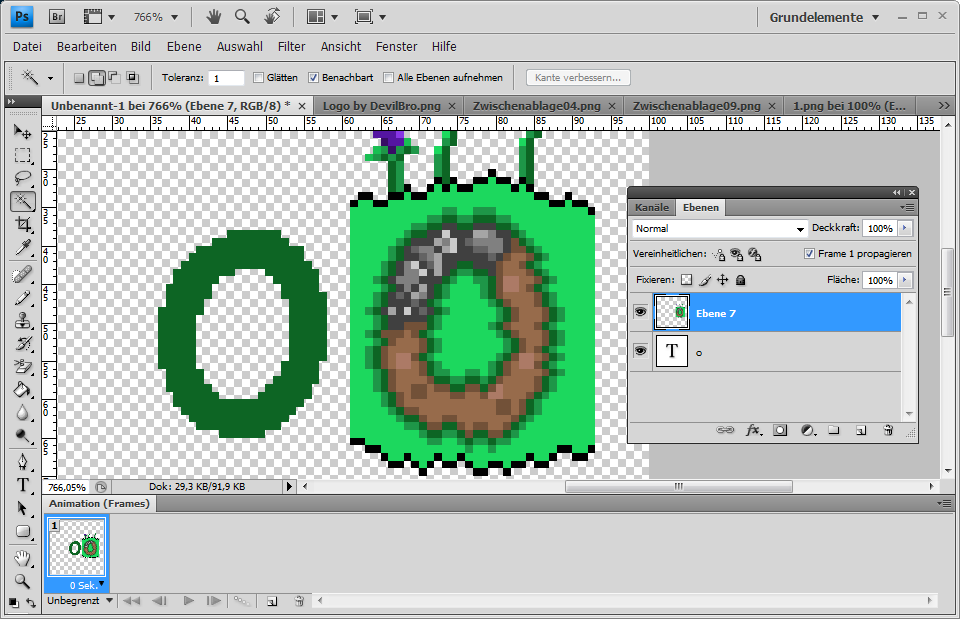
Creating new letters is the most time consuimg task in creating terraria logo signatures. Once you created a letter you can reuse it as many times as you want. Once you created the whole alphabet creating signatures is a piece of cake.
2.0 The Word
2.1 How to create a simple Word
Now the actual tutorial begins. I will explain you how to create a whole word by using the example "DevilBro". ;P
First collect all the letters you need. We need the letters "D", "e", "v", "i", "l", "B", "r" and "o".
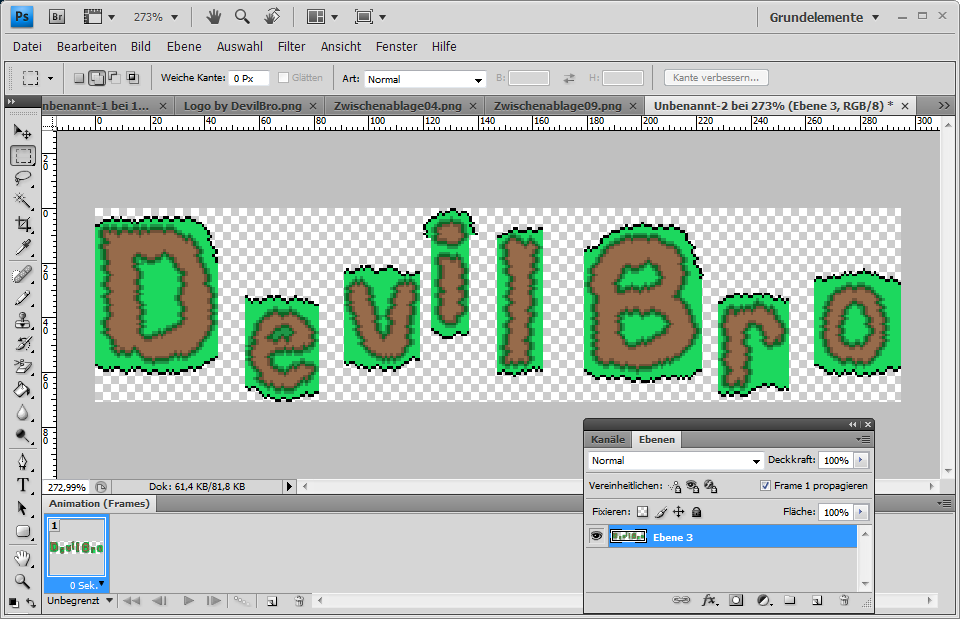
Now place them next to each other. But keep in mind to place them all on nearly the same height or the word will look awry. Also the gap between letters should not be bigger than 1 or 2 pixels. The word will look like this: (red line to see the height better)
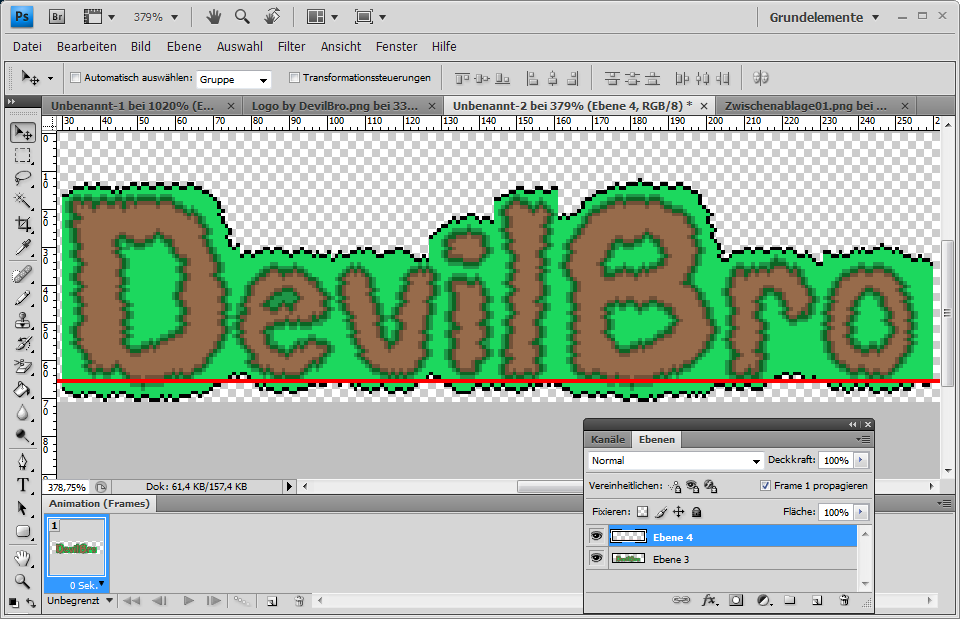
The ends are still open and not all black outlines of the letters are connected with each other. This will be our next job. There isn't really something to explain. It is just time consuming to place each pixel. The final version without details will look like this:

We will now add the details again. The concept is the same as the one with one single letter so no further explanation. With details:
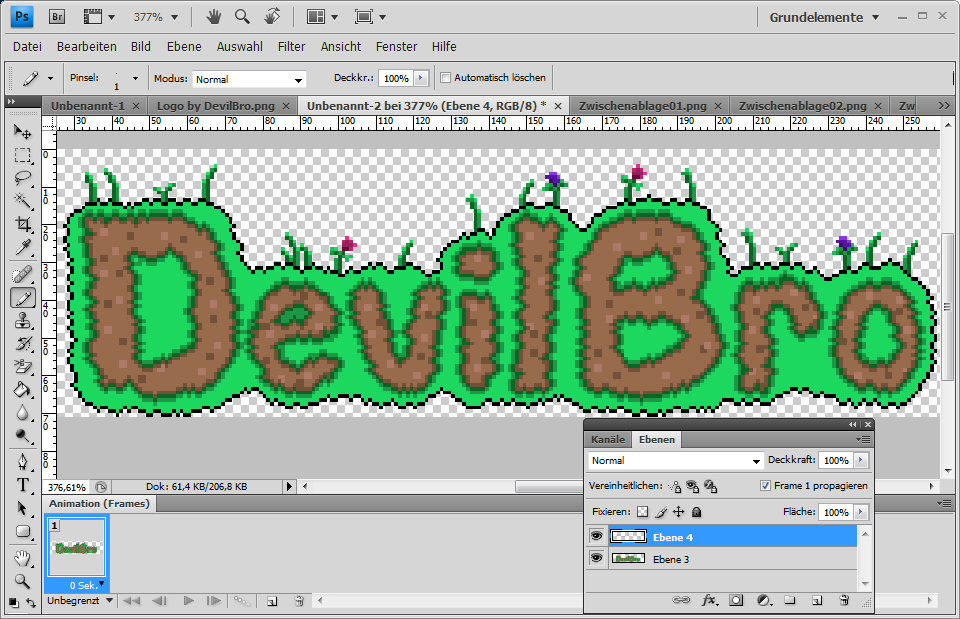
Again we can add other blocks. I will add stone over the whole word. I will also add a tree to the left like the original logo. With further editing:
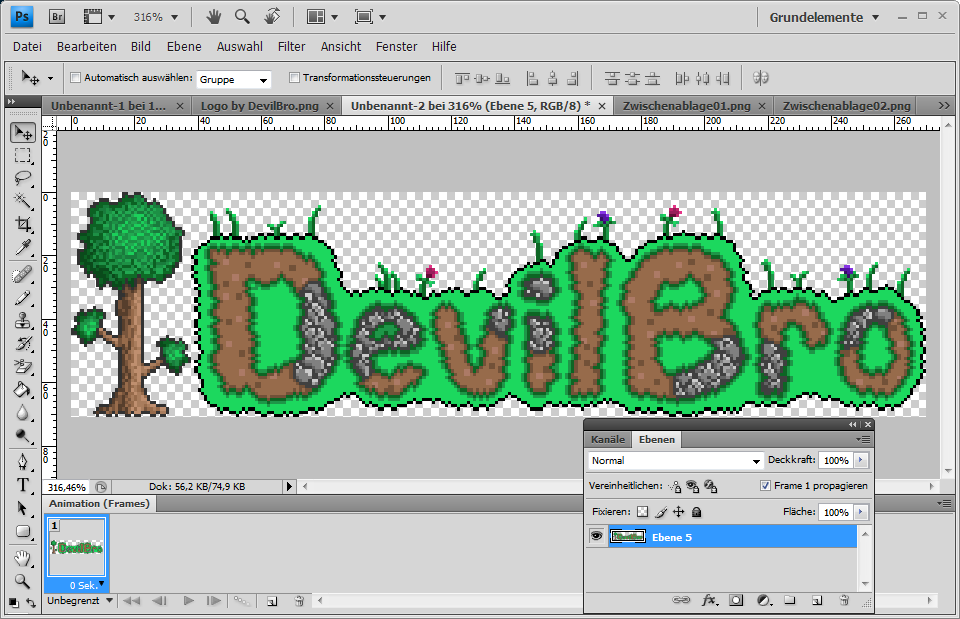
The final version looks like this:

2.2 How to make Signatures in different biomes
There are many different possibilities for different looks. You can see seven different Signatures in the animated thread logo. Biomes like Hollow and Corruption are rather easy to create. You only have to recolor the grass and use different sprite templates than stone. Most drawing programs support a "recolor same color" tool which makes it really easy to change one color in the whole picture to another one without it being connected to each other.
Creating a signature that uses an outline that isn't a one-color outline liek grass is a bit trickier. First you will have to recolor the dark brown outlines to black. It looks the best with most sprites. It should look like this:

We will create a hell biome signature. So erase the light brown of the dirt blocks, use the hellstone template and place it under the word.
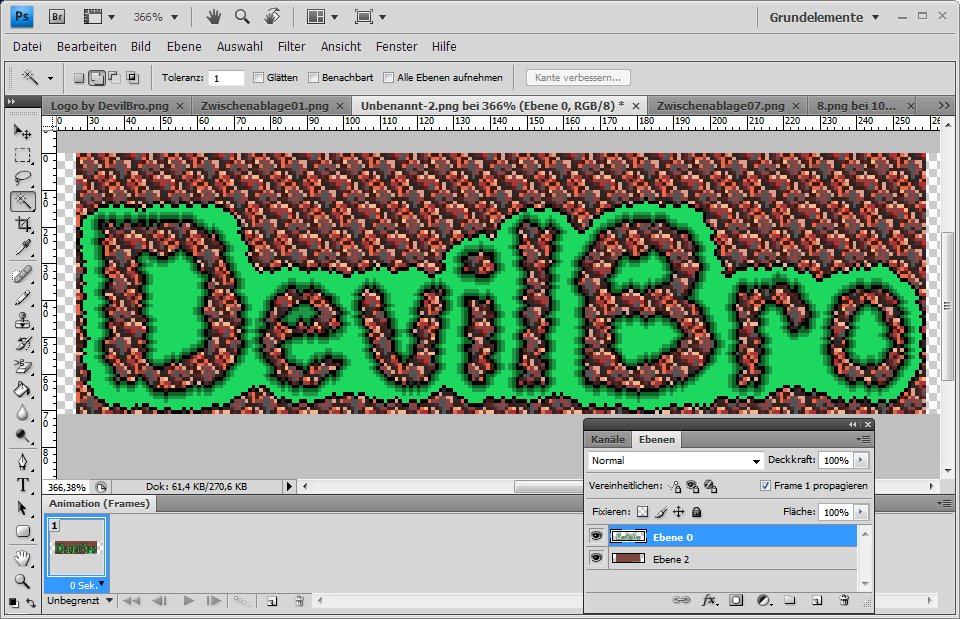
Delete everything that is not within the gap of the word.
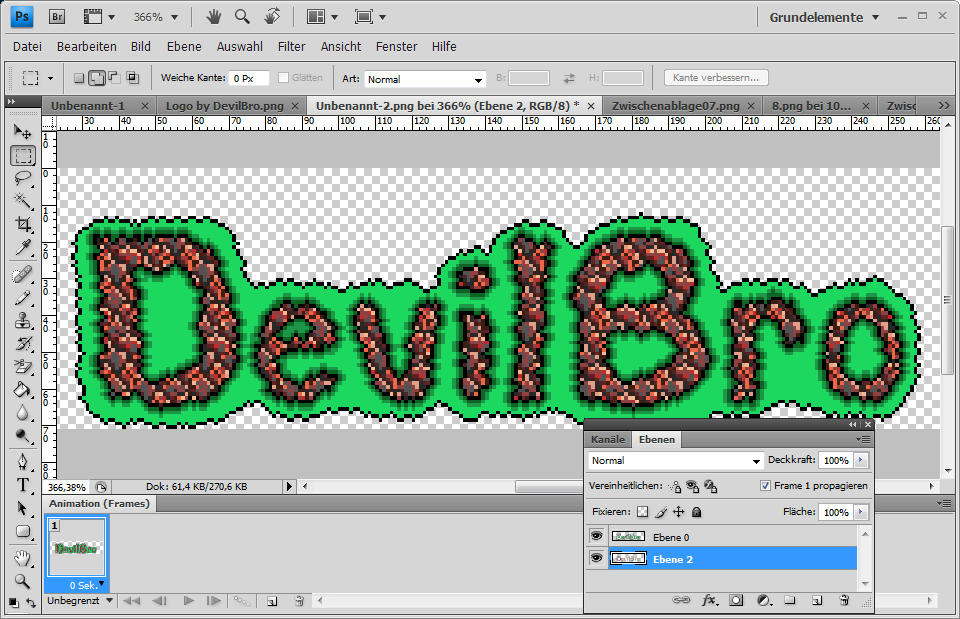
How we will add the ash outline. Delete the very light green, use the ash template and place it under the word.
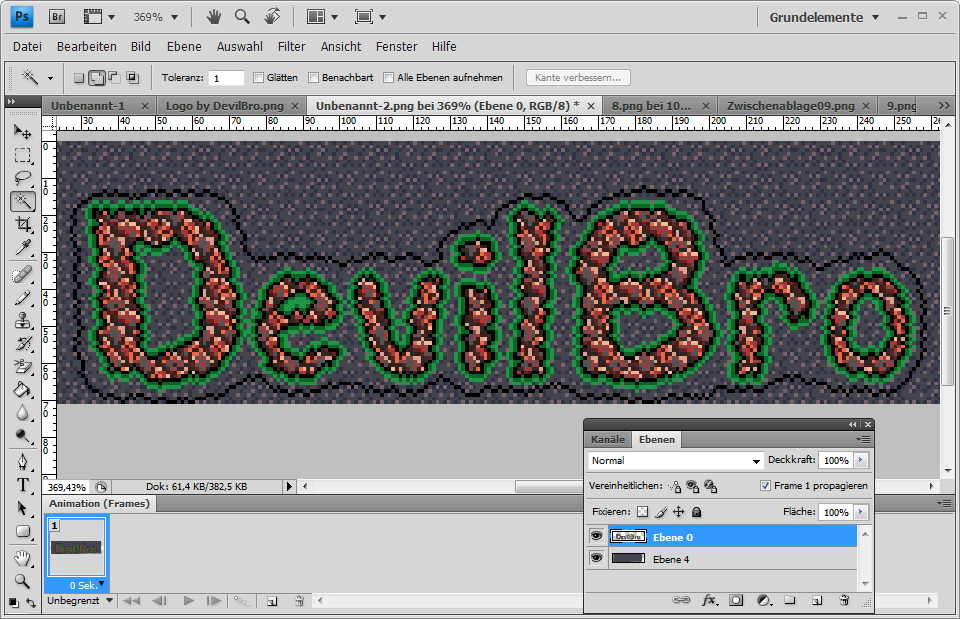
Again delete everything that is outside of the outline.
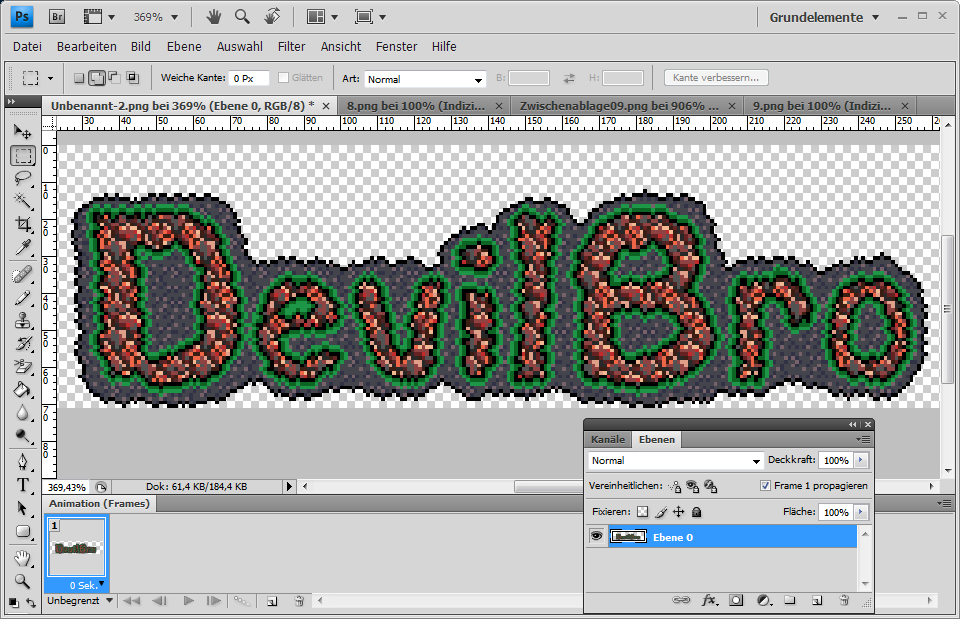
Now a tricky part will follow we have to add the two darker outlines WITH the ash sprite. Mark the bright green outline. You should now have the green outline marked so that you can only draw on the marked area. Use a brush that covers the whole signature and set the brush on 30% meaning it will only draw with 30% transparency and will not overdraw the whole colors. Use black to draw with 30% transparency over the ash sprite under the green outline (you have to switch to the ash template layer). I can't help you if you know nothing about how layers are handled in painting programs, sorry.It should look like this now:
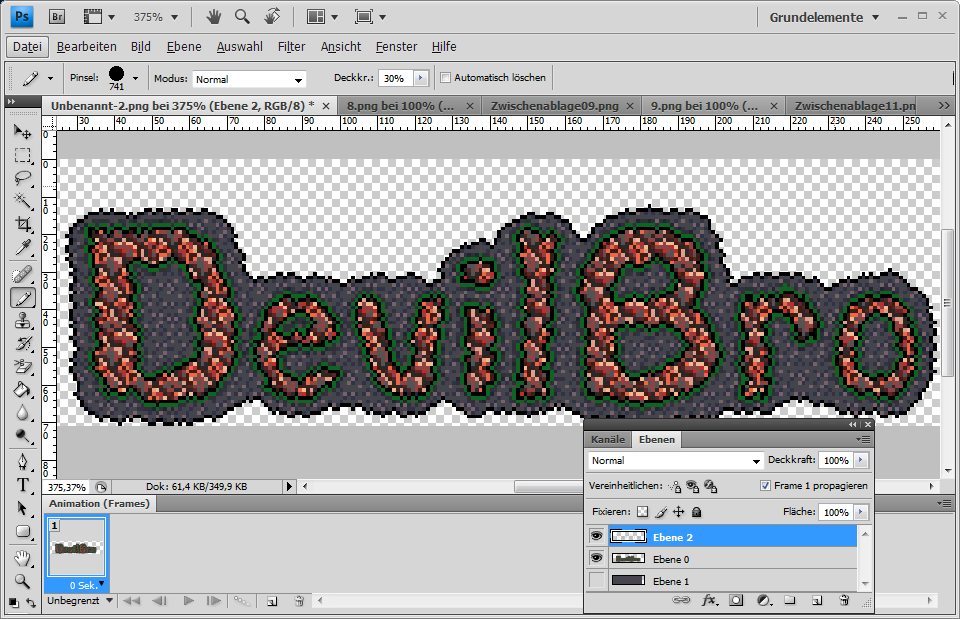
Do the same with the darker green outline. just use a 70% transparency brush instead of 30%. It will make the outline look way darker than the other one. Liek this:
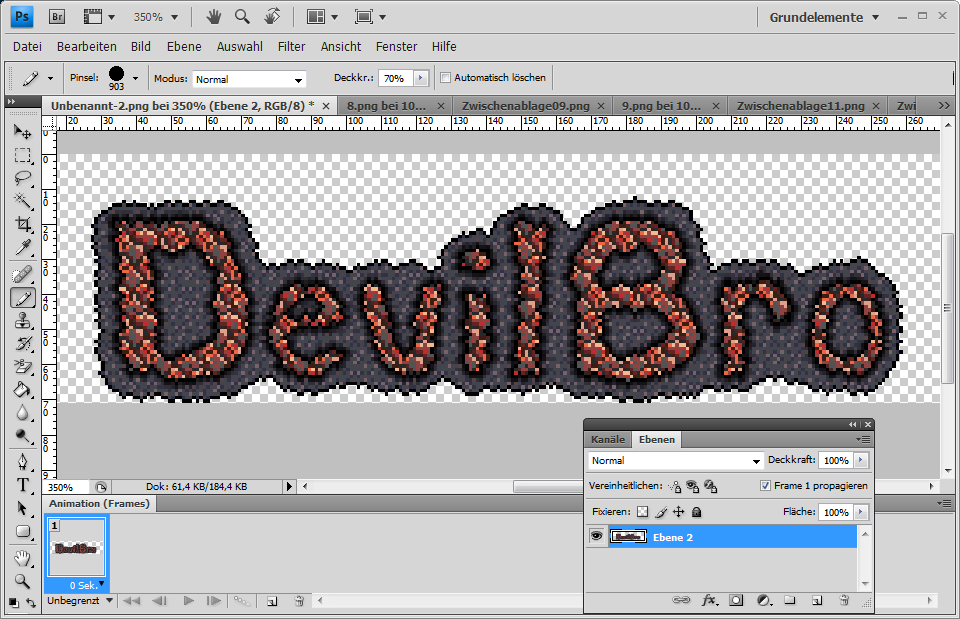
If you don't understand this part you can just use a one-color outline instead of the darkenedash sprite outline. So just use two dark purple-grey-ish (one brigther than the other but still darker than the actual ash). You will abrely be able to see the difference between the two version.
The final version will look like this:

This concept works with any sprite templates.
3.0 Extra Tutorials
3.1 Sprite Extracting
To extract the sprites from the game use a program called "XNB Exporter". The thread can be found here.
Download the "XNB Exporter" here.
Place the "XNB Exporter.exe" into the folder "Steam\steamapps\common\terraria\Content\Images"
Start the "XNB Exporter.exe".
You can either type the name of the .xnb file into the text field without the .xnb and press "Go for it!". For example to convert "NPC_1.xnb" file, you would type in "NPC_1" or you can alternatively convert all available .xnb files in the same folder by leaving the text field empty and press "Go for it!".
The selected .xnb file will now be converted to a .png file and saved in the same folder with the same name. The original file won't be deleted.
3.2 Sprite Templates
To create sprite templates you will first have to extract the sprites from the game (see 3.1). If you found the right sprite isolate the three sprites that are used for a block completely surrounded by the same block. For example i will make a Adamantite ore template. Open tiles_111 in your painting program and isolate this three blocks and move them together.

Copy the threeblock line and place two copies under the original one, always one block moved to the right.
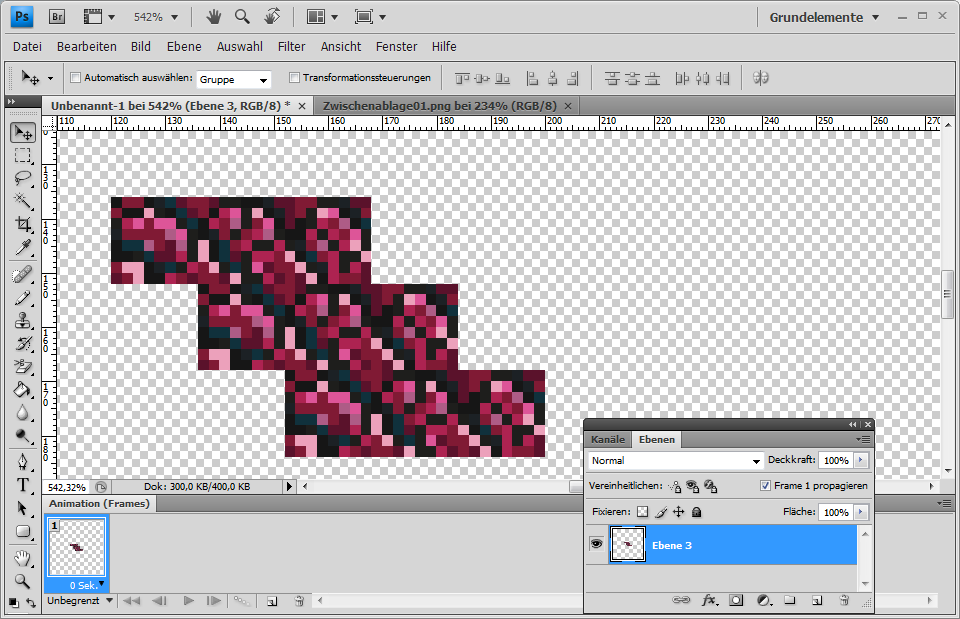
Copy the stair like construction and place it next to the original one until your template square is fully covered. I use a 320x320 (160x160 as 1px version).
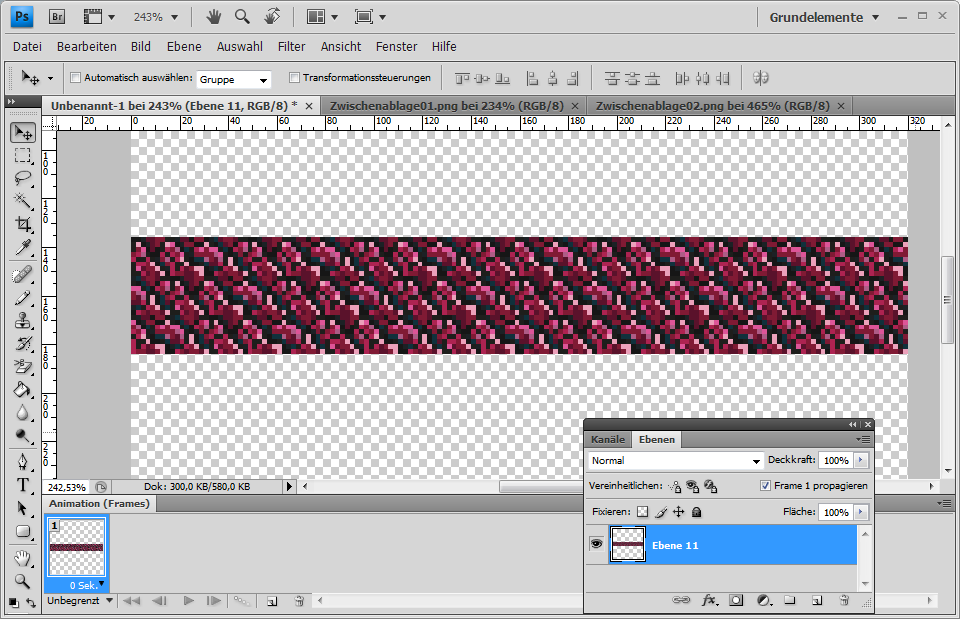
Now copy the block line and place it over adn udner the original one until it's completely filled.
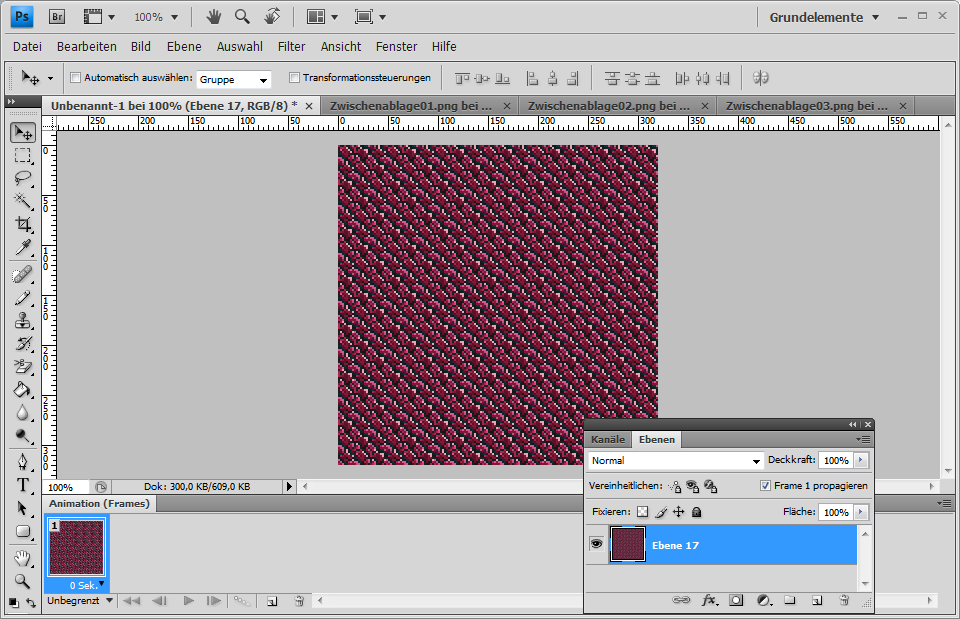
The template is finished and looks like this:

3.3 Resizing
This is mostly used to resize NPCs and other items to fit 1x1px signatures. As you all should know Terraria normaly uses 2x2px pixels. To resize a picture without losing quality you have to change the mode from RGB-colors to Indexed Colors. This will prevent pixels to blurr when shrinked or expanded. If the image is set to Indexed Colors you can change the picture size either from 1x1 to 2x2 or from 2x2 to 1x1. This will will different based on the program you use. If your image is 50x200px big and you want it to use 2x2px pixels instead of 1x1px pixels you have to change it to 100x400px. If you got a picture which should be changed from 2x2 to 1x1 just devide the size by 2. For example 100x300 will become 50x150. You can't shrink pictures that are already 1x1px. If you do you will delete pixels and the picture will look awkward.
A 1x1 signature:

A 2x2 signature

A false resized signature from 1x1 to 2x2 without being in Indexed Colors mode (really blurry)

A false resized signature from 1x1 to 0,5x0,5

(0,5x0,5 does not really exist since 1px is the smallest possible length)
4.0 Downloads
A folder with templates: Here (mirror)
A folder with the alphabet: Here (mirror)
all sprites and the original logic © by Re-Logic and their former creator
DevilBro, Feb 15, 2012
As many of you know, I used to have a workshop where I made Terraria Styled Logos. However, it was too much work and I had to close it. I learnt to make logos using a guide on Terraria Online by DevilBro. Now that TO is no longer a website, I have decided to repost his tutorial here, so that it can be easily accessed by members of the community. Enjoy.
You can utilise waybackmachine to view the original thread.

I am german so forgive me if my English is not the best
The program I use is Adobe Photoshop CS4 as you will notice further in the Tutorial
This thread is not meant as request thread, further request should still be posted on my profile or in my chatbox, it is difficult to follow which request I already answered in a thread and which not
Feel free to ask questions, but please try your best to answer them yourself, I do not like to answer the same question over and over again
Everything I do in Photoshop should also be possible in freeware softwares like GimP or Paint.net
This is a method I created myself and which I perfected while working with it, i do not expect anyone to understand this fully the first time you read it
Also i never worked with GimP or other freeware programs so please don't ask me how they work or where you can find special features. Use google if you have to there are many forums where people can help you.
This is really important never save files as jpeg files. Jpeg seriously lowers the quality of pictures and even makes pixel sprites blurry. I recommend you to save everything you make in .png files.
0.0 Contents
1.0 The Letters
1.1 How to create new letters
1.2 Adding extra blocks into your letters
2.0 The Word
2.1 How to create a simple Word
2.2 How to make Signatures in different biomes
3.0 Extra Tutorials
3.1 Sprite Extracting
3.2 Sprite Templates
3.3 Resizing
4.0 Downloads
1.0 The Letters
I created nearly every letter myself by editing the letters of the original Terraria Logo or by drawing them myself. I will provide all the letters I made in the past in a picture, feel free to use them.
1.1 How to create new letters
I will now explain you how to create new letters. We will now create the letter "o" in dirt block surrounded by grass. We start by drawing the letter with a normal circle brush (for normal letters I recommend a 5 or 6 pixel brush and for capitalised letters a 8 or 9 pixel brush). If you got problems drawing the the letter without it looking deformed I suggest you to write the letter in Comic Sand MS in the size 50 pt to follow the form with your pencil. We should get something like:
The green letter being the Comic Sans MS letter and the brown being our Logo letter. Remember that it doesn't have to look perfect at the end it is dirt surrounded by grass
Nearly finished. Now we have to add a darker outline. To get the right colors look at the game sprites adn jsut copy them. Depending on your program this can either be a 5 second job or a minute job if you have to place every pixel by hand. I won't explain you the easy way because you need Photoshop and some expierence with the program. So we will have to place every pixel by ourselves -sadface-. The "o" should now look like this:
Now we will add the two grass outlines arround the "o". Again with Photoshop it takes some seconds but we will have to place them by hand. The two color are the two shadow colors of the grass sprite, of course youc an sue your own colors if you want. Now the "o" looks like this:
Awesome guys we are nearly finished (with one letter... lol). We will now add the black outline which conects the letters and we will fill the inside with the light grass color. Try to follow the form of the letter when drawing the outlines. Also don't draw too long straight parts. It will make the outline look unorganic. There should be 2-3 pixels between the grassoutlines and the black outline. This is the only part i also have to do by hand because I couldn't find an easier way yet. The "o" itself is finished now and should look like:
We will now add details based on the kind of block and biome. Meaning we will add grass and dirt spots. Great our letter is now finished and should like this:
Good job, guys.
1.2 Adding extra blocks into your letters
In this part you will learn how to add extra blocks into your letters. To fit the biome we will add stone into our "o". We will start with marking off the part of the letter that will be stone and erase the dirt from it.
We will now outline the deleted area with a dark color. The color is based on the kind of block you want to use. I use black for most blocks, but for stone i will use a dark grey. We will also cut off the dirt parts from the stone aprts with the same dark brown used to cut off the irt from the grass.
To add the actual stone I will use a sprite template I created beforehand. I will explain in a later part how to create those templates. So just bear with the simple explaination for now. You lay the template under the letter and mark everything that is covered by the gap in the letter. Eras eevrythign that is not within the gap. The "o" should now look like this and is completely finished. AWESOME!
Creating new letters is the most time consuimg task in creating terraria logo signatures. Once you created a letter you can reuse it as many times as you want. Once you created the whole alphabet creating signatures is a piece of cake.
2.0 The Word
2.1 How to create a simple Word
Now the actual tutorial begins. I will explain you how to create a whole word by using the example "DevilBro". ;P
First collect all the letters you need. We need the letters "D", "e", "v", "i", "l", "B", "r" and "o".
Now place them next to each other. But keep in mind to place them all on nearly the same height or the word will look awry. Also the gap between letters should not be bigger than 1 or 2 pixels. The word will look like this: (red line to see the height better)
The ends are still open and not all black outlines of the letters are connected with each other. This will be our next job. There isn't really something to explain. It is just time consuming to place each pixel. The final version without details will look like this:
We will now add the details again. The concept is the same as the one with one single letter so no further explanation. With details:
Again we can add other blocks. I will add stone over the whole word. I will also add a tree to the left like the original logo. With further editing:
The final version looks like this:
2.2 How to make Signatures in different biomes
There are many different possibilities for different looks. You can see seven different Signatures in the animated thread logo. Biomes like Hollow and Corruption are rather easy to create. You only have to recolor the grass and use different sprite templates than stone. Most drawing programs support a "recolor same color" tool which makes it really easy to change one color in the whole picture to another one without it being connected to each other.
Creating a signature that uses an outline that isn't a one-color outline liek grass is a bit trickier. First you will have to recolor the dark brown outlines to black. It looks the best with most sprites. It should look like this:
We will create a hell biome signature. So erase the light brown of the dirt blocks, use the hellstone template and place it under the word.
Delete everything that is not within the gap of the word.
How we will add the ash outline. Delete the very light green, use the ash template and place it under the word.
Again delete everything that is outside of the outline.
Now a tricky part will follow we have to add the two darker outlines WITH the ash sprite. Mark the bright green outline. You should now have the green outline marked so that you can only draw on the marked area. Use a brush that covers the whole signature and set the brush on 30% meaning it will only draw with 30% transparency and will not overdraw the whole colors. Use black to draw with 30% transparency over the ash sprite under the green outline (you have to switch to the ash template layer). I can't help you if you know nothing about how layers are handled in painting programs, sorry.It should look like this now:
Do the same with the darker green outline. just use a 70% transparency brush instead of 30%. It will make the outline look way darker than the other one. Liek this:
If you don't understand this part you can just use a one-color outline instead of the darkenedash sprite outline. So just use two dark purple-grey-ish (one brigther than the other but still darker than the actual ash). You will abrely be able to see the difference between the two version.
The final version will look like this:
This concept works with any sprite templates.
3.0 Extra Tutorials
3.1 Sprite Extracting
To extract the sprites from the game use a program called "XNB Exporter". The thread can be found here.
Download the "XNB Exporter" here.
Place the "XNB Exporter.exe" into the folder "Steam\steamapps\common\terraria\Content\Images"
Start the "XNB Exporter.exe".
You can either type the name of the .xnb file into the text field without the .xnb and press "Go for it!". For example to convert "NPC_1.xnb" file, you would type in "NPC_1" or you can alternatively convert all available .xnb files in the same folder by leaving the text field empty and press "Go for it!".
The selected .xnb file will now be converted to a .png file and saved in the same folder with the same name. The original file won't be deleted.
3.2 Sprite Templates
To create sprite templates you will first have to extract the sprites from the game (see 3.1). If you found the right sprite isolate the three sprites that are used for a block completely surrounded by the same block. For example i will make a Adamantite ore template. Open tiles_111 in your painting program and isolate this three blocks and move them together.
Copy the threeblock line and place two copies under the original one, always one block moved to the right.
Copy the stair like construction and place it next to the original one until your template square is fully covered. I use a 320x320 (160x160 as 1px version).
Now copy the block line and place it over adn udner the original one until it's completely filled.
The template is finished and looks like this:
3.3 Resizing
This is mostly used to resize NPCs and other items to fit 1x1px signatures. As you all should know Terraria normaly uses 2x2px pixels. To resize a picture without losing quality you have to change the mode from RGB-colors to Indexed Colors. This will prevent pixels to blurr when shrinked or expanded. If the image is set to Indexed Colors you can change the picture size either from 1x1 to 2x2 or from 2x2 to 1x1. This will will different based on the program you use. If your image is 50x200px big and you want it to use 2x2px pixels instead of 1x1px pixels you have to change it to 100x400px. If you got a picture which should be changed from 2x2 to 1x1 just devide the size by 2. For example 100x300 will become 50x150. You can't shrink pictures that are already 1x1px. If you do you will delete pixels and the picture will look awkward.
A 1x1 signature:
A 2x2 signature
A false resized signature from 1x1 to 2x2 without being in Indexed Colors mode (really blurry)
A false resized signature from 1x1 to 0,5x0,5
(0,5x0,5 does not really exist since 1px is the smallest possible length)
4.0 Downloads
A folder with templates: Here (mirror)
A folder with the alphabet: Here (mirror)
all sprites and the original logic © by Re-Logic and their former creator
DevilBro, Feb 15, 2012
Attachments
Last edited:

