You are using an out of date browser. It may not display this or other websites correctly.
You should upgrade or use an alternative browser.
You should upgrade or use an alternative browser.
HOIK! [Guide] - Rapid Player/NPC/Etc Transport Using Only Sloped Tiles.
- Thread starter ZeroGravitas
- Start date
Can I Get Uhhh
Spazmatism
THis is a really cool "bug". I'm gonna try it out!
Brain Goo
Terrarian
Hey everyone!
I've noticed that sometimes size 1 items can be moved with hoiks continuously.
But i cant find what does it depends on. Have someone seen it and knows how to force it behave like that all the time? I attach a video to demonstrate it:
BTW, since this is my first message on Terraria forums so I decided to share what I'm trying to construct now:
This should be a "one click hoictronic herbs farm" - I will not need to plant anything, herbs grow naturally on large farms.
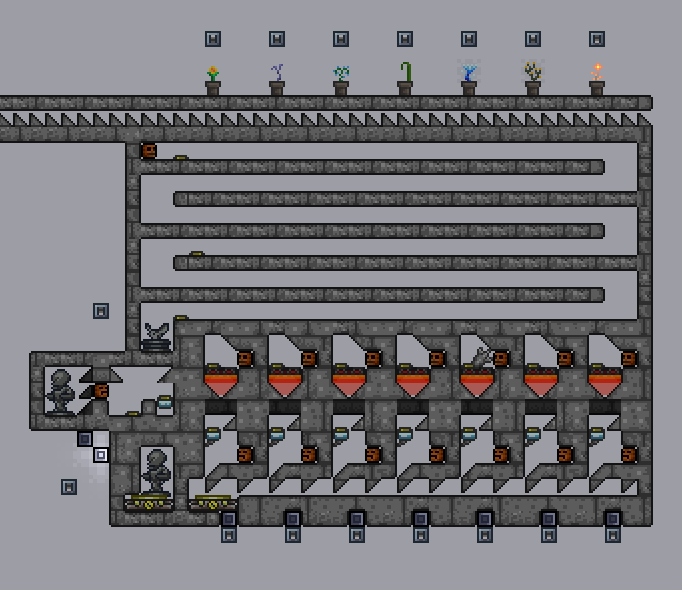
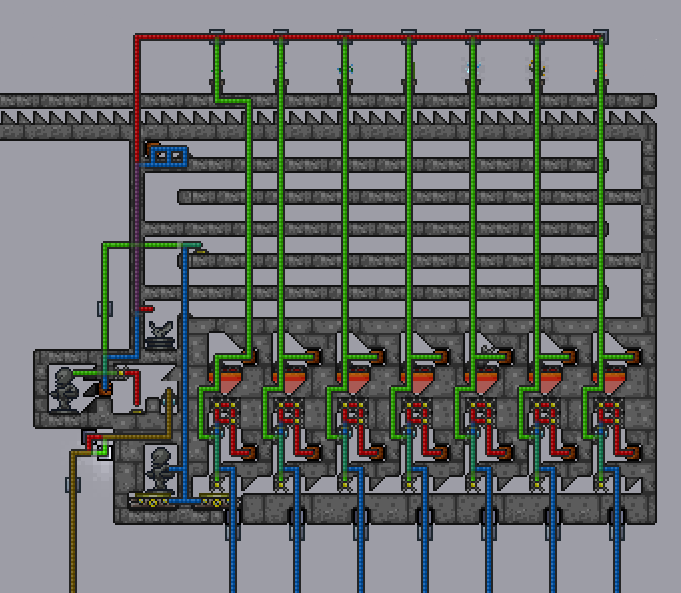
Its not yet ready, I want to add some things and than I'll maybe make a detailed post on it.
- Add lava watering with pumps before collecting Fireblossom
- My 30 act/s sceleton engine works only while night (daytime skeleton stuks in blocks), I need think some other variant
- Make switches for mushrooms (they are separated and burned now)
- Learn size 1 items horizontal transportation
- Simplify and optimize.
I've noticed that sometimes size 1 items can be moved with hoiks continuously.
But i cant find what does it depends on. Have someone seen it and knows how to force it behave like that all the time? I attach a video to demonstrate it:
BTW, since this is my first message on Terraria forums so I decided to share what I'm trying to construct now:
This should be a "one click hoictronic herbs farm" - I will not need to plant anything, herbs grow naturally on large farms.
Its not yet ready, I want to add some things and than I'll maybe make a detailed post on it.
- Add lava watering with pumps before collecting Fireblossom
- My 30 act/s sceleton engine works only while night (daytime skeleton stuks in blocks), I need think some other variant
- Make switches for mushrooms (they are separated and burned now)
- Learn size 1 items horizontal transportation
- Simplify and optimize.
Last edited:
DicemanX
Brain of Cthulhu
Hey everyone!
I've noticed that sometimes size 1 items can be moved with hoiks continuously.
But i cant find what does it depends on. Have someone seen it and knows how to force it behave like that all the time? I attach a video to demonstrate it:
Yes, this is a known issue, and to date we haven't been able to figure out what precisely impacts whether size 1 items can be continuously hoiked. However, there are some consistent observations made thus far:
1) There tends to be fewer issues on large worlds
2) The continuous hoiking is more likely the more you go towards the center of the map and the more you elevate the hoik above 0 altitude
BTW, since this is my first message on Terraria forums so I decided to share what I'm trying to construct now:
This should be a "one click hoictronic herbs farm" - I will not need to plant anything, herbs grow naturally on large farms.
A promising start! It will be very interesting to see it in action when it's fully finished!
DicemanX
Brain of Cthulhu
Hey everyone!
- My 30 act/s sceleton engine works only while night (daytime skeleton stuks in blocks), I need think some other variant
If you're not too particular where you want the farm to be in your world, then I'd suggest testing the hoiking of size 1 items at various positions in the world (stick to the center and above 0 altitude if possible). If you find a spot where continuous hoiking of size 1 items is possible (and it seems it will always be possible somewhere in the map), then you won't have to worry about the skeleton engine.
Homieofepicton
Terrarian
I'm having a bit of a problem...
 Is this a problem with the Flexability?
DicemanX
Brain of Cthulhu
I'm having a bit of a problem...View attachment 55707 Is this a problem with the Flexability?
Hoiks propel players up or down ahead of propelling them sideways, so you need to block the up hoik to transition into the horizontal hoik track again.
Here's one way to make it work:

Last edited:
DestroyerArcher
The Destroyer
About a year ago, I made a hoik-like structure that trapped pixies and gastropods.

The idea is that pixies fly into the hoik, get trapped, and the lava burned them, allowing you to collect loot.
I don't know if it is possible to transport pixies to different areas, though.
The idea is that pixies fly into the hoik, get trapped, and the lava burned them, allowing you to collect loot.
I don't know if it is possible to transport pixies to different areas, though.
Diamondheart
Duke Fishron
YAY! The console update today fixed so many issues with the hoiks on the xbox360.
ED209
Plantera

My small Tutorial: Hoiks
Hoiks are an amazing thing found by ZeroGravitas, but sometimes it may be hard to understand HOW to make it. The purpose is known, but how to make it can be a challenge.
The red and blue arrows represent which direction the Hoiks that are made go.
The red arrow points right, while the blue points left. Follow the sloped blocks below them to understand which way is left and right for Hoiks.
In the second level with the numbers 1, 2, 3, and 4, this area shows the steps to make a Hoik:
Step 1: Use a platform and a block of any kind, and place them next to each other on the ground.
Step 2: Slope the platform so its like stairs going right and up.
Step 3: Slope the block next to the just sloped platform to point up and left. By doing it this way, the slope will push you in the direction you want. In this case, it is Right.
Step 4: Slope ALL blocks after the first two, repeat with either a 1 block space between each sloped block, or all positioned next to one another. Both work, but having a space in between works just as good, and saves on block usage. Stop placing and sloping blocks where you wish to stop at.
MAKE SURE TO TEST IT! For left and right Hoiks, press the DOWN and LEFT/RIGHT keys TOGETHER to move into the Hoik and use it. If going LEFT, hold DOWN and LEFT keys, to use the left transit Hoik.
Vise versa also works. After you start using the Hoik and begin rapid transit, you do not need to press/hold any keys on your keyboard/mouse. The Hoik will move you FOR you
Finally in the third and fourth row are more Hoiks and a Distance counter. The Distance counter is set to 1-50 blocks in distance to show the scale of these example Hoiks.
Thank you very much, and have a wonderful day.
(Please reply if you wish for an UP and DOWN Hoik tutorial as well.)
I would DEFINITELY like a guide for up & down please, I've been looking for one and can't find it anywhere.
Diamondheart
Duke Fishron
I would DEFINITELY like a guide for up & down please, I've been looking for one and can't find it anywhere.
That's this guide, page 1... problem is on console things are still a little bit glitchy about the hoiks so some of the spacing is different. Usually a second layer of blocks above the teleporter row in the ceiling works (wall layer the hoik is pointed at and one space over from for up and down).
Homieofepicton
Terrarian
Thank youHoiks propel players up or down ahead of propelling them sideways, so you need to block the up hoik to transition into the horizontal hoik track again.
Here's one way to make it work:
Oh and uh. Nice Builder's Workshop map!
Frak
Terrarian
"Fixed so many issues" as if the hoik wasn't an issue on its ownYAY! The console update today fixed so many issues with the hoiks on the xbox360.
DicemanX
Brain of Cthulhu
"Fixed so many issues" as if the hoik wasn't an issue on its own
It isn't an issue anymore, it's a feature of the game now
") .
.Diamondheart
Duke Fishron
For engineers, it really is a feature. For people who have difficulty building it, it's an issue. If it didn't serve a purpose and was just randomly throwing people into ceilings or walls I would completely say it's a bug or issue, but it is controllable.... and extreamlly useful when you get the timing of it down. Setup a pump system to drain the ocean sometime without using a hoik'd activation system, then drain the other ocean using it. Bet you even with the couple minutes to build the hoik setup it still takes less than half the time to drain that second ocean.