Console Simple Frost Moon Arena Setup

ManDaMisdemeanor

Skeletron Prime
Note: This setup may not work if you dont have the horsemans blade, so this setup is currently for those who have farmed pumpkin moon to that specific point...

Anyways, hello again. There has been some debate on how to effectively farm frost moon in console and though most seasoned players do know about this method, I will post this guide here for those who may have some difficulty with it. The frost monn can be easily farmed with some effort and minmal setup. The things you will need to do this is : Traps (about 30, they can be any type but for this I will be using spears and flames), 4 statues (one chest statue and any other three mob statues i.e. slimes, skeletons, jellyfish), four one second timers, actuators, wire, two teleporters, lava buckets, honey buckets and other regen items (optional) and building blocks, most importantly the horsemans blade. So, without further ado, lets begin.

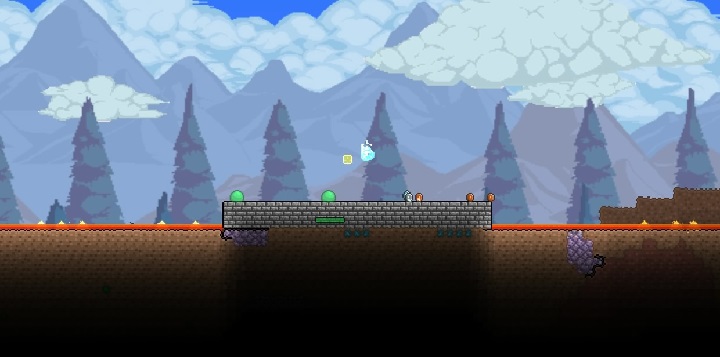
Start by building a stage three blocks high by roughly 15 blocks wide. Clear out an area 60 blocks wide on each side of it and fill those areas in with lava. Make the lava deep enough that it will burn the trash drops that fall saving the important drops from despawning.
Terraria_20150829155150.jpg


The lava will also prevent mobs from spawning on either side of the arena, limiting the spawn to the stage you create. But, for mobs to spawn here, you will need to be high enough for them to do so.

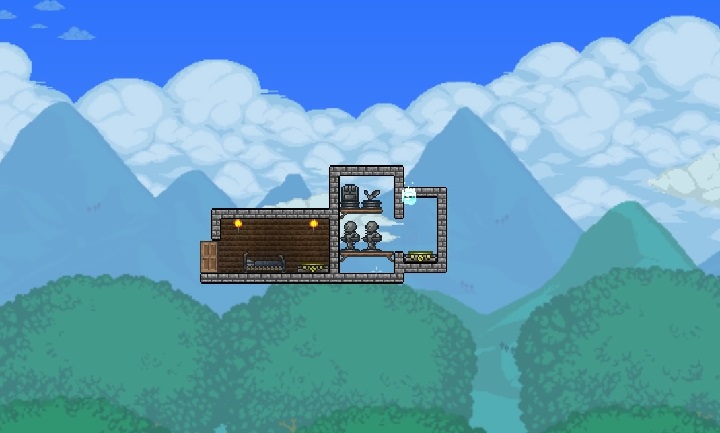
Next you will need to build up 40 blocks off your stage. Here is where the workings of the farm will take place. Build two boxes, one will be your spawn point, the other will house the statues you use.
Terraria_20150829155119.jpg


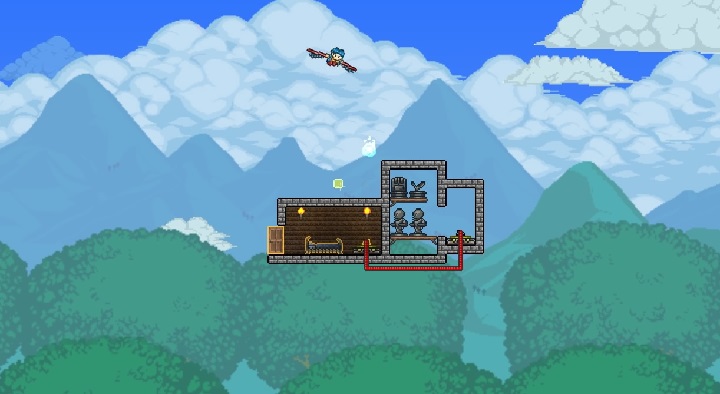
Link these two boxes with teleporters to go back and forth between them quickly. I always found using a pressure plate on the teleporter from the spawn room and a switch in the statue box best so you dont accidentally let mobs escape or accidentally teleport out.
Terraria_20150829155248.jpg


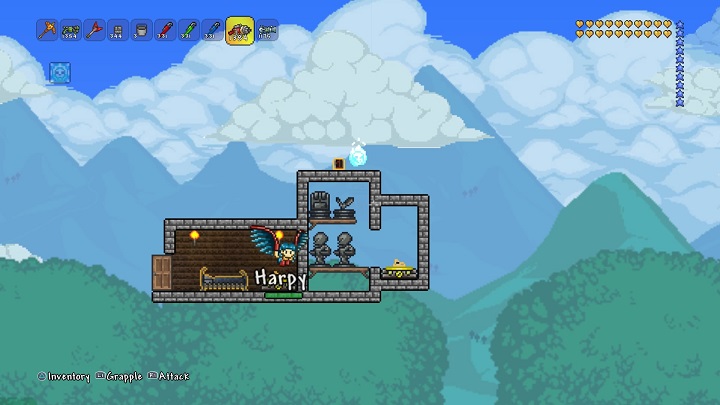
Now time to setup the statues. Place a one second timer on top of the statue box and run all three colored wires to each of the statues. This will maximize the spawns from each statue and increase the ability of this setup to work.
Terraria_20150829155556.jpg


Sadly I didnt get a pic of my wiring but you should get the idea. All that you do is run each color wire to each statue, and they can overlap because each color wire works independently from each other and each can be activated by the same one second timer.

Once you have tested your statues and teleporters, its time to move on to traps...

The traps I'm using are spears and flames (18 flames and 16 spears though this will work with less as well as different traps)

The first set of traps you'll want to place about 20 blocks above the stage you created, and spread them out in a way where there is a good area of effect for them. Once you have them placed, wire them and place actuators on each of them. Place a switch on top of them and wire it to the traps. Once you activate the switch, the traps will become activated. Remove the switch and the actuators. Do not turn the switch off before removing it or the traps will go back to their normal state. Once the traps are actuated, wire each horizontal row a different color and run the wires to your control area (the area where you'll turn them on and off.
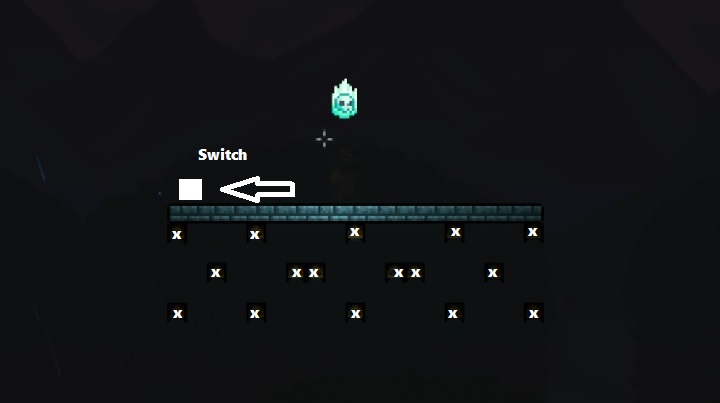
Terraria_20150829160051.jpg


Note: Spearheads come off when actuated spears retract, so creating a catch plate under your respawn box will ensure you dont get hit, but are useful for hitting mobs who fly above them.

Now on to the second set of traps above your box.

I used flame traps for this, though, spiky balls or spears work as well. Build up just a few blocks above your box. Like the traps below your box, place them in a manner that maximizes area of effect. Once they are placed how you desire them, wire them and actuate them doing the same steps as you did with the other traps you previously setup.
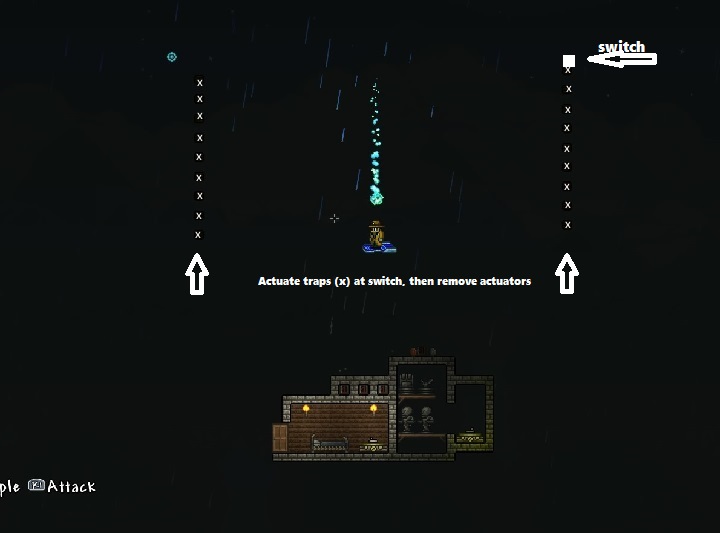
Terraria_20150829160904.jpg


Place three one second timers down and wire each wire color to one of them (meaning red wire to a timer, blue to the second timer, green to the third timer. This way the traps will alternate their cycles and maximize damage. Use switches or pressure plates to activate them.

Now you have the traps done, our focus will be on the statues and melee damage and speed. Before that though, the empty space below the statues is ideal for a honey dip and there are areas that can use a campfire and heart lantern so take a little time for regen items. They help.

Now the reason behind the statues. If you have the horsemans blade, this setup makes farming easy. If you dont, this wont work cause this works through the horsemans blades homing pumpkins to farm mobs. Turn on the mob statues. Using the horsemans blade, swing into the the statue mobs and you will see homing pumpkins coming in from all sides.
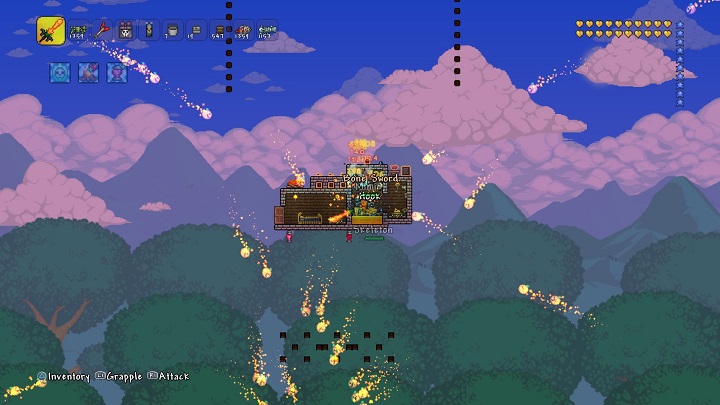
Terraria_20150829162958.jpg


These pumpkins will home in on the closest mob to them and in large clusters, do insane amounts of damage. Since the horsemans blade is also autoswing all you have to do is hold the attack button. The timer will constantly generate new mobs each time you kill them. Using a chest statue means you have a tough mob to have increased damage and crit against, while the weaker mobs increase the quantity of pumpkins as well as trigger your invulnerabilty much like sitting on a spike. The pumpkin flurry also carries any melee buffs you have as well as melee effect buffs. Ichor is devastating in wave events because the pumkins will inflict ichor debuff on any mob or boss vulnerable to it.

Armor and accessory loadout, the best is tanking armor beetle, turtle, dragon, and accessories, anything that boosts melee speed, emblems, regen, invulnerabilty, set to menacing, lucky, or increased melee speed, any one of those should work. I used beetle armor, fire gauntlet, avenger and destroyer emblems, celestial stone and ankh shield.

Potions include ironskin, regen, well fed items, ichor flask, tipsy items for damage and thats it. Regen speed increases because you are not moving from the box.

Results...
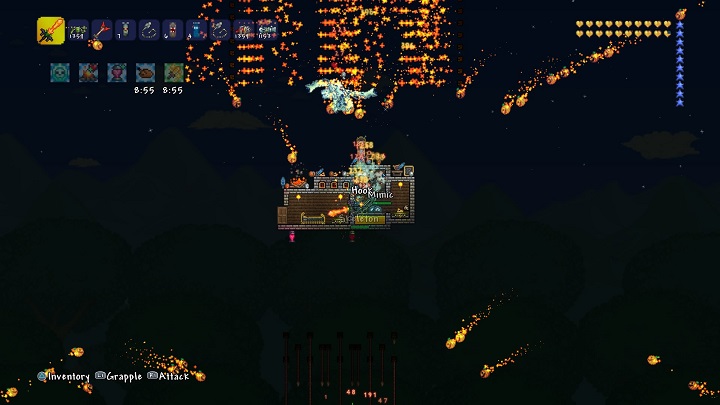
Terraria_20150829163908.jpg


Wave 11 by 10:30 Wave 18 by 1:45 Wave 20 by 4:15

Terraria_20150829163943.jpg


Hope this helps out those who are asking. If you have any questions, comments, constructive criticism, feel free to ask or comment.
 
Last edited:
Looks like a more than decent arena for the Frost Moon event! :)

I did try a similar approach to the event, using statues and Horse-blade. But instead of Flame Traps, I used spear batteries with a bird engine, where the spears themselves can push me trough the first waves fairly quick without me doing anything. As well having a double-layer spawn bridge above the ground that would allow me to have lava all the way through and having the few surviving mobs fall down on it to take additional damage.

What I also thought about when I saw the choice of statues is that your backpack must be getting filled up pretty fast and the by the time you get to the Final Wave, you have already reached the maximum of allowed items that can be on the ground simultaneously, ending up with a lot of item de-spawning.
For that I would suggest that you used Mimic/Slime/Crab/Bird/Rabbit or Bat statues, instead of the Skeleton statue as all the aforementioned does not have that high (if any) drop rate of items.
 
That is a valid point you have there. I changed two statues on my main farm after I read your comment to one slime one mimic one bird and a bunny statue. As long as the blade hits any mob, be it passive or aggressive, homing pumpkins still show and it greatly reduced statue drops. Thanks for pointing that out. I used flames because that's what I had available, but a small adjustment could accomodate any trap type. Even with the reduced garbage drops however the loot spawn bug is still alive in my game unfortunately, with most drops still despawning if you use the farm through the entire event.
 
This is the posting I found when goggling . Thanks for posting took me in a whole new direction from using magic and razorpine . Between this post and another about Dicemanx and others about the max hps and using NPC's in place of bird engines to activate statues ...I came up with a boulder drop to activate 5 1sec timers on 6 statues ( Ithink I am getting too many mobs for my blade too handle) I got the idea from making a boulder drop that sends ( from right they will role left and used asphalt to help reload fast ) 120 boulders can add about 300 or more to max out 2000 wire lengh I believe ... if l find it will help in bettering my time. Anyway am working on it so I think its time to stop talking about it or I will not stop lol . Oh could you bye chance message me on how to take a screenshot on PS3 I might like to put in future posts ... am new and working on an Active Title to match my Avatar . Thanks again ...and I liked you...one last thing so far 2:00 am best Final Wave time ...owe alot to you seasoned players !!
 
Last edited:
another nice addition would be placeing a water candle in the spawn point to increase the amount of mob spawns thus reduceing the time it would take to get to wave 20
 
I really like what you did here. Would you mind doing a recording?
The site i use to host my XBox One pics and videos is xboxdvr.com.
You don't need and account or anything.


If you want something a bit more challenging to build I suggest @DicemanX's pumpkin moon farm.

I built it on Xbox One, works like a charm. I did not get as much platinum as he does, I believe i hit the 400 item limit after my inventory was full even though i burn off the piddly items like he did.


Another REALLY great one that will blow your mind is @terramappy's 1.3.1 farm. No we can't build it yet as we are missing many of the parts but man is it impressive!!

 
Last edited:
Good to see this thread isn't totally mothballed lol. I have been looking into some of @DicemanX and @terramappy work and have took inspiration from some of their builds, especially on my personal world (also play on PC too).
I may try to work on a recording here pretty soon for you if I can free up some time to do so.

P.S. To the rest that have commented, thank you for your thoughts and ideas. I had only recently returned last month and it was nice to read them.
 
Note: This setup may not work if you dont have the horsemans blade, so this setup is currently for those who have farmed pumpkin moon to that specific point...

Anyways, hello again. There has been some debate on how to effectively farm frost moon in console and though most seasoned players do know about this method, I will post this guide here for those who may have some difficulty with it. The frost monn can be easily farmed with some effort and minmal setup. The things you will need to do this is : Traps (about 30, they can be any type but for this I will be using spears and flames), 4 statues (one chest statue and any other three mob statues i.e. slimes, skeletons, jellyfish), four one second timers, actuators, wire, two teleporters, lava buckets, honey buckets and other regen items (optional) and building blocks, most importantly the horsemans blade. So, without further ado, lets begin.

Start by building a stage three blocks high by roughly 15 blocks wide. Clear out an area 60 blocks wide on each side of it and fill those areas in with lava. Make the lava deep enough that it will burn the trash drops that fall saving the important drops from despawning.

View attachment 75211

The lava will also prevent mobs from spawning on either side of the arena, limiting the spawn to the stage you create. But, for mobs to spawn here, you will need to be high enough for them to do so.

Next you will need to build up 40 blocks off your stage. Here is where the workings of the farm will take place. Build two boxes, one will be your spawn point, the other will house the statues you use.

View attachment 75212

Link these two boxes with teleporters to go back and forth between them quickly. I always found using a pressure plate on the teleporter from the spawn room and a switch in the statue box best so you dont accidentally let mobs escape or accidentally teleport out.

View attachment 75213

Now time to setup the statues. Place a one second timer on top of the statue box and run all three colored wires to each of the statues. This will maximize the spawns from each statue and increase the ability of this setup to work.

View attachment 75214

Sadly I didnt get a pic of my wiring but you should get the idea. All that you do is run each color wire to each statue, and they can overlap because each color wire works independently from each other and each can be activated by the same one second timer.

Once you have tested your statues and teleporters, its time to move on to traps...

The traps I'm using are spears and flames (18 flames and 16 spears though this will work with less as well as different traps)

The first set of traps you'll want to place about 20 blocks above the stage you created, and spread them out in a way where there is a good area of effect for them. Once you have them placed, wire them and place actuators on each of them. Place a switch on top of them and wire it to the traps. Once you activate the switch, the traps will become activated. Remove the switch and the actuators. Do not turn the switch off before removing it or the traps will go back to their normal state. Once the traps are actuated, wire each horizontal row a different color and run the wires to your control area (the area where you'll turn them on and off.

View attachment 75216

Note: Spearheads come off when actuated spears retract, so creating a catch plate under your respawn box will ensure you dont get hit, but are useful for hitting mobs who fly above them.

Now on to the second set of traps above your box.

I used flame traps for this, though, spiky balls or spears work as well. Build up just a few blocks above your box. Like the traps below your box, place them in a manner that maximizes area of effect. Once they are placed how you desire them, wire them and actuate them doing the same steps as you did with the other traps you previously setup.

View attachment 75223

Place three one second timers down and wire each wire color to one of them (meaning red wire to a timer, blue to the second timer, green to the third timer. This way the traps will alternate their cycles and maximize damage. Use switches or pressure plates to activate them.

Now you have the traps done, our focus will be on the statues and melee damage and speed. Before that though, the empty space below the statues is ideal for a honey dip and there are areas that can use a campfire and heart lantern so take a little time for regen items. They help.

Now the reason behind the statues. If you have the horsemans blade, this setup makes farming easy. If you dont, this wont work cause this works through the horsemans blades homing pumpkins to farm mobs. Turn on the mob statues. Using the horsemans blade, swing into the the statue mobs and you will see homing pumpkins coming in from all sides.

View attachment 75226

These pumpkins will home in on the closest mob to them and in large clusters, do insane amounts of damage. Since the horsemans blade is also autoswing all you have to do is hold the attack button. The timer will constantly generate new mobs each time you kill them. Using a chest statue means you have a tough mob to have increased damage and crit against, while the weaker mobs increase the quantity of pumpkins as well as trigger your invulnerabilty much like sitting on a spike. The pumpkin flurry also carries any melee buffs you have as well as melee effect buffs. Ichor is devastating in wave events because the pumkins will inflict ichor debuff on any mob or boss vulnerable to it.

Armor and accessory loadout, the best is tanking armor beetle, turtle, dragon, and accessories, anything that boosts melee speed, emblems, regen, invulnerabilty, set to menacing, lucky, or increased melee speed, any one of those should work. I used beetle armor, fire gauntlet, avenger and destroyer emblems, celestial stone and ankh shield.

Potions include ironskin, regen, well fed items, ichor flask, tipsy items for damage and thats it. Regen speed increases because you are not moving from the box.

Results...

View attachment 75229

Wave 11 by 10:30 Wave 18 by 1:45 Wave 20 by 4:15

View attachment 75230

Hope this helps out those who are asking. If you have any questions, comments, constructive criticism, feel free to ask or comment.
Wow. Thank you. I knew how to do the traps but I couldn't get the Horseman's Blade to effectively summon pumpkins.
 
Unfortunately I didn't get the game until recently. Any chance of getting the Horsemans blade or wait until next Hallooween?
 
Unfortunately I didn't get the game until recently. Any chance of getting the Horsemans blade or wait until next Hallooween?

You can get the blade as a possible drop from Pumpkings in the Pumpkin Moon event.

This event can be started anytime after killing Plantera on your world and then simply crafting the item that starts the event.

All you need are,

30 Pumpkins (buy seeds from the Dryad NPC and plant them)
5 Ectoplasm (from the Dungeon after killing the Wall Of Flesh boss)
10 Hallowed Bars (from bosses)

Craft these at an Orichalcum or Mythril Anvil and use the item as soon as night time starts.

Have fun :)
 
What would be a decent setup Pre-Horseman Blade then. My buddy who is using Spectre armor with the hood, providing us Life steal, and I am using Full Beetle with scale mail and all warding modifiers on my accessories but we still get demolished even by the Pumpkings or we take very long to kill them. We have a small farm set up but found too many traps seems to make the traps shoot or go off less and some of our attacks don't register. Any ideas?

I am asking for Pumpkin Moon set up first however, so I can get the Horsemans blade. Thanks.
 
Spectre regenerative and vampire knives for melee would help recover health as you are fighting Mourning Woods and Pumpkings. Once you see your health is low, switch to those to regain your health then switch back to your powerful weapons. Terra Blade, Flairon, are good melee weapons to use, razorblade typhoon, spectre staff works great with both regenerative and damage mage armor. Using melee, use flasks of ichor to reduce damage resistance and mobs will die quicker.
As far as traps go, you are correct. Too many traps at once will negate damage due to mob invincibility cool down. I believe zerogravitas determined that to be seven ticks from when a mob can takes damage to the next time it can again. To fix that, you can use timers and pressure plates and a statue engine to stagger the timing of traps making them more effective. You can also spread your traps out further apart (about eight blocks apart) and increase the effectiveness of them as well.
 
Note: This setup may not work if you dont have the horsemans blade, so this setup is currently for those who have farmed pumpkin moon to that specific point...

Anyways, hello again. There has been some debate on how to effectively farm frost moon in console and though most seasoned players do know about this method, I will post this guide here for those who may have some difficulty with it. The frost monn can be easily farmed with some effort and minmal setup. The things you will need to do this is : Traps (about 30, they can be any type but for this I will be using spears and flames), 4 statues (one chest statue and any other three mob statues i.e. slimes, skeletons, jellyfish), four one second timers, actuators, wire, two teleporters, lava buckets, honey buckets and other regen items (optional) and building blocks, most importantly the horsemans blade. So, without further ado, lets begin.

Start by building a stage three blocks high by roughly 15 blocks wide. Clear out an area 60 blocks wide on each side of it and fill those areas in with lava. Make the lava deep enough that it will burn the trash drops that fall saving the important drops from despawning.

View attachment 75211

The lava will also prevent mobs from spawning on either side of the arena, limiting the spawn to the stage you create. But, for mobs to spawn here, you will need to be high enough for them to do so.

Next you will need to build up 40 blocks off your stage. Here is where the workings of the farm will take place. Build two boxes, one will be your spawn point, the other will house the statues you use.

View attachment 75212

Link these two boxes with teleporters to go back and forth between them quickly. I always found using a pressure plate on the teleporter from the spawn room and a switch in the statue box best so you dont accidentally let mobs escape or accidentally teleport out.

View attachment 75213

Now time to setup the statues. Place a one second timer on top of the statue box and run all three colored wires to each of the statues. This will maximize the spawns from each statue and increase the ability of this setup to work.

View attachment 75214

Sadly I didnt get a pic of my wiring but you should get the idea. All that you do is run each color wire to each statue, and they can overlap because each color wire works independently from each other and each can be activated by the same one second timer.

Once you have tested your statues and teleporters, its time to move on to traps...

The traps I'm using are spears and flames (18 flames and 16 spears though this will work with less as well as different traps)

The first set of traps you'll want to place about 20 blocks above the stage you created, and spread them out in a way where there is a good area of effect for them. Once you have them placed, wire them and place actuators on each of them. Place a switch on top of them and wire it to the traps. Once you activate the switch, the traps will become activated. Remove the switch and the actuators. Do not turn the switch off before removing it or the traps will go back to their normal state. Once the traps are actuated, wire each horizontal row a different color and run the wires to your control area (the area where you'll turn them on and off.

View attachment 75216

Note: Spearheads come off when actuated spears retract, so creating a catch plate under your respawn box will ensure you dont get hit, but are useful for hitting mobs who fly above them.

Now on to the second set of traps above your box.

I used flame traps for this, though, spiky balls or spears work as well. Build up just a few blocks above your box. Like the traps below your box, place them in a manner that maximizes area of effect. Once they are placed how you desire them, wire them and actuate them doing the same steps as you did with the other traps you previously setup.

View attachment 75223

Place three one second timers down and wire each wire color to one of them (meaning red wire to a timer, blue to the second timer, green to the third timer. This way the traps will alternate their cycles and maximize damage. Use switches or pressure plates to activate them.

Now you have the traps done, our focus will be on the statues and melee damage and speed. Before that though, the empty space below the statues is ideal for a honey dip and there are areas that can use a campfire and heart lantern so take a little time for regen items. They help.

Now the reason behind the statues. If you have the horsemans blade, this setup makes farming easy. If you dont, this wont work cause this works through the horsemans blades homing pumpkins to farm mobs. Turn on the mob statues. Using the horsemans blade, swing into the the statue mobs and you will see homing pumpkins coming in from all sides.

View attachment 75226

These pumpkins will home in on the closest mob to them and in large clusters, do insane amounts of damage. Since the horsemans blade is also autoswing all you have to do is hold the attack button. The timer will constantly generate new mobs each time you kill them. Using a chest statue means you have a tough mob to have increased damage and crit against, while the weaker mobs increase the quantity of pumpkins as well as trigger your invulnerabilty much like sitting on a spike. The pumpkin flurry also carries any melee buffs you have as well as melee effect buffs. Ichor is devastating in wave events because the pumkins will inflict ichor debuff on any mob or boss vulnerable to it.

Armor and accessory loadout, the best is tanking armor beetle, turtle, dragon, and accessories, anything that boosts melee speed, emblems, regen, invulnerabilty, set to menacing, lucky, or increased melee speed, any one of those should work. I used beetle armor, fire gauntlet, avenger and destroyer emblems, celestial stone and ankh shield.

Potions include ironskin, regen, well fed items, ichor flask, tipsy items for damage and thats it. Regen speed increases because you are not moving from the box.

Results...

View attachment 75229

Wave 11 by 10:30 Wave 18 by 1:45 Wave 20 by 4:15

View attachment 75230

Hope this helps out those who are asking. If you have any questions, comments, constructive criticism, feel free to ask or comment.
Would using 4 shark statues work cause I've been searching for statues for a week and that's all I've found
 
Back
Top Bottom