psmith
Terrarian
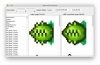
I started working on a tool which converts all Terraria textures to HD. So far it's in a really early stage so please be kind ")
Can be downloaded from here: sullerandras/terraria-hd-converter
It's written in Java so you will need to install a Java Runtime Environment to run it. Java can be downloaded from this website for example: AdoptOpenJDK or you can download it from Oracle if you wish.
Screenshot

Changelog
0.2 - 2020-06-06 - Added xBR filter which seems to be better in some cases than the xBRZ filter
0.1 - 2020-05-30 - Initial release with xBRZ filter
How to use it?
1. Locate the textures what you want to convert. The textures must be in PNG format (so Terraria's original XNB files are NOT supported yet; maybe later).
2. My app converts images from the input folder to the output folder. The input folder is currently hardcoded and it must be "temp1". The output folder can be edited, but it is "temp2" by default.
3. Once the conversion is done, create a texture pack in Terraria using the newly converted HD images.
Step-by-step instructions
1. Use TExtract to convert the Terraria XNB textures to PNG.
2. Move the PNG folder into the same folder where the terraria-hd-converter-0.1.jar is and rename it to "temp1". For example if my jar file is in your Downloads folder then move the "temp1" in your Downloads folder as well. This is going to be the input folder where my app will look for the low resolution textures.
3. Start my app by double clicking on the downloaded jar file.
4. You should see one of the textures loaded by default. See screenshot above. If you don't see that texture when my app loads then you probably put the "temp1" folder to a wrong place.
5. Click on the "Convert all" button. It takes 1-2 minutes to convert all textures (there's a progress bar on the bottom).
6. The HD textures are saved into a "temp2" folder. You will need to create a new texture pack in Terraria and copy the converted files there.
7. Create a new texture pack folder in Terraria's ResourcePacks folder, call it "HD" for example
8. Create a "pack.json" file in the "HD" folder with this content:
{
"Name": "HD",
"Author": "Your Name",
"Description": "HD",
"Version": {
"major": 0,
"minor": 1
}
}
9. Create a "Content\Images" folder in the HD folder
10. Copy or move all high definition PNG files from the "temp2" folder to the ResourcePacks\HD\Content\Images folder
11. Start Terraria and enable the HD texture pack
12. Enjoy
Can be downloaded from here: sullerandras/terraria-hd-converter
It's written in Java so you will need to install a Java Runtime Environment to run it. Java can be downloaded from this website for example: AdoptOpenJDK or you can download it from Oracle if you wish.
Screenshot
Changelog
0.2 - 2020-06-06 - Added xBR filter which seems to be better in some cases than the xBRZ filter
0.1 - 2020-05-30 - Initial release with xBRZ filter
How to use it?
1. Locate the textures what you want to convert. The textures must be in PNG format (so Terraria's original XNB files are NOT supported yet; maybe later).
2. My app converts images from the input folder to the output folder. The input folder is currently hardcoded and it must be "temp1". The output folder can be edited, but it is "temp2" by default.
3. Once the conversion is done, create a texture pack in Terraria using the newly converted HD images.
Step-by-step instructions
1. Use TExtract to convert the Terraria XNB textures to PNG.
2. Move the PNG folder into the same folder where the terraria-hd-converter-0.1.jar is and rename it to "temp1". For example if my jar file is in your Downloads folder then move the "temp1" in your Downloads folder as well. This is going to be the input folder where my app will look for the low resolution textures.
3. Start my app by double clicking on the downloaded jar file.
4. You should see one of the textures loaded by default. See screenshot above. If you don't see that texture when my app loads then you probably put the "temp1" folder to a wrong place.
5. Click on the "Convert all" button. It takes 1-2 minutes to convert all textures (there's a progress bar on the bottom).
6. The HD textures are saved into a "temp2" folder. You will need to create a new texture pack in Terraria and copy the converted files there.
7. Create a new texture pack folder in Terraria's ResourcePacks folder, call it "HD" for example
8. Create a "pack.json" file in the "HD" folder with this content:
{
"Name": "HD",
"Author": "Your Name",
"Description": "HD",
"Version": {
"major": 0,
"minor": 1
}
}
9. Create a "Content\Images" folder in the HD folder
10. Copy or move all high definition PNG files from the "temp2" folder to the ResourcePacks\HD\Content\Images folder
11. Start Terraria and enable the HD texture pack
12. Enjoy
Attachments
Last edited: