MiltVala
Plantera
So, This is my first suggestion! I almost find it weird I haven't done anything yet considering how I used to frequent the suggestion forums.
I've actually been spending about half a month passively building upon ideas, doodling, jotting notes, and this is the result!
Feel free to help rename anything cause I suck with names XD
Yes I renamed them in the last edit
 The Three Champions
 (place holder
 )
)
First off, the player must craft the Challenger's Obelisk (will be described later) and place it anywhere in the world with suitable room (it's tall). The bosses will spawn according to how many hardmode bosses have been defeated. For each boss killed, their spawn chance increases by 5%. For each boss, a segment of the obelisk will glow. The maximum percentage stackable is 50% (each segment is glowing).At the start of the day with the event active, the text "The Challengers have arrived!" and each of the bosses will spawn at the Obelisk closest to the original spawn point in their NPC forms. Yup, that's right, they start as NPCs like the clother and skeletron. And of course, they are immune to damage. To initiate the boss fight, open up the dialogue with one of them and select "challenge". All of them must be fought at once.
Unlike most bosses, if you fail, they don't despawn. They will revert to NPC form, and regain all their health. However they will drop 25% less coins each time you have lost to them (losing four times will deplete the coin drop to 0. They will stay there until they have been defeated.
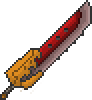
Zhan Ma Dao
Damage: 78
Knockback: 9
Max Stack: 1
Rarity:

Use Time: 26
Tooltip: Fabled for its ability to cut horses clean in half!
Holding the mouse rather than autoswing the sword will put it in "charge mode". The sword will be held above the player's head while doing so. for every 1.5 seconds held, one of the three circles on the blade will begin to glow blue. Each stack increases the size of the blade by 10% (represented by a larger blue outline of the sword. Damage is also increases by 5% per stack. This effect stacks up to three.

Silo Drake
Damage: 38
Knockback: 4
Max stack: 1
Velocity: 7
Rarity:
Use Time: 32
Fires a burst of three rockets parallel to each other at the cost of one. The player moves at -80% speed while firing.

Combustion Staff
Damage: 40
Knockback: 5
Max stack: 1
Mana: 15
Velocity: 8
Rarity:
Use Time: 25
Tooltip: The floor is on fire!
Fires a ball of Greek flame that is heavily affected by gravity, bounces twice, and pierces 5 enemies. The ball leaves a trail of Greek fire that falls to the ground and lingers for 5 seconds.

Bane of Gods
Damage: 90
Knockback: 10
Max stack: 1
Velocity: 6
Rarity:
Use Time: 35
Tooltip: The Gods tremble in your wake!
Auto swings like other hammers (but this one cannot be used as a tool). It lobs a "Ghost hammer" projectile that does 80% of the weapon's damage. The projectile will fly forward for around ten blocks before falling to the ground due to gravity.
Attack Patterns
Phase 1 40,000/40,000
He drops his trophy at this stage
10,000 health
100 damage
15 defense

Jade Fury
Damage: 68
Knockback: 8
Max stack: 1
Velocity: 12
Rarity:
Use Time: 20
Tooltip: Imbues arrows with mythical power.
Arrows shoot in a straight line for 200 blocks before arching down. Nothing very special, but it fires arrows with a much higher velocity. Arrows shot will leave a green fire particle effect

Dynasty Cannon
Damage: 70
Knockback: 3
Max stack: 1
Mana: 12
Velocity: 15
Rarity:
Use time: 15
Tooltip: Fires a piercing laser with the power of ancients. BWEEEEN!
This magic weapon fires a laser that is two blocks thick and pierces infinitely (does not no-clip blocks). However, the player cannot move while the cannon is selected. Think of it as an upgraded heat ray.

Kusanagi
Damage: 60
Knockback: 4
Max stack: 1
Rarity:
Use time: 14
Tooltip: A legendary sword, said to belong to a god.
A very fast autoswinging sword. Each hit releases 3-5 "energy shards" that deal 20% of the weapons base damage. These shards do not pierce.

Orochi Rifle
Damage: 30
Knockback: 1.8
Max stack: 1
Rarity:
Use time: 11
Tooltip: Fires a burst of eight shots, for the price of one!
A heavily upgraded version of the CAR, The Oroch rifle fires 8 round bursts. Shots fired leave a green fire particle effect and give ammunition an additional 20% chance to inflict On Fire!
Attack Patterns
Phase 1 35,000/35,000

Staff of Spirits
Damage: 75
Knockback: 8
Max stack: 1
Mana: 18
Velocity: 0.2
Rarity:
Use time: 27
Tooltip: (working on it)
This staff casts three spinning balls of light in a arc that slowly moves forward for 3 seconds. After 3 seconds have passed, the projectiles will accelerate greatly and home in on the nearest enemy. The projectiles no clip through walls, but will prefer to home on enemies not obstructed by blocks.

Cursed Brush
Damage: 50
Knockback: 3
Max stack: 1
Mana: 10
Velocity: 10
Rarity:
Use time: 27
Tooltip: Summons cursed paintings to fight for you.
Buff: Paintings have risen to fight for you
This summoning weapon will summon 4 different types of minions. A melee orientated, a ranger, a drop collector, and a buffer. (I'll add the sprites later)
The melee orientated would track enemies in a similar fashion to the minions of the pirate staff
The Ranger will hover around a target, shooting a piercing shot every 2 seconds.
The drop collector does exactly what it is supposed to do, collect drops. They will no clip through blocks to collect drops and go back to you with the drops. hey can pick up one stack of items each trip.
The Buffer will stay near you, giving you the buff "Ink shield" ( +2 Defense, +2 HP/s Life regen, +5% damage, +20% minion knockback) you can have a maximum of two of these.
Due to the way the staff works, You will get four different minion buff icons. The staff will normally cycle between all four minions in the order of melee, ranged, collector, and buffer before cycling back. However, clicking on an existing minion will summon a minion of the same type.

Heart Piercer
Damage: 60
Knockback: 0
Max stack: 1
Velocity: 14
Rarity:
Use time: 18
Tooltip: Latches onto enemies, forcing their hearts to bleed.
When hitting an enemy, if the mouse is held down, the flail would latch onto the enemy. With each hit, the mob has a 33% chance to drop a heart.

Crystal Doormat
Damage: 50
Knockback: 1
Max stack: 1
Mana: 17
Velocity: 8
Rarity:
Use time: 27
Tooltip: Not the best way to treat a guest.
Lobs a crystal ball that is effected by gravity and latches to the first block it touches. The "door mat" would do damage to any enemy that walks on to it at a constant rate. It stays there for 7 seconds.
(This is incomplete and will be added to later) I'm about 1/3 of the way done but feel free to comment or criticize. I'd also like some help on names, but the Zhan Ma Dao stays
Update 3: Added drop info for the Shadow Mage and changed method of summoning
Update 2: renamed thread, added The Ghoul, lowered The Tank's health, changed method of summoning.
Update 1: Added summon method and the 1st boss The Tank
I've actually been spending about half a month passively building upon ideas, doodling, jotting notes, and this is the result!
Feel free to help rename anything cause I suck with names XD
Yes I renamed them in the last edit
)
These three bosses will be post-Plantera .
Summoning
First off, the player must craft the Challenger's Obelisk (will be described later) and place it anywhere in the world with suitable room (it's tall). The bosses will spawn according to how many hardmode bosses have been defeated. For each boss killed, their spawn chance increases by 5%. For each boss, a segment of the obelisk will glow. The maximum percentage stackable is 50% (each segment is glowing).At the start of the day with the event active, the text "The Challengers have arrived!" and each of the bosses will spawn at the Obelisk closest to the original spawn point in their NPC forms. Yup, that's right, they start as NPCs like the clother and skeletron. And of course, they are immune to damage. To initiate the boss fight, open up the dialogue with one of them and select "challenge". All of them must be fought at once.
Unlike most bosses, if you fail, they don't despawn. They will revert to NPC form, and regain all their health. However they will drop 25% less coins each time you have lost to them (losing four times will deplete the coin drop to 0. They will stay there until they have been defeated.
The Bosses
So this is the fun part (stats are subject to change)
All the bosses can no-clip through walls similar to Mourning Wood and Everscream
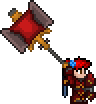
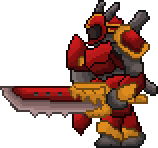
Melee boss: "The Tank"
This guy has the highest health, and is the most aggressive of the three.
40,000 health
80 damage
60 defense
Zhan Ma Dao 25% (100% for first time)
Silo Drake 25%
 Rocket I (30-50) 100% with Silo Drake
Combustion Staff 25%
Bane of Gods 25%
 Champion's Helmet 14.9% (100% on first time)
 Bulwark Shield 50%
The Tank's Trophy 10% (sprite coming soon)
The Tank's Armor 10% (sprite coming soon)
So this is the fun part (stats are subject to change)
All the bosses can no-clip through walls similar to Mourning Wood and Everscream
Melee boss: "The Tank"
This guy has the highest health, and is the most aggressive of the three.
40,000 health
80 damage
60 defense
The Tank's Trophy 10% (sprite coming soon)
The Tank's Armor 10% (sprite coming soon)
Zhan Ma Dao
Damage: 78
Knockback: 9
Max Stack: 1
Rarity:
Use Time: 26
Tooltip: Fabled for its ability to cut horses clean in half!
Holding the mouse rather than autoswing the sword will put it in "charge mode". The sword will be held above the player's head while doing so. for every 1.5 seconds held, one of the three circles on the blade will begin to glow blue. Each stack increases the size of the blade by 10% (represented by a larger blue outline of the sword. Damage is also increases by 5% per stack. This effect stacks up to three.
Silo Drake
Damage: 38
Knockback: 4
Max stack: 1
Velocity: 7
Rarity:
Use Time: 32
Fires a burst of three rockets parallel to each other at the cost of one. The player moves at -80% speed while firing.
Combustion Staff
Damage: 40
Knockback: 5
Max stack: 1
Mana: 15
Velocity: 8
Rarity:
Use Time: 25
Tooltip: The floor is on fire!
Fires a ball of Greek flame that is heavily affected by gravity, bounces twice, and pierces 5 enemies. The ball leaves a trail of Greek fire that falls to the ground and lingers for 5 seconds.
Bane of Gods
Damage: 90
Knockback: 10
Max stack: 1
Velocity: 6
Rarity:
Use Time: 35
Tooltip: The Gods tremble in your wake!
Auto swings like other hammers (but this one cannot be used as a tool). It lobs a "Ghost hammer" projectile that does 80% of the weapon's damage. The projectile will fly forward for around ten blocks before falling to the ground due to gravity.
Attack Patterns
Phase 1 40,000/40,000
- Slowly walks toward you (think paladin)
- Lunges at you with his sword 3 times with brief pauses in between.
- Stands in one place, and fire a volley of three homing missiles from his chest. These are fast moving and have 100 health, 100 defense, and do 70 damage. They explode when destroyed inflicting damage if you are too close.
- restarts pattern
- Runs at you with greatly increased speed.
- Lunges at you with increased speed and has a 33% chance to perform an "upward swing" in the case that the player has flown above him.
- Fires a rapid bust of 8 missiles (same as previous but with no pause) and then shoots a Greek fire projectile that bounces, coating the floor with fire that does 50 damage and lingers for 10 seconds
- Will jump up attempting to land on you and then restarts pattern
He drops his trophy at this stage
10,000 health
100 damage
15 defense
- Charges at you directly with insane amounts of speed and will go airborne for short periods of time if needed.
- Fires a constant barrage of missiles that continues for 5 seconds.
- Charges at you again but leaves Greek fire behind him that last 20 seconds and linger in the air for an average amount of time.
- Swings his sword down sending a large shockwave projectile towards you that does 100 damage.
- restarts pattern
Ranged Boss: "The Ghoul"
This guy tends to stay further away and focuses on attacking the player via range.
(sprite coming soon)
35,000 health
50 damage
30 defense
Jade Fury 25% (100% on first time)
Dynasty Cannon 25%
Kusanagi 25%
Orochi Rifle 25%
 Champion's Headdress 14.9% (100% on first try)
(sprite coming soon) Shoulder Ballista 50%
(sprite coming soon) The Ghoul's Trophy 10%
(sprite coming soon) The Ghoul's Armor 10%
This guy tends to stay further away and focuses on attacking the player via range.
(sprite coming soon)
35,000 health
50 damage
30 defense
(sprite coming soon) Shoulder Ballista 50%
(sprite coming soon) The Ghoul's Trophy 10%
(sprite coming soon) The Ghoul's Armor 10%
Jade Fury
Damage: 68
Knockback: 8
Max stack: 1
Velocity: 12
Rarity:
Use Time: 20
Tooltip: Imbues arrows with mythical power.
Arrows shoot in a straight line for 200 blocks before arching down. Nothing very special, but it fires arrows with a much higher velocity. Arrows shot will leave a green fire particle effect
Dynasty Cannon
Damage: 70
Knockback: 3
Max stack: 1
Mana: 12
Velocity: 15
Rarity:
Use time: 15
Tooltip: Fires a piercing laser with the power of ancients. BWEEEEN!
This magic weapon fires a laser that is two blocks thick and pierces infinitely (does not no-clip blocks). However, the player cannot move while the cannon is selected. Think of it as an upgraded heat ray.
Kusanagi
Damage: 60
Knockback: 4
Max stack: 1
Rarity:
Use time: 14
Tooltip: A legendary sword, said to belong to a god.
A very fast autoswinging sword. Each hit releases 3-5 "energy shards" that deal 20% of the weapons base damage. These shards do not pierce.
Orochi Rifle
Damage: 30
Knockback: 1.8
Max stack: 1
Rarity:
Use time: 11
Tooltip: Fires a burst of eight shots, for the price of one!
A heavily upgraded version of the CAR, The Oroch rifle fires 8 round bursts. Shots fired leave a green fire particle effect and give ammunition an additional 20% chance to inflict On Fire!
Attack Patterns
Phase 1 35,000/35,000
- Tries to sticks to either the left or right side edge of the screen.
- Shoots a very fast non-arching arrow in your direction dealing 80 damage in a slow constant rate.
- Occasionally charges forward attempting to ram the player dealing contact damage.
- Jumps back to edge of screen and restarts pattern
- Begins firing bursts of bullets in the player's general direction in short intervals, shots have a spread of 20 degrees and each shot does 60 damage.
- Hovers above you and strafes the ground with yellow "Dynasty lasers" before retuning back to the side of the screen.
- Fires a salvo of arrows into the air which rain down over the player (same arrows of phase 1)
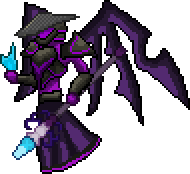
Magic/Summoner Boss: "The Shadow Mage"
She (yes she, it will be clearer when I make their NPC sprites) focusses on summoning minions, and later AOE type attacks.
30,000 health
70 damage
25 defense
Staff of Spirits 25% (100% on first time)
Cursed Brush 25%
Heart Piercer 25%
Crystal Doormat 25%
 Champion's Hat 14.5% (100% on first time)
(sprite coming soon) Ink Wings 50%
(sprite coming soon) Shadow Mage Trophy 10%
(sprite coming soon) Shadow Mage Robes 10%
She (yes she, it will be clearer when I make their NPC sprites) focusses on summoning minions, and later AOE type attacks.
30,000 health
70 damage
25 defense
(sprite coming soon) Ink Wings 50%
(sprite coming soon) Shadow Mage Trophy 10%
(sprite coming soon) Shadow Mage Robes 10%
Staff of Spirits
Damage: 75
Knockback: 8
Max stack: 1
Mana: 18
Velocity: 0.2
Rarity:
Use time: 27
Tooltip: (working on it)
This staff casts three spinning balls of light in a arc that slowly moves forward for 3 seconds. After 3 seconds have passed, the projectiles will accelerate greatly and home in on the nearest enemy. The projectiles no clip through walls, but will prefer to home on enemies not obstructed by blocks.
Cursed Brush
Damage: 50
Knockback: 3
Max stack: 1
Mana: 10
Velocity: 10
Rarity:
Use time: 27
Tooltip: Summons cursed paintings to fight for you.
Buff: Paintings have risen to fight for you
This summoning weapon will summon 4 different types of minions. A melee orientated, a ranger, a drop collector, and a buffer. (I'll add the sprites later)
The melee orientated would track enemies in a similar fashion to the minions of the pirate staff
The Ranger will hover around a target, shooting a piercing shot every 2 seconds.
The drop collector does exactly what it is supposed to do, collect drops. They will no clip through blocks to collect drops and go back to you with the drops. hey can pick up one stack of items each trip.
The Buffer will stay near you, giving you the buff "Ink shield" ( +2 Defense, +2 HP/s Life regen, +5% damage, +20% minion knockback) you can have a maximum of two of these.
Due to the way the staff works, You will get four different minion buff icons. The staff will normally cycle between all four minions in the order of melee, ranged, collector, and buffer before cycling back. However, clicking on an existing minion will summon a minion of the same type.
Heart Piercer
Damage: 60
Knockback: 0
Max stack: 1
Velocity: 14
Rarity:
Use time: 18
Tooltip: Latches onto enemies, forcing their hearts to bleed.
When hitting an enemy, if the mouse is held down, the flail would latch onto the enemy. With each hit, the mob has a 33% chance to drop a heart.
Crystal Doormat
Damage: 50
Knockback: 1
Max stack: 1
Mana: 17
Velocity: 8
Rarity:
Use time: 27
Tooltip: Not the best way to treat a guest.
Lobs a crystal ball that is effected by gravity and latches to the first block it touches. The "door mat" would do damage to any enemy that walks on to it at a constant rate. It stays there for 7 seconds.
(This is incomplete and will be added to later) I'm about 1/3 of the way done but feel free to comment or criticize. I'd also like some help on names, but the Zhan Ma Dao stays
Update 3: Added drop info for the Shadow Mage and changed method of summoning
Update 2: renamed thread, added The Ghoul, lowered The Tank's health, changed method of summoning.
Update 1: Added summon method and the 1st boss The Tank
Last edited: