Clara
Terrarian
Hiya, this is the master thread in a series covering the mechanics in the Tales of the Terrarian 1.3.1 Map
This thread covers the wiring and mechanics throughout the map, including smaller and simpler parts.
Here is a series explaining the more complex wiring systems in the map:
Part 1: Power Generator
Part 2: Combining Player Sensors
Part 3: Shooting Minigame
Part 4: Mechanical Boss
Map Making
Most of the wiring here is very simple, what is important when adding mechanisms in an adventure map is to try to make the map enjoyable, not try to create the most complex wiring systems. Integrating wiring with good map design is what you should be trying to do, this is very important to keep in mind.
Core Mechanics
Beginning
Area 1 - Haunted House
Area 2 - Cultist Hideout
Area 3 - Frozen Castle
Area 4 - Overgrown Dungeon
Area 5 - Hell Carnival
Area 6 - Ancient Temple
Area 7 - Scientist's Lair
Final Boss
This thread covers the wiring and mechanics throughout the map, including smaller and simpler parts.
Here is a series explaining the more complex wiring systems in the map:
Part 1: Power Generator
Part 2: Combining Player Sensors
Part 3: Shooting Minigame
Part 4: Mechanical Boss
Map Making
Most of the wiring here is very simple, what is important when adding mechanisms in an adventure map is to try to make the map enjoyable, not try to create the most complex wiring systems. Integrating wiring with good map design is what you should be trying to do, this is very important to keep in mind.
Core Mechanics
These are core mechanics and little systems we use throughout the map and are very useful to know about.
One Time Activation
Sometimes you want something to only activate once, for example so a gate opens permanently or so a message is sent only once. We generally used this set up:

The input is sent via the red wire, firing the dart trap, hitting the plate at the end, sending an output signal via the blue wire and blocking off the dart trap from firing again.
There are different ways to do this, it would probably be simpler to use an OR gate with 2 OFF lamps. The input would turn on one lamp, sending an output from the logic gate. The output from the logic gate would activate the other logic lamp, so the logic gate will always be on forever, regardless of the setting of the other logic lamp.
Timers
There are different uses for timers, one thing you can do is set it to send a second signal after a second signal essentially activating something for 1/3/5 seconds, Here is an examaple:

When the blue wire is activated it turns on a torch and also turns on the 1 second timer. After 1 second the timer sends another signal via the blue wire, turning the torch off after 1 second. It also sends a signal to the logic gate lamp via the red wire (AND/OR/XOR, they all work the same with one lamp) which then sends a signal a signal back to the timer via the green wire, turning off the timer so this mini system is closed.
You can use similar logic to combine timers and create an extended period of delay or make events happen in order:

A signal is sent from the red wire at the bottom right, turning on the timer. After 1 second the timer then sends a signal via the green wire, which activates a dart trap. It also sends a signal to the logic gate which in turn sends a signal turning the timer off and activating the next timer. The whole system then repeats as it goes through different timers. Every second a different dart trap is fired. You can make different events happen at specific times using this, or create a long delay for something to happen.
Counters
Counters are used to keep track of a variable, they are a basic part in a lot of larger systems. There are 2 ways they are made in this map, one is with spear traps:


Every second the timer at the top left activates all the spear traps at once. There is one gap between a spear trap and a pressure plate (ignore the spooky wood, it is inactive when the timer is on) and when the spear traps are fired one spear will go through the gap hitting a pressure plate. The pressure plate then blocks off the gap and creates a new gap to the right, as you can see in the wiring. Every second it will count up by one. Each plate is connected to parts of a bridge, so every second a new part of the bridge becomes active, so the bridge slowly appears.
It is slightly more reliable to use logic gates in a counter:


Every time the yellow wire at the top is activated, it sends a signal to all the logic gates, which are faulty. Faulty logic gates send a signal if the lamps are on and not if they are off. So if they are all sent a signal, only the logic gate with a lamp on will then send a signal. It will turn itself off and turn the lamp on for the next logic gate, so it increases by one every time a signal is sent.
Combing Player Sensors
Merge player sensors together to cerate larger zones to detect players, this thread goes in detail about it:
http://forums.terraria.org/index.php?threads/combining-player-sensors-tales-of-the-terrarian.43910/
One Time Activation
Sometimes you want something to only activate once, for example so a gate opens permanently or so a message is sent only once. We generally used this set up:

The input is sent via the red wire, firing the dart trap, hitting the plate at the end, sending an output signal via the blue wire and blocking off the dart trap from firing again.
There are different ways to do this, it would probably be simpler to use an OR gate with 2 OFF lamps. The input would turn on one lamp, sending an output from the logic gate. The output from the logic gate would activate the other logic lamp, so the logic gate will always be on forever, regardless of the setting of the other logic lamp.
Timers
There are different uses for timers, one thing you can do is set it to send a second signal after a second signal essentially activating something for 1/3/5 seconds, Here is an examaple:

When the blue wire is activated it turns on a torch and also turns on the 1 second timer. After 1 second the timer sends another signal via the blue wire, turning the torch off after 1 second. It also sends a signal to the logic gate lamp via the red wire (AND/OR/XOR, they all work the same with one lamp) which then sends a signal a signal back to the timer via the green wire, turning off the timer so this mini system is closed.
You can use similar logic to combine timers and create an extended period of delay or make events happen in order:

A signal is sent from the red wire at the bottom right, turning on the timer. After 1 second the timer then sends a signal via the green wire, which activates a dart trap. It also sends a signal to the logic gate which in turn sends a signal turning the timer off and activating the next timer. The whole system then repeats as it goes through different timers. Every second a different dart trap is fired. You can make different events happen at specific times using this, or create a long delay for something to happen.
Counters
Counters are used to keep track of a variable, they are a basic part in a lot of larger systems. There are 2 ways they are made in this map, one is with spear traps:


Every second the timer at the top left activates all the spear traps at once. There is one gap between a spear trap and a pressure plate (ignore the spooky wood, it is inactive when the timer is on) and when the spear traps are fired one spear will go through the gap hitting a pressure plate. The pressure plate then blocks off the gap and creates a new gap to the right, as you can see in the wiring. Every second it will count up by one. Each plate is connected to parts of a bridge, so every second a new part of the bridge becomes active, so the bridge slowly appears.
It is slightly more reliable to use logic gates in a counter:


Every time the yellow wire at the top is activated, it sends a signal to all the logic gates, which are faulty. Faulty logic gates send a signal if the lamps are on and not if they are off. So if they are all sent a signal, only the logic gate with a lamp on will then send a signal. It will turn itself off and turn the lamp on for the next logic gate, so it increases by one every time a signal is sent.
Combing Player Sensors
Merge player sensors together to cerate larger zones to detect players, this thread goes in detail about it:
http://forums.terraria.org/index.php?threads/combining-player-sensors-tales-of-the-terrarian.43910/
Beginning
Switch Gate
At the start there are some switches to make the player interact with the map right at the start and ensure they have read the rules. The player must press the green and blue (3rd and 4th) switches only to open the gate:

The 3rd and 4th switches are connected to an AND gate and the other switches are all connected to an OR gate (which is functional the same as an NOR gate), both those logic gates are then connected to an AND gate. So if both the 3rd and 4th switches are flicked AND not any of the others are flicked, it would activate this final logic gate, opening the passage. This could be simplified into a single AND gate, demonstrated in this thread:
http://forums.terraria.org/index.php?threads/my-password-door-terraria-1-3-1.43805/
Storyboard
As the player walks through the first corridor, panels light up and a story is told in chat:

Player sensors are aligned to the centre of each panel, so it lights up the corresponding panel. It also sends a signal to an announcement box at every panel, via one time activation so the messages only happen once and in order.
At the start there are some switches to make the player interact with the map right at the start and ensure they have read the rules. The player must press the green and blue (3rd and 4th) switches only to open the gate:

The 3rd and 4th switches are connected to an AND gate and the other switches are all connected to an OR gate (which is functional the same as an NOR gate), both those logic gates are then connected to an AND gate. So if both the 3rd and 4th switches are flicked AND not any of the others are flicked, it would activate this final logic gate, opening the passage. This could be simplified into a single AND gate, demonstrated in this thread:
http://forums.terraria.org/index.php?threads/my-password-door-terraria-1-3-1.43805/
Storyboard
As the player walks through the first corridor, panels light up and a story is told in chat:

Player sensors are aligned to the centre of each panel, so it lights up the corresponding panel. It also sends a signal to an announcement box at every panel, via one time activation so the messages only happen once and in order.
Area 1 - Haunted House
Trapped Chest
At the top of the first part of the haunted house, there is a trap chest to trick players:

Very simple, it removes the blocks below the player and solidifies the walls so they can't get out from falling.
Bow and Arrow Challenges
Underground you get a bow and endless quiver, you are presented with an easy challenge, to hit a projectile pressure plate:

Hitting it opens the path forward, it's just to teach the player the mechanics. Next there is a harder challenge:

The wiring is pretty much the same, this time you have to be a lot be a lot more accurate with your shot. The next challenge gets a bit more interesting:

The player must stand on the weighted pressure plate on the right, it opens up the gate in the middle, allowing them to shoot the target on the left. hitting the target will then close the gate, but then when the player steps off of the weighted pressure plate the gate will open. The final type of bow and arrow challenge requires some timing:

The player must shoot while they aren't on the weighted pressure plate, as standing on it will activate the blocks right next to it. Before it hits the wall they must then get on it, which opens up the blocks around the pressure plate, so the arrow will hit the plate, opening the gate for the player to progress.
Conveyor Belt Bridge
The player must traverse a bridge of conveyor belts which are constantly going back and forth, details of the wiring can be found in this thread:
http://forums.terraria.org/index.php?threads/combining-player-sensors-tales-of-the-terrarian.43910/
Power Generator
This is quite a complex wiring system so has its own thread explaining how it works:
http://forums.terraria.org/index.php?threads/power-generator-tales-of-the-terrarian.43907/
Inactive Clouds
Another simple concept, the cloud are inactive until the player jumps on top of them:

The wiring is just a player sensor connected to actuated blocks, so it will change the actuation state of the blocks when a player activates the sensor.
At the top of the first part of the haunted house, there is a trap chest to trick players:

Very simple, it removes the blocks below the player and solidifies the walls so they can't get out from falling.
Bow and Arrow Challenges
Underground you get a bow and endless quiver, you are presented with an easy challenge, to hit a projectile pressure plate:

Hitting it opens the path forward, it's just to teach the player the mechanics. Next there is a harder challenge:

The wiring is pretty much the same, this time you have to be a lot be a lot more accurate with your shot. The next challenge gets a bit more interesting:

The player must stand on the weighted pressure plate on the right, it opens up the gate in the middle, allowing them to shoot the target on the left. hitting the target will then close the gate, but then when the player steps off of the weighted pressure plate the gate will open. The final type of bow and arrow challenge requires some timing:

The player must shoot while they aren't on the weighted pressure plate, as standing on it will activate the blocks right next to it. Before it hits the wall they must then get on it, which opens up the blocks around the pressure plate, so the arrow will hit the plate, opening the gate for the player to progress.
Conveyor Belt Bridge
The player must traverse a bridge of conveyor belts which are constantly going back and forth, details of the wiring can be found in this thread:
http://forums.terraria.org/index.php?threads/combining-player-sensors-tales-of-the-terrarian.43910/
Power Generator
This is quite a complex wiring system so has its own thread explaining how it works:
http://forums.terraria.org/index.php?threads/power-generator-tales-of-the-terrarian.43907/
Inactive Clouds
Another simple concept, the cloud are inactive until the player jumps on top of them:

The wiring is just a player sensor connected to actuated blocks, so it will change the actuation state of the blocks when a player activates the sensor.
Area 2 - Cultist Hideout
Player Trap
A cute little trap which forces the player to escape by falling down:

It activates the blocks around the player and gives no room for the player to get off of the weighted pressure plate, so they are forced to drop down. If you're really sadistic you could make it so the player can't get out at all by replacing the platform capturing yourself a Terrarian.
Granite Golem Fight
Another sneaky trap, the player is suddenly confronted with a fight against a granite golem:

The player jumps to the platform at the top, but the player sensor deactivate it so the player falls down. A signal is sent to block the player in by closing the wall on the left, and a granite golem is spawned. A timer is used and after several seconds it sends a signal back, opening the wall and activating the platforms for the player to progress.
Minecart Bridge
This challenge uses combined player sensors, there are more details in this thread:
http://forums.terraria.org/index.php?threads/combining-player-sensors-tales-of-the-terrarian.43910/
A cute little trap which forces the player to escape by falling down:

It activates the blocks around the player and gives no room for the player to get off of the weighted pressure plate, so they are forced to drop down. If you're really sadistic you could make it so the player can't get out at all by replacing the platform capturing yourself a Terrarian.
Granite Golem Fight
Another sneaky trap, the player is suddenly confronted with a fight against a granite golem:

The player jumps to the platform at the top, but the player sensor deactivate it so the player falls down. A signal is sent to block the player in by closing the wall on the left, and a granite golem is spawned. A timer is used and after several seconds it sends a signal back, opening the wall and activating the platforms for the player to progress.
Minecart Bridge
This challenge uses combined player sensors, there are more details in this thread:
http://forums.terraria.org/index.php?threads/combining-player-sensors-tales-of-the-terrarian.43910/
Area 3 - Frozen Castle
Logic Gate Shooting
The player must hit all the projectile pressure plates to turn on all the logic lamps:

When all the lamps are on it will activate the AND logic gate, opening up a passage.
Wire Bulb Gate
The 4 switches must be pressed to progress:

The switches are all connected to an AND logic gate, so the gate will open when they are all switched. All the 4 switches have a different wire colour passing through a wire bulb, showing off the new item, which lights up in a corner with the colour of wire that is activated and passed through it.
Player Sensor Zone
Another use of combining player sensors, as featured in this thread:
http://forums.terraria.org/index.php?threads/combining-player-sensors-tales-of-the-terrarian.43910/
Staircase
The platforms activate as the player climbs the staircase:

Player sensors are connected to the platforms, so they activate when the player jumps on top of them, creating a cool effect of the staircase following the player.
Underwater Projectile Plate Gate
The player needs to hit both pressure plates within 1 second to open the gate:

Each plate activates a logic lamp in an AND gate. But each plate is also connected to a timer which turns itself off after 1 second. So to activate the logic gate both plates need to be hit within 1 second. The logic gate then goes to a one time activation, opening the gate permanently.
Broken Power Generator
The lever does not open the gate until power is restored:

The lever activates a logic lamp on an AND logic gate, but it is connected to a timer so it turns off after a few seconds. A lever below restores the power, it turns on the other logic lamp. When the lever here is then next pressed it will open the gate as the logic gate will be activated.
The player must hit all the projectile pressure plates to turn on all the logic lamps:

When all the lamps are on it will activate the AND logic gate, opening up a passage.
Wire Bulb Gate
The 4 switches must be pressed to progress:

The switches are all connected to an AND logic gate, so the gate will open when they are all switched. All the 4 switches have a different wire colour passing through a wire bulb, showing off the new item, which lights up in a corner with the colour of wire that is activated and passed through it.
Player Sensor Zone
Another use of combining player sensors, as featured in this thread:
http://forums.terraria.org/index.php?threads/combining-player-sensors-tales-of-the-terrarian.43910/
Staircase
The platforms activate as the player climbs the staircase:

Player sensors are connected to the platforms, so they activate when the player jumps on top of them, creating a cool effect of the staircase following the player.
Underwater Projectile Plate Gate
The player needs to hit both pressure plates within 1 second to open the gate:

Each plate activates a logic lamp in an AND gate. But each plate is also connected to a timer which turns itself off after 1 second. So to activate the logic gate both plates need to be hit within 1 second. The logic gate then goes to a one time activation, opening the gate permanently.
Broken Power Generator
The lever does not open the gate until power is restored:

The lever activates a logic lamp on an AND logic gate, but it is connected to a timer so it turns off after a few seconds. A lever below restores the power, it turns on the other logic lamp. When the lever here is then next pressed it will open the gate as the logic gate will be activated.
Area 4 - Overgrown Dungeon
Labyrinth
Wiring wise this isn't very complex, you must flick levers to navigate to the exit at the top right:

Each lever toggles the state of different gates. If the lever at the bottom right is lever A, the one at the right is lever B and the one at the top left is lever C then this is order the player must flick them:
A > hit projectile pressure plate at bottom > B > A > C > B > A
Waterbolt Challenges
There are a series of waterbolt challenges where you must hit projectile presure plates with the waterbolt, here is the first one:

The waterbolt must be shoot directly horizontally so it bounces between the the projectile rpessure plates, alternating which gates are open, so the player can go through them while the waterbolt bounces. The next challenge is similar:

Bounce the waterbolt horizontally while you go to the weighted pressure plate at the top, opening a gate for the waterbolt to hit the projectile pressure plate, letting the player advance. This one uses a timer:

The projectile pressure plate is connected to a timer, so the gate will only be open for a second before closing, so you must bounce the waterbolt so you are close enough to the gate to get past in time. Here there are two plates connected to timers:

Each of the plates is connected to a 5 second timer, and they are connected to different lamps on an AND gate. So they both need to be activated within 5 second for the platform to activate, and the player must quickly jump onto the platform and move on. In the final room there are a bunch of platforms that only stay activate for 5 seconds:

The projectile pressure plates must be hit in the right order, activating the platforms in the right order, if they do it in the wrong order or slowly the platforms disappear after 5 seconds.
Wiring wise this isn't very complex, you must flick levers to navigate to the exit at the top right:

Each lever toggles the state of different gates. If the lever at the bottom right is lever A, the one at the right is lever B and the one at the top left is lever C then this is order the player must flick them:
A > hit projectile pressure plate at bottom > B > A > C > B > A
Waterbolt Challenges
There are a series of waterbolt challenges where you must hit projectile presure plates with the waterbolt, here is the first one:

The waterbolt must be shoot directly horizontally so it bounces between the the projectile rpessure plates, alternating which gates are open, so the player can go through them while the waterbolt bounces. The next challenge is similar:

Bounce the waterbolt horizontally while you go to the weighted pressure plate at the top, opening a gate for the waterbolt to hit the projectile pressure plate, letting the player advance. This one uses a timer:

The projectile pressure plate is connected to a timer, so the gate will only be open for a second before closing, so you must bounce the waterbolt so you are close enough to the gate to get past in time. Here there are two plates connected to timers:

Each of the plates is connected to a 5 second timer, and they are connected to different lamps on an AND gate. So they both need to be activated within 5 second for the platform to activate, and the player must quickly jump onto the platform and move on. In the final room there are a bunch of platforms that only stay activate for 5 seconds:

The projectile pressure plates must be hit in the right order, activating the platforms in the right order, if they do it in the wrong order or slowly the platforms disappear after 5 seconds.
Area 5 - Hell Carnival
Shooting Minigame
Probably the most complex system in the map, there are more details in this thread:
http://forums.terraria.org/index.php?threads/shooting-minigame-tales-of-the-terrarian.43914/
Target Shooting
There are targets of increasing difficulty to hit, giving different prizes:

The player stands on the weighted pressure plate, opening up gaps for them to shoot through. The first target can easily be hit by a bow/waterbolt, dropping a heart from above. The second one must be hit by shooting the waterbolt through the second gap, and opens up the path downwards. The third target can only be hit with the flower of fire, it opens up a room with a life crystal.
Boulder Obstacles
Another small but cute part of the map, simple wiring but it adds to the immersion a lot:

Shooting the projectile pressure plates release the boulder, opening the path but creating an obstacle.
Rotating Geysers
Geysers underneath ash platforms in lava rotate from left to right:

When the player activates the player sensor to the left a dart trap fires at the bottom, slowly going through honey and hitting 3 projectiles plates. Each plate activates one of the geysers, the final one also activates the dart trap repeating the cycle infinitely.
Flow of Fire Bounce
Here you must shoot the flower of fire so it bounces on all the projectile pressure plates inside the hut:

Each plate is connected to a timer, which opens up a gate for 1 second, letting the fireball pass if it hits the plate. With several of these in order, good aim is needed, the final plate will activate a platform for the player to advance.
Dunk the Penguin
The evil player must dunk a penguin in lava to progress:

The lever spawns in a penguin, standing on the weighted pressure plates opens up the target, where it can then be hit with the flower of fire. Hitting the target opens up a gate for the penguin to walk though, falling into lava and standing on a pressure plate which opens up a gate for the player to progress.
Circus
Inside the circus is a mesh of little puzzles, it can be confusing:

The cage with the blood zombies is a trap, attacking the player when the lever to the left is flicked. The angle of the cannon can be changed by the levers either side of it, it needs to be aimed at the targets on the right. To shoot them you first need to climb to the platform above the honey take and press the lever. There is a player sensor there that opens up one of the targets and the lever fires a cannon, hitting the target will dunk the player in the tank and active a platform to get to the lever in the middle. When you get there, standing on the pressure plate will open up the other target, pressing the elver will fire the cannon, a successful hit then opens up the platform to the left via the tightrope.
Probably the most complex system in the map, there are more details in this thread:
http://forums.terraria.org/index.php?threads/shooting-minigame-tales-of-the-terrarian.43914/
Target Shooting
There are targets of increasing difficulty to hit, giving different prizes:

The player stands on the weighted pressure plate, opening up gaps for them to shoot through. The first target can easily be hit by a bow/waterbolt, dropping a heart from above. The second one must be hit by shooting the waterbolt through the second gap, and opens up the path downwards. The third target can only be hit with the flower of fire, it opens up a room with a life crystal.
Boulder Obstacles
Another small but cute part of the map, simple wiring but it adds to the immersion a lot:

Shooting the projectile pressure plates release the boulder, opening the path but creating an obstacle.
Rotating Geysers
Geysers underneath ash platforms in lava rotate from left to right:

When the player activates the player sensor to the left a dart trap fires at the bottom, slowly going through honey and hitting 3 projectiles plates. Each plate activates one of the geysers, the final one also activates the dart trap repeating the cycle infinitely.
Flow of Fire Bounce
Here you must shoot the flower of fire so it bounces on all the projectile pressure plates inside the hut:

Each plate is connected to a timer, which opens up a gate for 1 second, letting the fireball pass if it hits the plate. With several of these in order, good aim is needed, the final plate will activate a platform for the player to advance.
Dunk the Penguin
The evil player must dunk a penguin in lava to progress:

The lever spawns in a penguin, standing on the weighted pressure plates opens up the target, where it can then be hit with the flower of fire. Hitting the target opens up a gate for the penguin to walk though, falling into lava and standing on a pressure plate which opens up a gate for the player to progress.
Circus
Inside the circus is a mesh of little puzzles, it can be confusing:

The cage with the blood zombies is a trap, attacking the player when the lever to the left is flicked. The angle of the cannon can be changed by the levers either side of it, it needs to be aimed at the targets on the right. To shoot them you first need to climb to the platform above the honey take and press the lever. There is a player sensor there that opens up one of the targets and the lever fires a cannon, hitting the target will dunk the player in the tank and active a platform to get to the lever in the middle. When you get there, standing on the pressure plate will open up the other target, pressing the elver will fire the cannon, a successful hit then opens up the platform to the left via the tightrope.
Area 6 - Ancient Temple
Multiple Plate Challenge
Here you have to hit 2 plates at the same time:
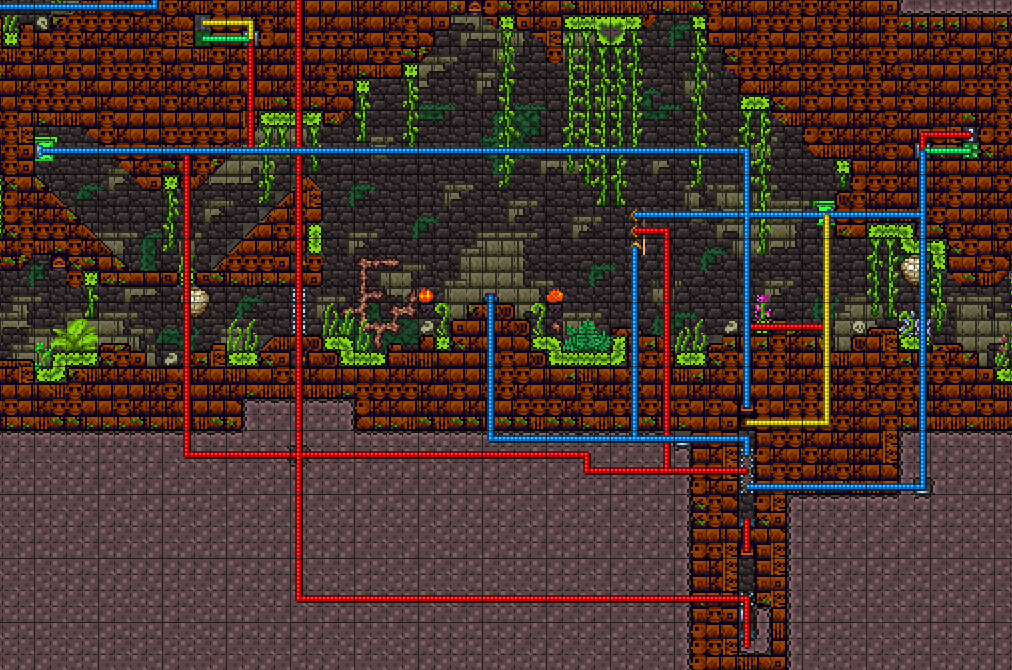
Standing on the weighted pressure plate opens up an active block at the bottom right. The 2 projectile plates will open up another block for 1 second only as they are connected to a timer, so they need to be hit in sync. They also will activate a spear trap, so if all blocks are open it will go through, opening a gate.
Skeleton Fight Room
The player gets trapped in a room where they must fight skeletons:
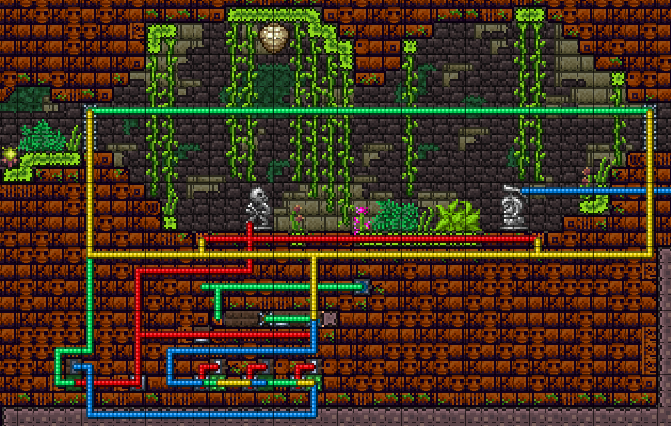
The player sensor locks the doors and starts a chain of timers. Every few seconds a skeleton will spawn and the upwards flame traps fire, until the chain of timers end, opening up the doors so the player can continue.
Spear Trap Corridor
Spear traps activate in rotation:

The player sensor activates a dart trap, which goes and activates a column of horizontal spear traps 1 by 1. At the end it activates another dart trap, activating the other column. It then cycles back to the first dart trap, endlessly shooting dart traps the player must carefully avoid.
Tetris
Sand falls down Tetris style, the players has to avoid:
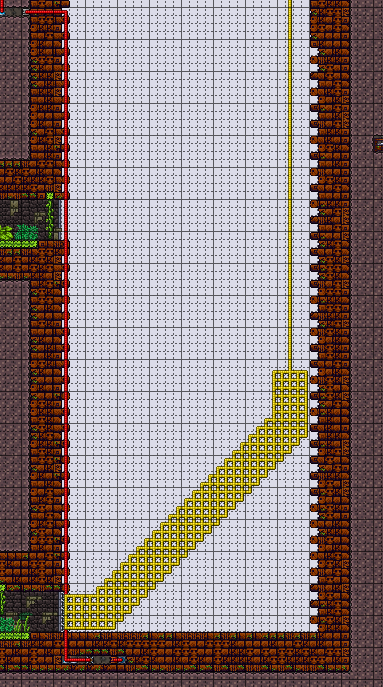
A player sensor activates a timer up above, this is where the sand falls. The sand is placed above also:
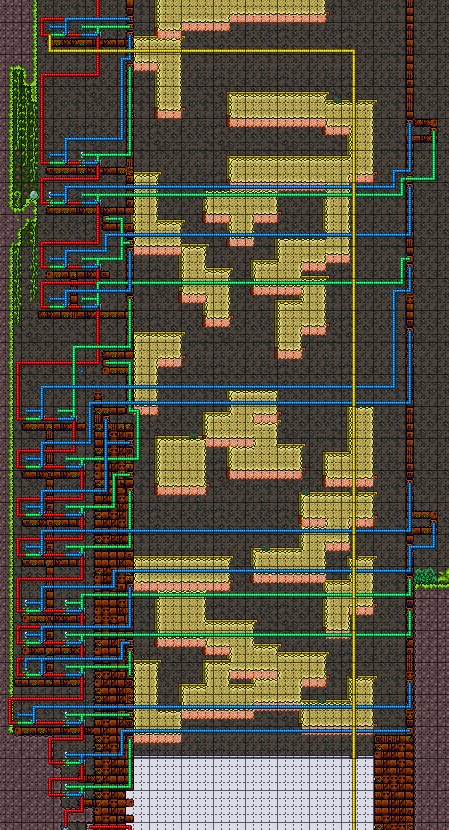
The timer is a chain of 1 second timers, every second a dart trap will fire, breaking cobweb underneath sand, dropping it into the arena. When the sand has fallen down actuators are actuated to make a path through the sand, in case the player dies and has to come back. Again the wiring here is actually very simple, what's important here is creating a fun challenge, this is one of the more interesting challenges in terms of gameplay.
Here you have to hit 2 plates at the same time:
Standing on the weighted pressure plate opens up an active block at the bottom right. The 2 projectile plates will open up another block for 1 second only as they are connected to a timer, so they need to be hit in sync. They also will activate a spear trap, so if all blocks are open it will go through, opening a gate.
Skeleton Fight Room
The player gets trapped in a room where they must fight skeletons:
The player sensor locks the doors and starts a chain of timers. Every few seconds a skeleton will spawn and the upwards flame traps fire, until the chain of timers end, opening up the doors so the player can continue.
Spear Trap Corridor
Spear traps activate in rotation:
The player sensor activates a dart trap, which goes and activates a column of horizontal spear traps 1 by 1. At the end it activates another dart trap, activating the other column. It then cycles back to the first dart trap, endlessly shooting dart traps the player must carefully avoid.
Tetris
Sand falls down Tetris style, the players has to avoid:
A player sensor activates a timer up above, this is where the sand falls. The sand is placed above also:
The timer is a chain of 1 second timers, every second a dart trap will fire, breaking cobweb underneath sand, dropping it into the arena. When the sand has fallen down actuators are actuated to make a path through the sand, in case the player dies and has to come back. Again the wiring here is actually very simple, what's important here is creating a fun challenge, this is one of the more interesting challenges in terms of gameplay.
Area 7 - Scientist's Lair
Cube with 2 Paths
To get from one side to another, it randomly chooses one path which is safe, indicating the safe path with an arrow or the unsafe path with a cross:
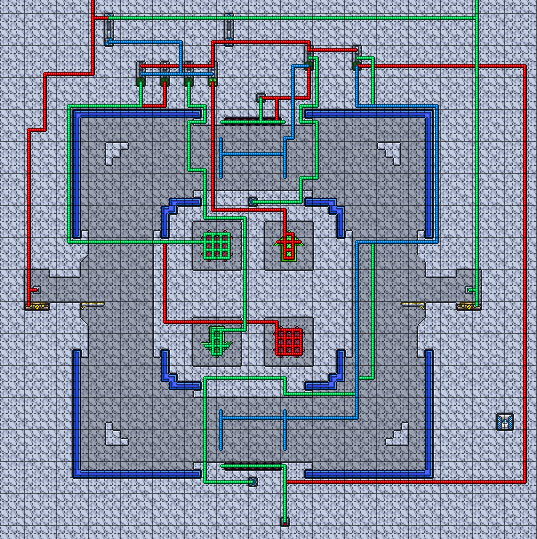
Whenever the player enters here via a teleporter it sets off the 2 50/50 faulty gate randomisers at the top. These then randomly choose which path is safe and whether to indicate it with an arrow or cross. When a player goes through a path a player sensor goes and checks whether the path is safe or not via an AND gate, and if it isn't it activates spear traps to hurt the player.
Rotating Spikes
Spikes actuate in rotation, so the player must go through the path of the spikes while they are inactive:
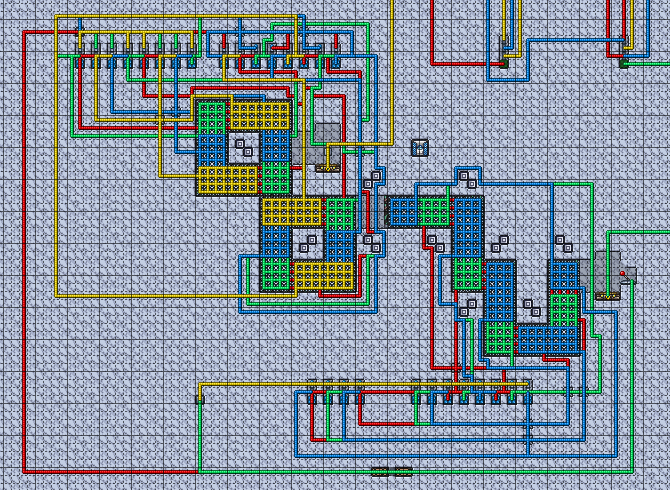
There's a lot of wiring here, there are 2 sections of rotating spikes. Each one is on a timer, the timer goes through a counter, the counter connected to different segments of the spikes. That's all the logic it to it really, counters are mentioned at the start of the thread on how they work. Otherwise all the wiring is connecting each part of the counters to parts of the spikes.
Maths Puzzle
Here you have to flick several switches to change what numbers appear, to correct a correct equation:
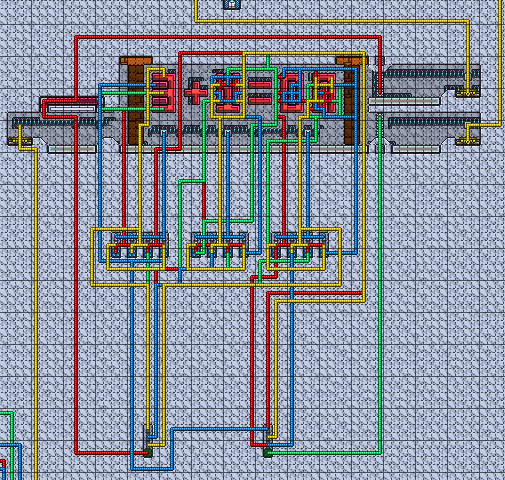
There are 3 numbers at one time, each one has a switch which cycles though 4 different numbers. It uses a counter to change them, which are in the middle of this image. The counter also changes which number visually appears by changing which gemspark blocks are lit up. When they are in the right combination, each counter will light up a lamp on an AND gate, so the AND gate will open up a path. There are 2 combinations of numbers which will do this.
Arrow Room
Everything is shadow painted except for arrows telling you to go, which appear when you need to change direction:
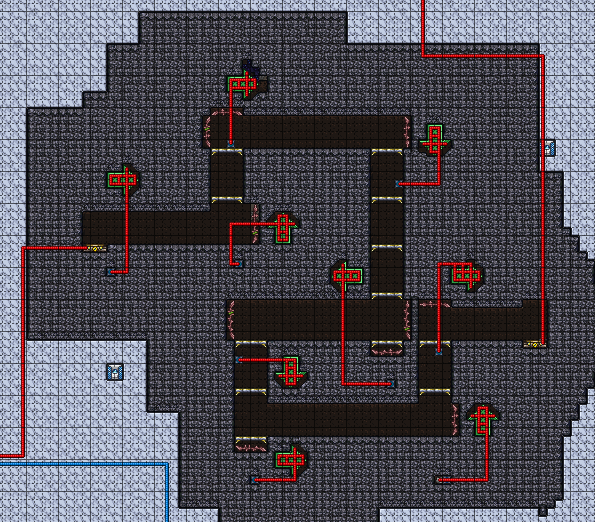
If you go too fast you will hit spikes. Player sensors tell when the player is close, lighting up the arrow so the player can change direction.
Multiple Plate Challenge
There is a projectile pressure plate which must be hit at different position to open different gates:
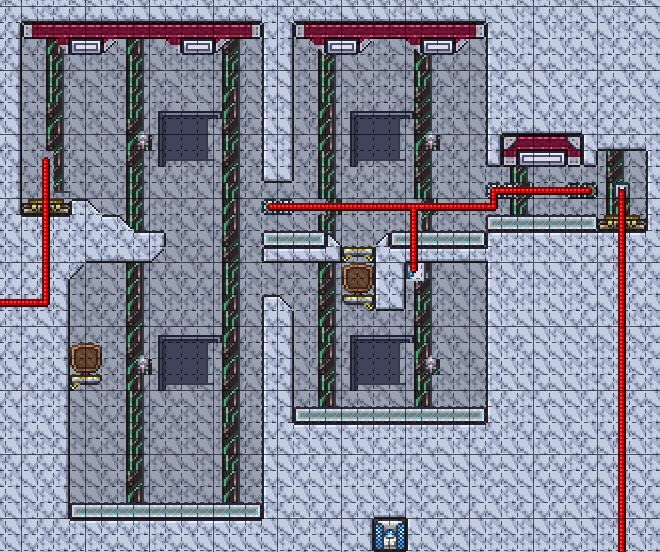
The player comes from the left and must use the flower of fire to hit the plate, letting them into the right side. There they must use the water bolt to bounce and slowly reach the plate, giving them enough time to get in the gate at the right, which will then toggle when the plate is hit, letting them pass if they got in fast enough.
Companion Cube Passage
The companion cube must go through a passage to open a gate:
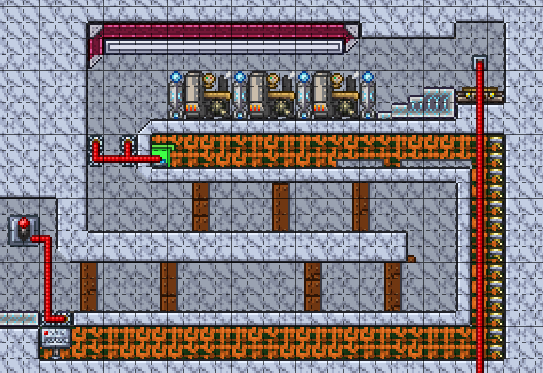
This just uses the fact that the companion cube activates projectile pressure plates, so when it gets to the end of the passage it opens the gate.
Artificial Rooms
A logic puzzle, you must flick levers in the right order to get to the end:
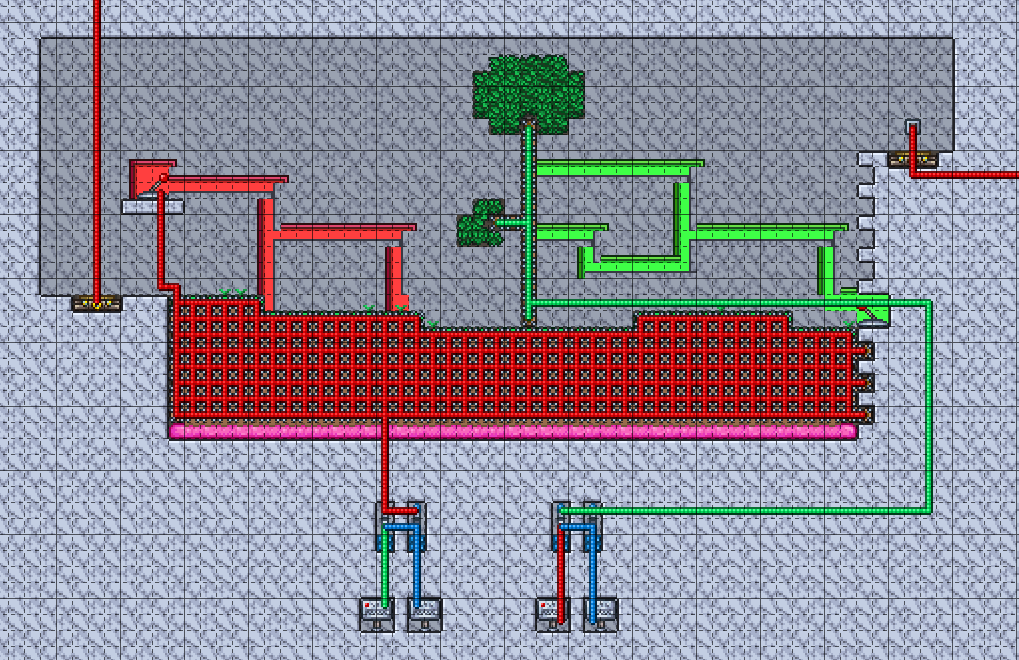
Each lever is connected to one block type, activating/inactivating them. They are positioned so it is a puzzle to figure out the order you have to press them. It also activates a counter which only counts twice, so it will alternatively activate 2 different announcement boxes, saying whether the blocks are activated or not.
Incinerator
The player must sacrifice their companion cube into lava:
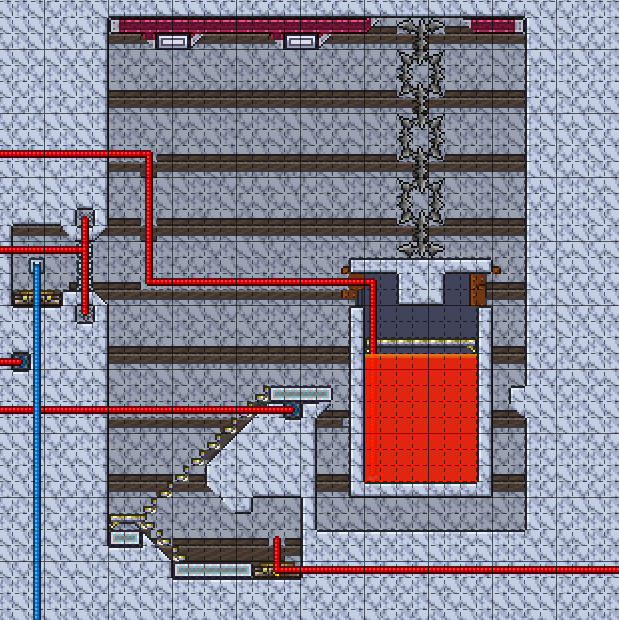
A projectile pressure plate is hidden in the lava, detecting if the cube went into lava and opening the gate if so.
To get from one side to another, it randomly chooses one path which is safe, indicating the safe path with an arrow or the unsafe path with a cross:
Whenever the player enters here via a teleporter it sets off the 2 50/50 faulty gate randomisers at the top. These then randomly choose which path is safe and whether to indicate it with an arrow or cross. When a player goes through a path a player sensor goes and checks whether the path is safe or not via an AND gate, and if it isn't it activates spear traps to hurt the player.
Rotating Spikes
Spikes actuate in rotation, so the player must go through the path of the spikes while they are inactive:
There's a lot of wiring here, there are 2 sections of rotating spikes. Each one is on a timer, the timer goes through a counter, the counter connected to different segments of the spikes. That's all the logic it to it really, counters are mentioned at the start of the thread on how they work. Otherwise all the wiring is connecting each part of the counters to parts of the spikes.
Maths Puzzle
Here you have to flick several switches to change what numbers appear, to correct a correct equation:
There are 3 numbers at one time, each one has a switch which cycles though 4 different numbers. It uses a counter to change them, which are in the middle of this image. The counter also changes which number visually appears by changing which gemspark blocks are lit up. When they are in the right combination, each counter will light up a lamp on an AND gate, so the AND gate will open up a path. There are 2 combinations of numbers which will do this.
Arrow Room
Everything is shadow painted except for arrows telling you to go, which appear when you need to change direction:
If you go too fast you will hit spikes. Player sensors tell when the player is close, lighting up the arrow so the player can change direction.
Multiple Plate Challenge
There is a projectile pressure plate which must be hit at different position to open different gates:
The player comes from the left and must use the flower of fire to hit the plate, letting them into the right side. There they must use the water bolt to bounce and slowly reach the plate, giving them enough time to get in the gate at the right, which will then toggle when the plate is hit, letting them pass if they got in fast enough.
Companion Cube Passage
The companion cube must go through a passage to open a gate:
This just uses the fact that the companion cube activates projectile pressure plates, so when it gets to the end of the passage it opens the gate.
Artificial Rooms
A logic puzzle, you must flick levers in the right order to get to the end:
Each lever is connected to one block type, activating/inactivating them. They are positioned so it is a puzzle to figure out the order you have to press them. It also activates a counter which only counts twice, so it will alternatively activate 2 different announcement boxes, saying whether the blocks are activated or not.
Incinerator
The player must sacrifice their companion cube into lava:
A projectile pressure plate is hidden in the lava, detecting if the cube went into lava and opening the gate if so.
Final Boss
The final boss, this thread details how it works:
http://forums.terraria.org/index.php?threads/mechanical-boss-tales-of-the-terrarian.43920/
http://forums.terraria.org/index.php?threads/mechanical-boss-tales-of-the-terrarian.43920/
