Boffin
Brain of Cthulhu
Hello! Welcome to my tutorial where I will go through the many aspects of world generation!
Currently in this tutorial:
- Generating Ore
- Generating Buildings
- Making custom caves using a modified function (free code!)
- Creating chests and adding loot (in the buildings section)
- ModWorld overrides and how to use them
Tile ID List: http://dev.willhuxtable.com/ids/#tile
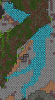
So, before I go into the depths of doing some other things, I'm going to explain Terraria's odd system for x and y co-ordinates. In the spoiler below is an image I created showing how Terraria's system works in comparison to the usual x and y.
WHERE TO PUT THE CODE
The code needs to be placed in a .cs file that has a class that extends ModWorld. So, your standard MWorld.cs file would look like this:
Now, there are two different functions that you can override to place your code in. WorldGenPostGen() is called after the main world is generated. WorldGenModifyTaskLisk(List<WorldGenTask> list) is the best way to do it but the most tricky. This allows you to place your WorldGenTask into the list at any point, and also allows you to delete some of it. So, you could technically, for example, stop the jungle from generating. You could copy the vanilla code for the Jungle, and edit it to make your own jungle biome and replace the existing one. This can be done via the list variable provided. "list" contains all of the tasks, so you can delete them all (and crash your game) or be sensible
Now, there are a few different things you can do with list:
) in the list. Add, well, adds it on to the end of the list (so basically just WorldGenPostGen()) and RemoveAt allows you remove at any index (see spoiler). Here is an example of how to use these:
ORES
So, there are a few steps in generating an ore. The function used for generating ores is WorldGen.OreRunner(int i, int j, double strength, int steps, ushort type). I and J are the x and y co-ordinates, strength and steps are, well, something that not a lot of people really understand but a number between 4 and 8 seems good for both of them and type is the ore / block to generate. The first thing we need to do however, is create the for loop for our ore generation:
Once you've followed the steps, your ore should generate in the world! But how about making it biome specific? (NOTE, MAY NOT ALWAYS WORK)
BUILDINGS
Buildings. Ahh, buildings. These are really fun to make! So let's get straight into it!
Wait! Before we get into it, if you want to see some of the building code from my new mod, Terramineral, click the spoiler. It's a bit more fully fledged than the tutorial code (and isn't finished, so a lil' WIP, but still works). The doors don't work, so they've been removed from this version. It has a chance to generate a table and chair! If you do decide to use this code, please at least give me credit, and if you don't, please don't say you coded it (at least don't say all of it). Thanks
Anyway, past that, let's get on with the tutorial! And yes, I could use Main.tile[x,y].type = 9001 but I'm going to use WorldGen.KillTile and WorldGen.PlaceTile etc. because then it's easier to understand where the tile's are destroyed and placed.
CAVES, HOLES AND PLACING LOTS OF BLOCKS
So this one's fun. There is a beautiful little function in WorldGen called digTunnel, which I've modified to make more compatible for you to use. I will post it here and explain what it does, and an example of how to use it!
So, there a few variables needed. The X and Y position of where the hole / sphere of blocks should be placed (I called it sphere because to the character, it would be a sphere), the size (experiment), whether or not it should place blocks and what type of block to place (if place is true). An Example of this function called could be:
Sphere(Main.maxTilesX/2, Main.maxTilesY/2, 50);
That would destroy a huge area in the center of the world.
Sphere(Main.maxTilesX/2, Main.maxTilesY/2, 50, true, 333);
That would place a ridiculous amount of platinum coin piles in the center of the world.
These can be used to make pretty awesome things, such as the World Hole in my new mod, which is a hole that goes pretty far down, with random bends etc. I will now show you how to do something similar!
RANDOM LOOT IN CHESTS / RANDOM DECIDED LOOT ETC.
Doing random loot in chests is... somewhat not random but also kind of random. You still have to decide which items to use but you can add lots to a list, making it much easier to sort your code! The code won't be implemented or shown as an image but I'm relatively sure it will work!
And that's it so far for this tutorial! Thanks for reading it! If you want to see some more tutorials, here is a handy list for your sake!
+ [Tutorial] Custom Boss - NPC AI and Server Syncing - By BlueMagic123
+ [Tutorial] Custom Dust - By BlueMagic123
+ [Tutorial] Summoner Weapon - By BlueMagic123
+ [TUTORIAL] How to make a basic flail weapon type weapon - By Gmod
+ Getting Started on Modding - By Berberborscing
+ [Tutorial] Generics and Custom JSON Properties - By MiraiMai
+ tAPI Community Resources - Development assistance for developers, by developers - By Neojin
+ [Tutorial] Projectile Guide and Implementation - By Sin Costan
Currently in this tutorial:
- Generating Ore
- Generating Buildings
- Making custom caves using a modified function (free code!)
- Creating chests and adding loot (in the buildings section)
- ModWorld overrides and how to use them
Tile ID List: http://dev.willhuxtable.com/ids/#tile
I'm going to presume that you have a decent knowledge of c#, and already know basic key terms such as class extending etc. Though I am willing to help you if you reply I don't really want to write all of your code for you.
So, before I go into the depths of doing some other things, I'm going to explain Terraria's odd system for x and y co-ordinates. In the spoiler below is an image I created showing how Terraria's system works in comparison to the usual x and y.
http://imgur.com/md5Vfafs
So, for example, if you wanted to go downwards in Y position, you would add to the Y value, and subsequently subtract from the Y value to go up in the Y Co-ordinate.
So, for example, if you wanted to go downwards in Y position, you would add to the Y value, and subsequently subtract from the Y value to go up in the Y Co-ordinate.
WHERE TO PUT THE CODE
The code needs to be placed in a .cs file that has a class that extends ModWorld. So, your standard MWorld.cs file would look like this:
Code:
using System;
using System.Collections.Generic;
using System.Linq;
using System.Text;
using System.Threading.Tasks;
using Microsoft.Xna.Framework;

using TAPI;
using Terraria;

namespace ModName
{
    class MWorld : ModWorld
    {
        public override void WorldGenPostGen()
        {
            //Code here
        }
    }
}
Now, there are two different functions that you can override to place your code in. WorldGenPostGen() is called after the main world is generated. WorldGenModifyTaskLisk(List<WorldGenTask> list) is the best way to do it but the most tricky. This allows you to place your WorldGenTask into the list at any point, and also allows you to delete some of it. So, you could technically, for example, stop the jungle from generating. You could copy the vanilla code for the Jungle, and edit it to make your own jungle biome and replace the existing one. This can be done via the list variable provided. "list" contains all of the tasks, so you can delete them all (and crash your game) or be sensible
Now, there are a few different things you can do with list:
- list.Insert(int index, WorldGenTask item)
- list.Add(WorldGenTask item)
- list.RemoveAt(int index)
) in the list. Add, well, adds it on to the end of the list (so basically just WorldGenPostGen()) and RemoveAt allows you remove at any index (see spoiler). Here is an example of how to use these:
Code:
list.Insert(19, new WorldGenTask.Action("ModName:WhatYouAreDoing", delegate
{
    //code
}));
list.Add(new WorldGenTask.Action("ModName:WhatYouAreDoing", delegate
{
    //code
}));
list.RemoveAt(14);- 0: World Terrain (DO NOT DELETE)
- 1: Dirt Tiles
- 2: Sand
- 3: Hills
- 4: Dirt Behind Dirt
- 5: Stone in the Dirt
- 6: Dirt in the Stone
- 7: Clay
- 8: Random Holes
- 9: Small Caves
- 10: Large Caves
- 11: Surface Caves
- 12: Snow Biome
- 13: Jungle Biome
- 14: Cleanup Stray Tiles (DO NOT DELETE)
- 15: Floating Islands
- 16: Mushroom Patches
- 17: Mud in the Dirt
- 18: Silt
- 19: Ores
- 20: Webs
- 21: Underworld
- 22: Water Bodies
- 23: Dungeon
- 24: Crimson / Corruption
- 25: Slush and Ice
- 26: Mountain Caves
- 27: Beaches
- 28: Gems
- 29: Sand Gravity (this isn't the actual sand gravity, this is just so that sand that is floating fills in empty space beneath before the world starts (hence the large sand pillars underground)
- 30: Clean Dirt Background (DO NOT DELETE)
- 31: Pyramid
- 32: Dirty rock runner (Probably best not to delete, but meh)
- 33: Living Trees
- 34: Altars
- 35: Liquid Modifier (DO NOT DELETE)
- 36: Jungle Temple
- 37: Hornet Nests
- 38: Smoothing (DO NOT DELETE)
- 39: Settling Liquids
- 40: Waterfalls (Probably best not to delete, but meh)
- 41: Make Watery Ice Thing (that's how it's written in the code lol)
- 42: Life Crystals (Great for custom life crystals!)
- 43: Statues
- 44: Treasure
- 45: Treasure: The Sequel
- 46: Jungle Treasure
- 47: Ocean Treasure
- 48: Spider Caves (Delete if you have arachnophobia, though no poison staff )
- 49: Gem Caves
- 50: Moss
- 51: Jungle Temple 2 (Idk)
- 52: Cave Walls
- 53: Underground Tress
- 54: Islands Houses
- 55: Traps (for the paranoid)
- 56: Breakables (pots etc.)
- 57: Hellforges
- 58: Spread Grass
- 59: Rubbish
- 60: Cacti
- 61: Find Spawn (DO NOT DELETE)
- 62: Leafy walls
- 63: Spawn Guide
- 64: Sunflowers
- 65: Trees
- 66: Herbs
- 67: Extra Scenery
- 68: Weeds
- 69: Vines (Don't laugh)
- 70: Flowers
- 71: Mushrooms
- 72: Extra Scenery: The Sequel
- 73: Gem Crystals
- 74: Moss Plants
- 75: Mud Walls
- 76: Queen Bee
- 77: World Fixes (DO NOT DELETE)
- 78: Finding Tile Frames (DO NOT DELETE)
ORES
So, there are a few steps in generating an ore. The function used for generating ores is WorldGen.OreRunner(int i, int j, double strength, int steps, ushort type). I and J are the x and y co-ordinates, strength and steps are, well, something that not a lot of people really understand but a number between 4 and 8 seems good for both of them and type is the ore / block to generate. The first thing we need to do however, is create the for loop for our ore generation:
The for loop that we will be creating will decide how many veins of the ore we'll be generating. So, our for loop will look something like this:
Where it says /*Amount of veins here*/, replace that with the number. Make sure it's an integer!
Code:
for (int amount = 0; amount < /*Amount of veins here*/; amount++)
{
    //code here will be made later
}
Where it says /*Amount of veins here*/, replace that with the number. Make sure it's an integer!
So, now we need to get a random x and y position to generate our ore at. You can generate it at any x value (usually an ore can be generated anywhere in the x value), and the y value is up to you. There are many different values that can be used (some of these have to be converted to integers, hence the "(int)" before them!): (int)Main.worldSurface, (int)Main.rockLayer, WorldGen.lavaLine and (int)Main.hellLayer. I'm pretty sure that they are self explanatory!
So to generate our values, we'd need to do something like this:
So, again, the minimum Y value is how high up in the world the ore can spawn, so a good example would be:
So to generate our values, we'd need to do something like this:
Code:
for (int amount = 0; amount < /*Amount of veins here*/; amount++)
{
    int x = Main.rand.Next(minX, maxX);
    int y = Main.rand.Next(minY, maxY);
}
So, again, the minimum Y value is how high up in the world the ore can spawn, so a good example would be:
Code:
int y = Main.rand.Next((int)Main.worldSurface, (int)Main.hellLayer);Now, I have some examples for what steps and strength do, though like I said earlier, it's easier to just pick a random number between 3 and 8 or so.
Steps (value between 40 and 80):
http://imgur.com/Id5L5PIs
Strength (value between 40 and 80):
http://imgur.com/SYEP3t7s
So, a way to explain this is, well. Strength is how big the generation is, the steps is how many times it generates it around the original x and y. If you understand that well done. If you don't, don't worry. So the code you'll want to add now is:
Code:
for (int amount = 0; amount < /*Amount of veins here*/; amount++)
{
    int x = Main.rand.Next(minX, maxX);
    int y = Main.rand.Next(minY, maxY);
    int strength = Main.rand.Next(4, 8);
    int steps = Main.rand.Next(4, 8);
}So, now you'll want to make your tile. Just for this tutorial, in the post below this one, every now and then I will just put a link to an ore texture, if you don't want to make it yourself! I recommend making your own, but if you really can't, feel free to just use one of mine (you will have to make the item for it yourself).
So, presuming you've made your own tile, you can now add it to your code. I recommend doing it in the OreRunner instead of making a variable! My ore is called Byzanticiraniotilimbiphianitismite.
Remember to change the internal name and that to your own
So, presuming you've made your own tile, you can now add it to your code. I recommend doing it in the OreRunner instead of making a variable! My ore is called Byzanticiraniotilimbiphianitismite.
Code:
for (int amount = 0; amount < /*Amount of veins here*/; amount++)
{
    int x = Main.rand.Next(minX, maxX);
    int y = Main.rand.Next(minY, maxY);
    int strength = Main.rand.Next(4, 8);
    int steps = Main.rand.Next(4, 8);
    WorldGen.OreRunner(x, y, strength, steps, TileDef.byName["T:ByzanticiraniotilimbiphianitismiteOre"]);
}
Remember to change the internal name and that to your own
Now you don't actually have to make the variables that I made for your code, you can easily condense it down into 4 lines (including the for loop) by simply putting all of the code in the OreRunner, like so:
(Note: Remeber to replace minX, minY, maxX and maxY with the respective integers!)
Code:
for (int amount = 0; amount < /*Amount of veins here*/; amount++)
{
    WorldGen.OreRunner(Main.rand.Next(minX, maxX), Main.rand.Next(minY, maxY), Main.rand.Next(4, 8), Main.rand.Next(4, 8), TileDef.byName["T:ByzanticiraniotilimbiphianitismiteOre"]);
}
(Note: Remeber to replace minX, minY, maxX and maxY with the respective integers!)
Once you've followed the steps, your ore should generate in the world! But how about making it biome specific? (NOTE, MAY NOT ALWAYS WORK)
Now, I only really know how to make it generate on specific tiles, so doing things like Jungle and, of course, crimson and corruption, may not work. However, snow is easy!
Now, there is a special way of checking a tile's attributes, which is Main.tile[x,y]. So, to check the tile's type, you would do: ((Main.tile[x,y].type == //TILE)). So, to add this to our neat code, we could do:
The problems with doing something like a crimson or corruption biome is that most of it is made of dirt, however, you could get it to spawn in the stone! The Jungle is made of mostly mud, so you could just check for mud, however, mud is all around the world (mushroom biome), so it might not always work. Sand etc. is self explanatory. You can also get it to spawn in hell by setting the minY to (int)Main.hellLayer and the maxY to 0.
Now, there is a special way of checking a tile's attributes, which is Main.tile[x,y]. So, to check the tile's type, you would do: ((Main.tile[x,y].type == //TILE)). So, to add this to our neat code, we could do:
Code:
for (int amount = 0; amount < /*Amount of veins here*/; amount++)
{
    do{
        int x = Main.rand.Next(minX, maxX);
        int y = Main.rand.Next(minY, maxY);
    } while (Main.tile[x,y].type != 147 || Main.tile[x,y].type != 161)
    WorldGen.OreRunner(x, y, Main.rand.Next(4, 8), Main.rand.Next(4, 8), TileDef.byName["T:ByzanticiraniotilimbiphianitismiteOre"]);
}
The problems with doing something like a crimson or corruption biome is that most of it is made of dirt, however, you could get it to spawn in the stone! The Jungle is made of mostly mud, so you could just check for mud, however, mud is all around the world (mushroom biome), so it might not always work. Sand etc. is self explanatory. You can also get it to spawn in hell by setting the minY to (int)Main.hellLayer and the maxY to 0.
BUILDINGS
Buildings. Ahh, buildings. These are really fun to make! So let's get straight into it!
Wait! Before we get into it, if you want to see some of the building code from my new mod, Terramineral, click the spoiler. It's a bit more fully fledged than the tutorial code (and isn't finished, so a lil' WIP, but still works). The doors don't work, so they've been removed from this version. It has a chance to generate a table and chair! If you do decide to use this code, please at least give me credit, and if you don't, please don't say you coded it (at least don't say all of it). Thanks
public static void GenBuilding(int x, int y)
{
int high = Main.rand.Next(28, 40);
int len = Main.rand.Next(9, 17);
int floor = (int)high / 3;
int floor2 = floor * 2;
for (int num3 = 0; num3 <= len; num3++ )
{
for (int num4 = 0; num4 <= high; num4++)
{
WorldGen.KillTile(x + num3, y - num4);
}
}
for (int num3 = 1; num3 < len; num3++)
{
for (int num4 = 1; num4 < high; num4++)
{
WorldGen.KillWall(x + num3, y - num4);
WorldGen.PlaceWall(x + num3, y - num4, 5);
}
}
for (int num = 0; num <= high; num++)
{
WorldGen.PlaceTile(x, y - num, 38);
WorldGen.PlaceTile(x + len, y - num, 38);
}
for (int num2 = 0; num2 <= len; num2++)
{
WorldGen.PlaceTile(x + num2, y, 38);
WorldGen.PlaceTile(x + num2, y - high, 38);
//floors
WorldGen.PlaceTile(x + num2, y - floor, 38);
WorldGen.PlaceTile(x + num2, y - floor2, 38);
}
if (Main.rand.Next(5)==0)
{
int tX = Main.rand.Next(3, len - 3);
WorldGen.PlaceTile(x + tX, y - floor - 1, 14);
if (Main.rand.Next(2)==0)
{
WorldGen.PlaceTile(x + tX + 2, y - floor - 1, 15, false, false, -1);
}
else
{
WorldGen.PlaceTile(x + tX + 2, y - floor - 1, 15, false, false, 0);
}
}
else if (Main.rand.Next(5) == 1)
{
int tX = Main.rand.Next(3, len - 3);
WorldGen.PlaceTile(x + Main.rand.Next(3, len - 3), y - floor2 - 1, 14);
if (Main.rand.Next(2) == 0)
{
WorldGen.PlaceTile(x + tX + 2, y - floor2 - 1, 15, false, false, -1);
}
else
{
WorldGen.PlaceTile(x + tX + 2, y - floor2 - 1, 15, false, false, 0);
}
}
}
{
int high = Main.rand.Next(28, 40);
int len = Main.rand.Next(9, 17);
int floor = (int)high / 3;
int floor2 = floor * 2;
for (int num3 = 0; num3 <= len; num3++ )
{
for (int num4 = 0; num4 <= high; num4++)
{
WorldGen.KillTile(x + num3, y - num4);
}
}
for (int num3 = 1; num3 < len; num3++)
{
for (int num4 = 1; num4 < high; num4++)
{
WorldGen.KillWall(x + num3, y - num4);
WorldGen.PlaceWall(x + num3, y - num4, 5);
}
}
for (int num = 0; num <= high; num++)
{
WorldGen.PlaceTile(x, y - num, 38);
WorldGen.PlaceTile(x + len, y - num, 38);
}
for (int num2 = 0; num2 <= len; num2++)
{
WorldGen.PlaceTile(x + num2, y, 38);
WorldGen.PlaceTile(x + num2, y - high, 38);
//floors
WorldGen.PlaceTile(x + num2, y - floor, 38);
WorldGen.PlaceTile(x + num2, y - floor2, 38);
}
if (Main.rand.Next(5)==0)
{
int tX = Main.rand.Next(3, len - 3);
WorldGen.PlaceTile(x + tX, y - floor - 1, 14);
if (Main.rand.Next(2)==0)
{
WorldGen.PlaceTile(x + tX + 2, y - floor - 1, 15, false, false, -1);
}
else
{
WorldGen.PlaceTile(x + tX + 2, y - floor - 1, 15, false, false, 0);
}
}
else if (Main.rand.Next(5) == 1)
{
int tX = Main.rand.Next(3, len - 3);
WorldGen.PlaceTile(x + Main.rand.Next(3, len - 3), y - floor2 - 1, 14);
if (Main.rand.Next(2) == 0)
{
WorldGen.PlaceTile(x + tX + 2, y - floor2 - 1, 15, false, false, -1);
}
else
{
WorldGen.PlaceTile(x + tX + 2, y - floor2 - 1, 15, false, false, 0);
}
}
}
Anyway, past that, let's get on with the tutorial! And yes, I could use Main.tile[x,y].type = 9001 but I'm going to use WorldGen.KillTile and WorldGen.PlaceTile etc. because then it's easier to understand where the tile's are destroyed and placed.
Now, the code I am doing is going to be in a function that takes in the x and y positions, so before all of it, I will add:
So, the variables we are going to randomly make are the length and height. You don't have to, but it makes it more interesting.
Code:
int x = Main.rand.Next(200, Main.maxTilesX);
int y = Main.rand.Next((int)Main.rockLayer, WorldGen.lavaLine);
GenBuilding(x, y);

public static void GenBuilding(int x, int y)
{
    //code
}
So, the variables we are going to randomly make are the length and height. You don't have to, but it makes it more interesting.
Code:
int x = Main.rand.Next(200, Main.maxTilesX);
int y = Main.rand.Next((int)Main.rockLayer, WorldGen.lavaLine);
GenBuilding(x, y);

public static void GenBuilding(int x, int y)
{
    int len = Main.rand.Next(9, 18);
    int high = Main.rand.Next(25, 41);
}So, to get our tiles to be placed, we need to destroy the tiles. To do that, we will use for loops.
The wall code is placed 1 block in from the tiles so that it's smooth with the tile outline!
Code:
int x = Main.rand.Next(200, Main.maxTilesX);
int y = Main.rand.Next((int)Main.rockLayer, WorldGen.lavaLine);
GenBuilding(x, y);

public static void GenBuilding(int x, int y)
{
    int len = Main.rand.Next(9, 18);
    int high = Main.rand.Next(25, 41);
    for (int num = 0; num <= len; num++)
    {
        for (int num2 = 0; num2 <= high; num2++)
        {
            WorldGen.KillTile(x + num, y - num2);
            //The reason we've done x + num is so that it works at the x co-ordinate we have picked. Doing it without x + and y - would make it kill tiles in the upper left part of the world
        }
    }
    for (int num3 = 1; num3 < len; num3++)
    {
        for (int num4 = 1; num4 < high; num4++)
        {
            WorldGen.KillWall(x + num3, y - num4);
            WorldGen.PlaceWall(x + num3, y - num4, 5);
            //5 is the wall type. I'm placing the walls now because it's filling in the background.
        }
    }
}
The wall code is placed 1 block in from the tiles so that it's smooth with the tile outline!
Now we need to make the outline of our building. We'll do the same kind of thing as the destroying, but without the middle (so, 1 for loop).
Code:
int x = Main.rand.Next(200, Main.maxTilesX);
int y = Main.rand.Next((int)Main.rockLayer, WorldGen.lavaLine);
GenBuilding(x, y);

public static void GenBuilding(int x, int y)
{
    int len = Main.rand.Next(9, 18);
    int high = Main.rand.Next(25, 41);
    for (int num = 0; num <= len; num++)
    {
        for (int num2 = 0; num2 <= high; num2++)
        {
            WorldGen.KillTile(x + num, y - num2);
            //The reason we've done x + num is so that it works at the x co-ordinate we have picked. Doing it without x + and y - would make it kill tiles in the upper left part of the world
        }
    }
    for (int num3 = 1; num3 < len; num3++)
    {
        for (int num4 = 1; num4 < high; num4++)
        {
            WorldGen.KillWall(x + num3, y - num4);
            WorldGen.PlaceWall(x + num3, y - num4, 5);
            //5 is the wall type. I'm placing the walls now because it's filling in the background.
        }
    }
    for (int num5 = 0; num5 <= high; num5++)
    {
        WorldGen.PlaceTile(x, y - num5, 38);             //Left Wall
        WorldGen.PlaceTile(x + len, y - num5, 38);    // Right Wall
    }
    for (int num6 = 0; num6 <= len; num6++)
    {
        WorldGen.PlaceTile(x + num6, y, 38);             //Floor
        WorldGen.PlaceTile(x + num6, y - high, 38);    //Ceiling
    }
}Now, you don't have to add floors, and you can add multiple, but for now, I'm only going to add one. You're going to do the same as the floor and ceiling but at another random y value.
Code:
int x = Main.rand.Next(200, Main.maxTilesX);
int y = Main.rand.Next((int)Main.rockLayer, WorldGen.lavaLine);
GenBuilding(x, y);

public static void GenBuilding(int x, int y)
{
    int len = Main.rand.Next(9, 18);
    int high = Main.rand.Next(25, 41);
    int floor = Main.rand.Next(7, high - 7);
    for (int num = 0; num <= len; num++)
    {
        for (int num2 = 0; num2 <= high; num2++)
        {
            WorldGen.KillTile(x + num, y - num2);
            //The reason we've done x + num is so that it works at the x co-ordinate we have picked. Doing it without x + and y - would make it kill tiles in the upper left part of the world
        }
    }
    for (int num3 = 1; num3 < len; num3++)
    {
        for (int num4 = 1; num4 < high; num4++)
        {
            WorldGen.KillWall(x + num3, y - num4);
            WorldGen.PlaceWall(x + num3, y - num4, 5);
            //5 is the wall type. I'm placing the walls now because it's filling in the background.
        }
    }
    for (int num5 = 0; num5 <= high; num5++)
    {
        WorldGen.PlaceTile(x, y - num5, 38);             //Left Wall
        WorldGen.PlaceTile(x + len, y - num5, 38);    // Right Wall
    }
    for (int num6 = 0; num6 <= len; num6++)
    {
        WorldGen.PlaceTile(x + num6, y, 38);             //Floor
        WorldGen.PlaceTile(x + num6, y - high, 38);    //Ceiling
        WorldGen.PlaceTile(x + num6, y - floor, 38);  //Second Floor
    }
}So, the idea of random loot is very fun! You can add anything, and you can add any kind of chest, including locked chests! Now, the function for placing chests is WorldGen.PlaceChest(int x, int y, ushort type = 21, bool notNearOtherChests = false, int style = 0). So, the chest is placed from bottom left, so that helps you with your x and y value! Leave the rest the same, except the style. That is the type of chests! Here is a list of different styles:
Now, we have to add loot. As I assume you know how to randomize the loot a little bit with If's and Main.rand.Next, I will show you how to add loot, but I will only add one item.
Random loot complete! Now just add more stuff on the end!
- style = 0: Wood Chest
- style = 1: Gold Chest
- style = 2: Locked Gold Chest
- style = 3: Shadow Chest
- style = 4: Locked Shadow Chest
- style = 5: Barrel
- style = 6: Trash Can
Code:
int x = Main.rand.Next(200, Main.maxTilesX);
int y = Main.rand.Next((int)Main.rockLayer, WorldGen.lavaLine);
GenBuilding(x, y);

public static void GenBuilding(int x, int y)
{
    int len = Main.rand.Next(9, 18);
    int high = Main.rand.Next(25, 41);
    int floor = Main.rand.Next(7, high - 7);
    for (int num = 0; num <= len; num++)
    {
        for (int num2 = 0; num2 <= high; num2++)
        {
            WorldGen.KillTile(x + num, y - num2);
            //The reason we've done x + num is so that it works at the x co-ordinate we have picked. Doing it without x + and y - would make it kill tiles in the upper left part of the world
        }
    }
    for (int num3 = 1; num3 < len; num3++)
    {
        for (int num4 = 1; num4 < high; num4++)
        {
            WorldGen.KillWall(x + num3, y - num4);
            WorldGen.PlaceWall(x + num3, y - num4, 5);
            //5 is the wall type. I'm placing the walls now because it's filling in the background.
        }
    }
    for (int num5 = 0; num5 <= high; num5++)
    {
        WorldGen.PlaceTile(x, y - num5, 38);             //Left Wall
        WorldGen.PlaceTile(x + len, y - num5, 38);    // Right Wall
    }
    for (int num6 = 0; num6 <= len; num6++)
    {
        WorldGen.PlaceTile(x + num6, y, 38);             //Floor
        WorldGen.PlaceTile(x + num6, y - high, 38);    //Ceiling
        WorldGen.PlaceTile(x + num6, y - floor, 38);  //Second Floor
    }
    int chestX = Main.rand.Next(1, len - 1);
    int chest1 = WorldGen.PlaceChest(x + chestX, y - floor - 1, 21, false, 0); // 0 for wood chest
}
Now, we have to add loot. As I assume you know how to randomize the loot a little bit with If's and Main.rand.Next, I will show you how to add loot, but I will only add one item.
Code:
int x = Main.rand.Next(200, Main.maxTilesX);
int y = Main.rand.Next((int)Main.rockLayer, WorldGen.lavaLine);
GenBuilding(x, y);

public static void GenBuilding(int x, int y)
{
    int len = Main.rand.Next(9, 18);
    int high = Main.rand.Next(25, 41);
    int floor = Main.rand.Next(7, high - 7);
    for (int num = 0; num <= len; num++)
    {
        for (int num2 = 0; num2 <= high; num2++)
        {
            WorldGen.KillTile(x + num, y - num2);
            //The reason we've done x + num is so that it works at the x co-ordinate we have picked. Doing it without x + and y - would make it kill tiles in the upper left part of the world
        }
    }
    for (int num3 = 1; num3 < len; num3++)
    {
        for (int num4 = 1; num4 < high; num4++)
        {
            WorldGen.KillWall(x + num3, y - num4);
            WorldGen.PlaceWall(x + num3, y - num4, 5);
            //5 is the wall type. I'm placing the walls now because it's filling in the background.
        }
    }
    for (int num5 = 0; num5 <= high; num5++)
    {
        WorldGen.PlaceTile(x, y - num5, 38);             //Left Wall
        WorldGen.PlaceTile(x + len, y - num5, 38);    // Right Wall
    }
    for (int num6 = 0; num6 <= len; num6++)
    {
        WorldGen.PlaceTile(x + num6, y, 38);             //Floor
        WorldGen.PlaceTile(x + num6, y - high, 38);    //Ceiling
        WorldGen.PlaceTile(x + num6, y - floor, 38);  //Second Floor
    }
    int chestX = Main.rand.Next(1, len - 1);
    int chest1 = WorldGen.PlaceChest(x + chestX, y - floor - 1, 21, false, 0); // 0 for wood chest
    Main.chest[chest1].item[0].SetDefaults(313); //313 is the item you would use!
    Main.chest[chest1].item[0].stack = 99; //how many there is. item[0] is the slot number!
}
Random loot complete! Now just add more stuff on the end!
CAVES, HOLES AND PLACING LOTS OF BLOCKS
So this one's fun. There is a beautiful little function in WorldGen called digTunnel, which I've modified to make more compatible for you to use. I will post it here and explain what it does, and an example of how to use it!
Code:
public static void Sphere(int X, int Y, int size, bool place = false, ushort placeType = 1)
        {
            float num = X;
            float num2 = Y;
            float num5 = size;
            int num6 = (int)(num - num5);

            while ((float)num6 <= num + num5)
            {
               int num7 = (int)(num2 - num5);
               while ((float)num7 <= num2 + num5)
               {
                    if ((double)(System.Math.Abs((float)num6 - num) + System.Math.Abs((float)num7 - num2)) < (double)num5 * (1.0 + (double)WorldGen.genRand.Next(-10, 11) * 0.005))
                    {
                        if (!place)
                        {
                            Main.tile[num6, num7].active(false);
                        }
                        else
                        {
                            Main.tile[num6, num7].active(true);
                            Main.tile[num6, num7].type = placeType;
                        }
                    }
                    num7++;
                }
                num6++;
            }
        }
So, there a few variables needed. The X and Y position of where the hole / sphere of blocks should be placed (I called it sphere because to the character, it would be a sphere
), the size (experiment), whether or not it should place blocks and what type of block to place (if place is true). An Example of this function called could be:Sphere(Main.maxTilesX/2, Main.maxTilesY/2, 50);
That would destroy a huge area in the center of the world.
Sphere(Main.maxTilesX/2, Main.maxTilesY/2, 50, true, 333);
That would place a ridiculous amount of platinum coin piles in the center of the world.
These can be used to make pretty awesome things, such as the World Hole in my new mod, which is a hole that goes pretty far down, with random bends etc. I will now show you how to do something similar!
Now, I don't want my world hole to be able to spawn where the character spawns, as that would mean infinite suicide, so, we have to run a precaution, making sure it's safe. We will do this with an If statement:
"hX" is our X co-ordinate (hole-X), so what about our Y Coordinate?
Code:
list.Insert(15, new WorldGenTask.Action("ModName:WorldHole", delegate
            {
                Main.statusText = "Big hole.... BIIIGGG Hole...";
                int hX;
                if (Main.rand.Next(2) == 0)
                {
                    hX = Main.rand.Next(1600, Main.maxTilesX/2 - 200);
                }
                else
                {
                    hX = Main.rand.Next(Main.maxTilesX/2 + 200, Main.maxTilesX - 1600);
                }
        }
"hX" is our X co-ordinate (hole-X), so what about our Y Coordinate?
To get it to generate on the surface, we are going to make an integer called "start", and make it 150 blocks above the surface! We will then reduce the variable down until there is a block in it's way, like so:
Now we have to start destroying the blocks!
Code:
list.Insert(15, new WorldGenTask.Action("ModName:WorldHole", delegate
            {
                Main.statusText = "Big hole.... BIIIGGG Hole...";
                int hX;
                if (Main.rand.Next(2) == 0)
                {
                    hX = Main.rand.Next(1600, Main.maxTilesX/2 - 200);
                }
                else
                {
                    hX = Main.rand.Next(Main.maxTilesX/2 + 200, Main.maxTilesX - 1600);
                }
                int start = (int)Main.worldSurface - 150; //150 so that it doesn't intersect with floating islands! Could be higher but 150 is pretty good.
                bool flag = Main.tile[hX, start].active();
                for (int num = 0; num < 200; num++)  //200 can be any number
                {
                    flag4 = Main.tile[hX, start].active();
                    if (flag)
                    {
                        break;
                    }
                    start++;
                }
        }
Now we have to start destroying the blocks!
You can randomize the bottom integer or you can dig a hole to hell. Up to you. We'll be digging to hell:
Code:
list.Insert(15, new WorldGenTask.Action("ModName:WorldHole", delegate
            {
                Main.statusText = "Big hole.... BIIIGGG Hole...";
                int hX;
                if (Main.rand.Next(2) == 0)
                {
                    hX = Main.rand.Next(1600, Main.maxTilesX/2 - 200);
                }
                else
                {
                    hX = Main.rand.Next(Main.maxTilesX/2 + 200, Main.maxTilesX - 1600);
                }
                int start = (int)Main.worldSurface - 150; //150 so that it doesn't intersect with floating islands! Could be higher but 150 is pretty good.
                bool flag = Main.tile[hX, start].active();
                for (int num = 0; num < 200; num++)  //200 can be any number
                {
                    flag4 = Main.tile[hX, start].active();
                    if (flag)
                    {
                        break;
                    }
                    start++;
                }
                int bottom = (int)Main.hellLayer+10;
                for (int num2 = start; num2 <= bottom; num2++)
                {
                    Sphere(hX, num2, Main.rand.Next(12, 16)); //Randomizing the size!
                    hX += Main.rand.Next(-1, 2); //This adds a random value to the X, so it isn't perfectly straight!
                }
}RANDOM LOOT IN CHESTS / RANDOM DECIDED LOOT ETC.
Doing random loot in chests is... somewhat not random but also kind of random. You still have to decide which items to use but you can add lots to a list, making it much easier to sort your code! The code won't be implemented or shown as an image but I'm relatively sure it will work!
So, the first thing we need to do is create a list<int> variable for the items:
This would make a list of integers called "loot" that contains EVERY SINGLE POTION possible to get in the game (I think). The numbers are the internal ID for the item.
Code:
List<int> loot = new List<int> { 2344, 2345, 2346, 2347, 2348, 2349, 2350, 2351, 2352, 2353, 2354, 2355, 2356, 2359, 301, 302, 303, 304, 305, 288, 289, 290, 291, 292, 293, 294, 295, 296, 297, 298, 299, 300, 226, 188, 189, 110, 28 }This would make a list of integers called "loot" that contains EVERY SINGLE POTION possible to get in the game (I think). The numbers are the internal ID for the item.
Now we need to pick a random item from the list:
Code:
List<int> loot = new List<int> { 2344, 2345, 2346, 2347, 2348, 2349, 2350, 2351, 2352, 2353, 2354, 2355, 2356, 2359, 301, 302, 303, 304, 305, 288, 289, 290, 291, 292, 293, 294, 295, 296, 297, 298, 299, 300, 226, 188, 189, 110, 28 }
int index = Main.rand.Next(0, loot.Count + 1); //this is the random item's number, the item isn't applied to the chest yetNow we need to put the item into the chest. We'll be putting this into the first slot (keep in mind that the chest variable DOES NOT exist yet. Once you have made your chest and want to apply the loot, please replace CHESTINT with your chest's variable!
That should be it! You can do this with multiple times, just make sure you make a new list and index integer for each item slot. There may be a way to do it with one list, but I'm not sure how to yet!
Code:
List<int> loot = new List<int> { 2344, 2345, 2346, 2347, 2348, 2349, 2350, 2351, 2352, 2353, 2354, 2355, 2356, 2359, 301, 302, 303, 304, 305, 288, 289, 290, 291, 292, 293, 294, 295, 296, 297, 298, 299, 300, 226, 188, 189, 110, 28 }
int index = Main.rand.Next(0, loot.Count + 1); //this is the random item's number, the item isn't applied to the chest yet
Main.chest[CHESTINT].item[0].SetDefaults(loot[index]);
That should be it! You can do this with multiple times, just make sure you make a new list and index integer for each item slot. There may be a way to do it with one list, but I'm not sure how to yet!
And that's it so far for this tutorial! Thanks for reading it! If you want to see some more tutorials, here is a handy list for your sake!
+ [Tutorial] Custom Boss - NPC AI and Server Syncing - By BlueMagic123
+ [Tutorial] Custom Dust - By BlueMagic123
+ [Tutorial] Summoner Weapon - By BlueMagic123
+ [TUTORIAL] How to make a basic flail weapon type weapon - By Gmod
+ Getting Started on Modding - By Berberborscing
+ [Tutorial] Generics and Custom JSON Properties - By MiraiMai
+ tAPI Community Resources - Development assistance for developers, by developers - By Neojin
+ [Tutorial] Projectile Guide and Implementation - By Sin Costan
Attachments


Last edited: