Terry N. Muse
Terrarian
Let's get this out of the way real quick.
No, you cannot fight Golem without killing Plantera. No, this is not practical. No, you cannot summon a Solar Eclipse pre-hardmode. No, you will not get any real loot out of this. But yes, you will get access to Lihzahrd traps and have uses for them. Yes, you can have a pet Lizard before you kill the Wall of Flesh. Yes, I'm assuming you're playing in Expert pre-hardmode. Yes, you will get all (okay, most) of the bragging rights.
And yes, it is possible to break into the Jungle Temple pre-hardmode.
We can. Therefore, we must.
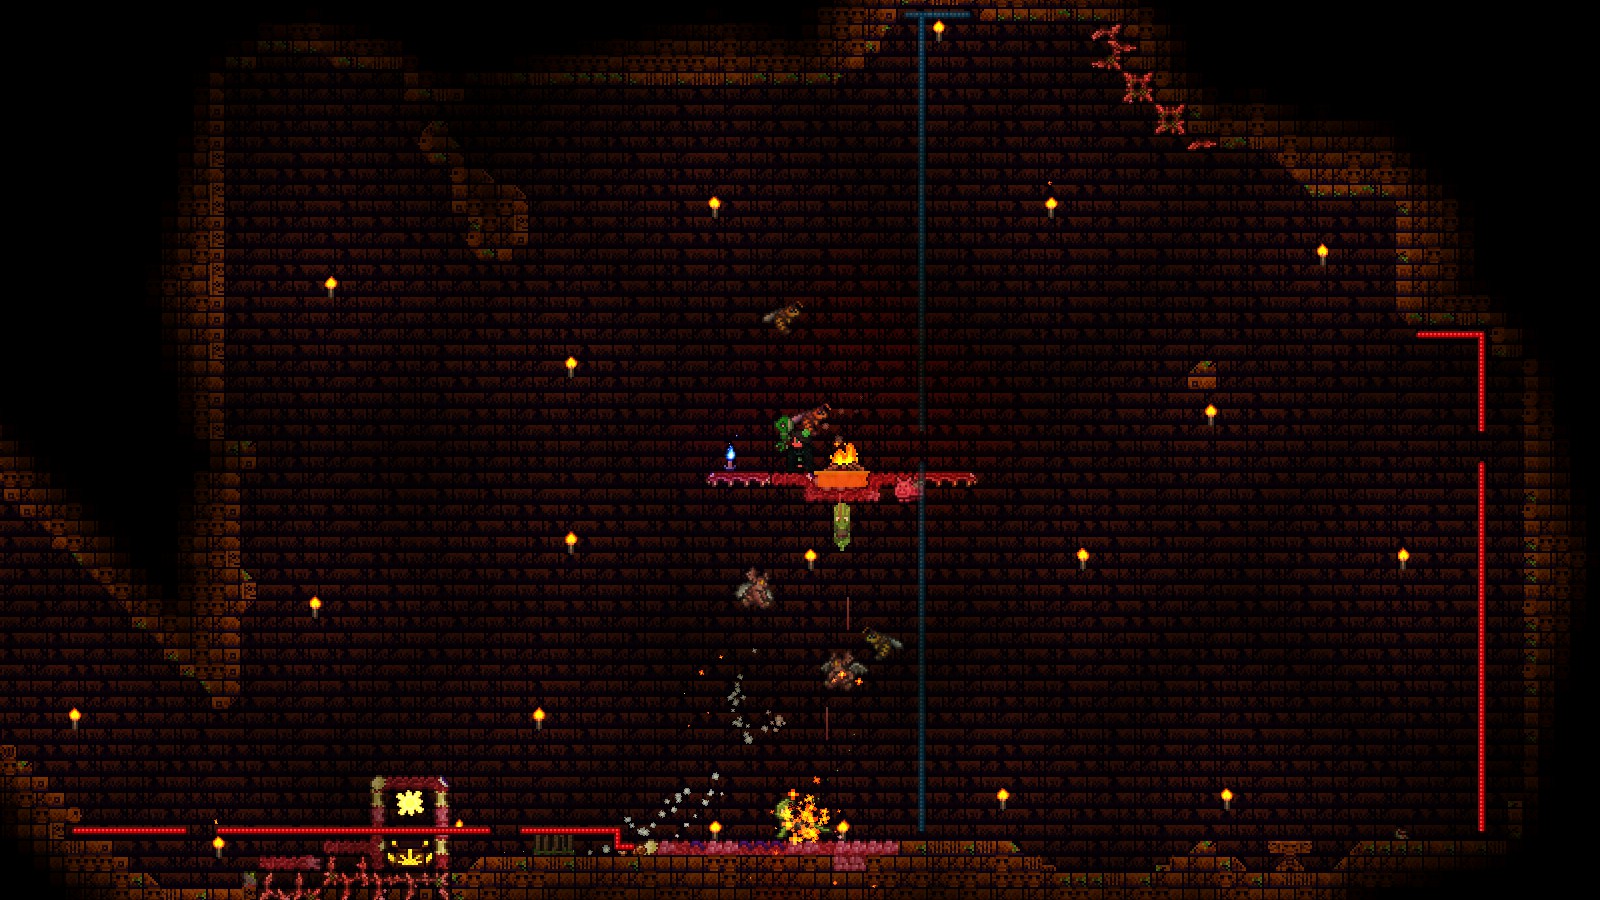
The Jungle Temple is a nasty place; in terms of locations and not events, it's the second nastiest place in the game right under the post-Plantera Dungeon, which we can't sequence break our way into for obvious reasons. There's only two real enemies to watch out for with very simplistic AI, but they pose a colossal threat to underequipped players - and they're not the real focus anyway. One slip of attention and you'll be roasted to a crisp or skewered on a stick or simply picked off by a Super Dart. Those are the real threat, more than any living enemy you'll meet in the Temple.
As a result, the most crucial preparation you need to make beforehand is acquiring the ability to see them coming. And no, relying on your eyes to spot the traps and plates doesn't count. Thankfully, this is easy to satisfy; simply dig up an ordinary Dart Trap and put it in your inventory. Whenever you're holding a mechanism like a trap, all wires will automatically reveal themselves - but only while you're holding it. Defeating Skeletron and rescuing the Mechanic for the Mechanical Lens and a way to actually defuse the traps from a safe distance is recommended.
When it comes to your gear, Rocket Boots and Cloud in a Bottle and their derivatives will serve you well. I strongly recommend reaching the Underworld before going here, because the Imp Staff's high damage shots and DOT debuff will play their role in chipping away at the bulky enemies you need to deal with. While you want to avoid physical confrontation, the Bee Keeper is likely your best option for a melee weapon. Because you'll be going to the Underworld anyway, you might as well grab some Molten armour while you're there (but doing it with Bee armour isn't impossible either). Warding accessories will also benefit you greatly, provided your piggy bank holds out. Defensive buffs such as Ironskin and Endurance are a massive boon, and don't be afraid to down a few Calming potions to suppress the Underground Jungle's preposterous spawn rate.
Your main weapons of choice should be the Phoenix Blaster and the Demon Scythe. You'll notice I picked two of the latest and strongest pre-hardmode weapons; we are sequence breaking into one of the final areas of the game, after all. The former is one of the best sources of DPS you can get your hands on and will be necessary to whittle down their health pools, while the latter provides the crowd control you'll inevitably need.
Finally, bring a few Campfires, a Heart Lantern, and some Honey Buckets. This is to conserve your potions for when you need them most. If you take a hit or two during a brief scuffle, wall off the room you're in and set up camp; with all three buffs (and maybe a Regeneration potion), you'll be back to full health in no time. Keep in mind that health regeneration is much faster when you're standing still, so make a small pool of honey and take a small rest in it. Once you're all healed up, just scoop up your honey and take your Heart Lantern with you on the way out to use again later.
So, you're all geared up and ready to raid the Temple. Go ahead and search for it in the Underground Jungle. It doesn't matter whether or not you can find the door; all you need to do is find the Jungle Temple at all, because you can break in from any point you desire with the power of hoik.
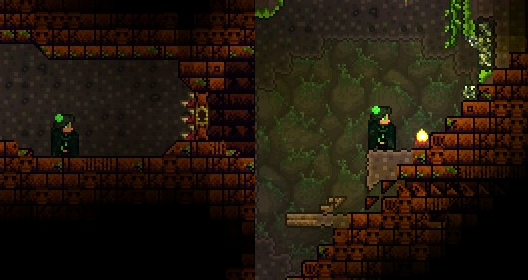
By placing platforms adjacent to the door and hammering them into stairs, you can simply hold down and walk through. If you find a wall, it'll be a bit more complicated and require more hammering, but it's not imposible by any means. By the way, once you're inside a wall, you can hammer the blocks you're clipped into and keep hoiking that way. Bear in mind that collision detection is a finicky thing; if you get stuck in the wall or find your screen violently jittering back and forth every frame, that's okay. Hammer the offending block into a different position, or just Magic Mirror out and try again in a different section.
Congratulations, you've performed Jungle Temple early! That was the easy part. Now you actually have to contend with the menaces within the Jungle Temple, and your precious Molten armour means a whole lot of nothing to them.
In the Temple, the two major enemies you'll meet are Lihzahrds and Flying Snakes. Both are vulnerable to knockback when you meet them, but Lihzahrds become immune to it when their health dips too low; in order to fight them, you need to pick them off from a safe location such as the ceiling where they can't reach you. They'll tend to clump up beneath you as you do this; another reason to bring an Imp is to ignite them and watch the light show.
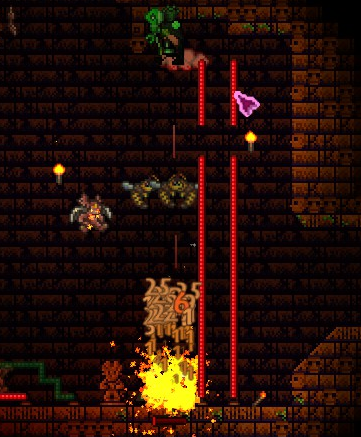
If any mishaps occur, the Bee Keeper's confusion can give you precious time to collect yourself and find a safespot while the Lihzahrds and Flying Snakes are stumbling away. The latter behave similarly to the various bats, but will only begin chasing you when you can be physically reached. If they can't get to you, they'll give up and wander to another part of the room. Their large hitbox means you can shoot them down with little difficulty, so your Phoenix Blaster will definitely come in handy here.
Of course, you won't always be in wide open rooms where you can grapple to or build platforms near the ceiling and feel completely safe from the Lihzahrds. Chokepoints are inevitable, and you have to penetrate them eventually... but this doesn't mean you have to take them head-on. Let the power of hoik shine once more!
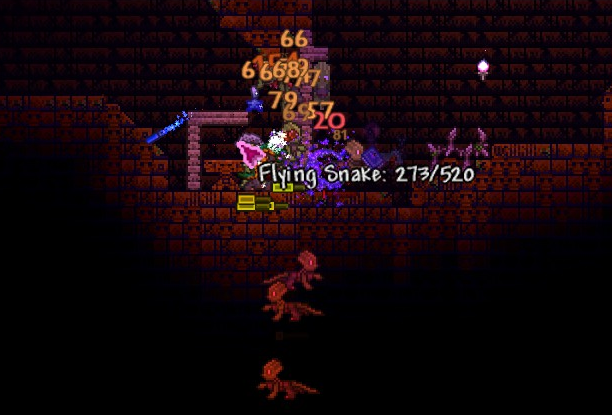
By walling off approaching enemies and then attaching stairs in the same configuration as the door, you've created a one-way wall. You won't be walking through, of course - your Demon Scythes will! Simply open fire on the stairs and the Scythes will shoot through, piercing the numerous Lihzahrds bunched up on the other side and clearing them out. Once the coast is clear, you can stroll on through.
However, a word of warning: when Lihzahrds get down on all fours, this changes their hitbox and collision detection. When hugging a wall that's one tile thick, it's not impossible for them to clip through, so don't drop your guard. That said, they might also clip through the floor and plummet into the abyss, so...
As you slowly pick your way through the Temple, collecting traps and building bridges over spikes and looting chests, don't forget to wall off rooms as you go! The last thing you want is enemy reinforcements getting the (possibly literal) drop on you when you're low on health or already dealing with enemies from the front in a tight corridor. This will also trap enemies spawning above as you move deeper into the Temple, blocking additional spawns and lowering the amount of hardmode mobs you have to fend off.
Eventually, you'll find your way to the Golem's chamber... and not much to do there. Go ahead and pick up the last few traps or empty the last chests while you're there, but it's simply not possible to summon the Golem right now. That said, you've already mapped out and robbed the Jungle Temple of all its traps, so it'll be a cakewalk the next time you pass through to fight it!
So what did you actually get out of this whole adventure? Bragging rights, mostly. But if you thoroughly scoured the Temple for all its traps and chests, you also got plenty of very strong mechanisms and Solar Tablets. Those will come in very handy come hardmode. For instance, Frozen Wings are in a very strong wing tier, but Ice Golems are such a pain! What do you do? Just set up camp in the Tundra with all your hot new traps and watch as the Frost Cores and Feathers come rolling in. This very same farm can also come in handy for grinding the Solar Eclipse... not that you can do much with it before killing the Mechanical Bosses. But once you do kill them, you can immediately summon an Eclipse the next day (thanks to those Solar Tablets of yours) and head to your farm to churn up some mobs and get yourself delicious toys like the Death Sickle and Terra Blade. That's right, you can kill the Mechanical Trio and easily get yourself a Terra Blade before the next day ends.
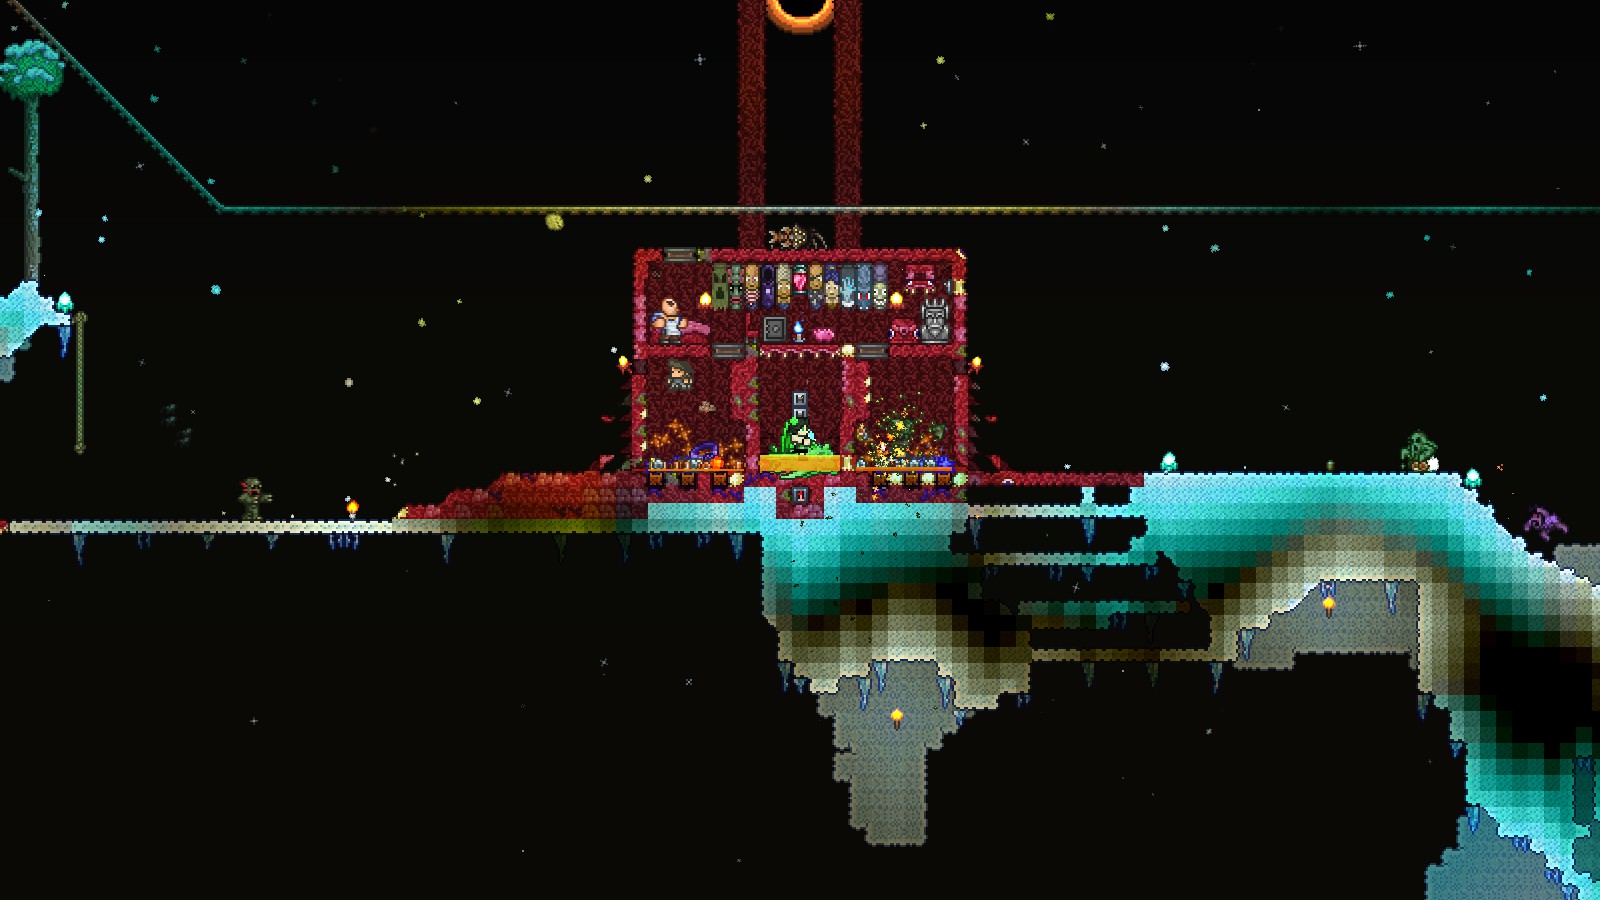
As for actually fighting the Mechanical Trio... well, I might do an in-depth on Mecha Mayhem at some point. Then again, you could always farm Duke Fishron...
That marks the end of this silly guide. In the end, the sequence break only goes so far; you can't actually break the scripted sequence of boss fights with it, but it's a very enjoyable experience for you challenge seekers out there, and the journey can teach you quite a bit; it certainly taught me a lot. I hope I was able to pass some of that information to you! Once again, I'm open to discussion and tips or pointers you might have, so feel free to post them below. Thanks for reading!
No, you cannot fight Golem without killing Plantera. No, this is not practical. No, you cannot summon a Solar Eclipse pre-hardmode. No, you will not get any real loot out of this. But yes, you will get access to Lihzahrd traps and have uses for them. Yes, you can have a pet Lizard before you kill the Wall of Flesh. Yes, I'm assuming you're playing in Expert pre-hardmode. Yes, you will get all (okay, most) of the bragging rights.
And yes, it is possible to break into the Jungle Temple pre-hardmode.
We can. Therefore, we must.
The Jungle Temple is a nasty place; in terms of locations and not events, it's the second nastiest place in the game right under the post-Plantera Dungeon, which we can't sequence break our way into for obvious reasons. There's only two real enemies to watch out for with very simplistic AI, but they pose a colossal threat to underequipped players - and they're not the real focus anyway. One slip of attention and you'll be roasted to a crisp or skewered on a stick or simply picked off by a Super Dart. Those are the real threat, more than any living enemy you'll meet in the Temple.
As a result, the most crucial preparation you need to make beforehand is acquiring the ability to see them coming. And no, relying on your eyes to spot the traps and plates doesn't count. Thankfully, this is easy to satisfy; simply dig up an ordinary Dart Trap and put it in your inventory. Whenever you're holding a mechanism like a trap, all wires will automatically reveal themselves - but only while you're holding it. Defeating Skeletron and rescuing the Mechanic for the Mechanical Lens and a way to actually defuse the traps from a safe distance is recommended.
When it comes to your gear, Rocket Boots and Cloud in a Bottle and their derivatives will serve you well. I strongly recommend reaching the Underworld before going here, because the Imp Staff's high damage shots and DOT debuff will play their role in chipping away at the bulky enemies you need to deal with. While you want to avoid physical confrontation, the Bee Keeper is likely your best option for a melee weapon. Because you'll be going to the Underworld anyway, you might as well grab some Molten armour while you're there (but doing it with Bee armour isn't impossible either). Warding accessories will also benefit you greatly, provided your piggy bank holds out. Defensive buffs such as Ironskin and Endurance are a massive boon, and don't be afraid to down a few Calming potions to suppress the Underground Jungle's preposterous spawn rate.
Your main weapons of choice should be the Phoenix Blaster and the Demon Scythe. You'll notice I picked two of the latest and strongest pre-hardmode weapons; we are sequence breaking into one of the final areas of the game, after all. The former is one of the best sources of DPS you can get your hands on and will be necessary to whittle down their health pools, while the latter provides the crowd control you'll inevitably need.
Finally, bring a few Campfires, a Heart Lantern, and some Honey Buckets. This is to conserve your potions for when you need them most. If you take a hit or two during a brief scuffle, wall off the room you're in and set up camp; with all three buffs (and maybe a Regeneration potion), you'll be back to full health in no time. Keep in mind that health regeneration is much faster when you're standing still, so make a small pool of honey and take a small rest in it. Once you're all healed up, just scoop up your honey and take your Heart Lantern with you on the way out to use again later.
So, you're all geared up and ready to raid the Temple. Go ahead and search for it in the Underground Jungle. It doesn't matter whether or not you can find the door; all you need to do is find the Jungle Temple at all, because you can break in from any point you desire with the power of hoik.
By placing platforms adjacent to the door and hammering them into stairs, you can simply hold down and walk through. If you find a wall, it'll be a bit more complicated and require more hammering, but it's not imposible by any means. By the way, once you're inside a wall, you can hammer the blocks you're clipped into and keep hoiking that way. Bear in mind that collision detection is a finicky thing; if you get stuck in the wall or find your screen violently jittering back and forth every frame, that's okay. Hammer the offending block into a different position, or just Magic Mirror out and try again in a different section.
Congratulations, you've performed Jungle Temple early! That was the easy part. Now you actually have to contend with the menaces within the Jungle Temple, and your precious Molten armour means a whole lot of nothing to them.
In the Temple, the two major enemies you'll meet are Lihzahrds and Flying Snakes. Both are vulnerable to knockback when you meet them, but Lihzahrds become immune to it when their health dips too low; in order to fight them, you need to pick them off from a safe location such as the ceiling where they can't reach you. They'll tend to clump up beneath you as you do this; another reason to bring an Imp is to ignite them and watch the light show.
If any mishaps occur, the Bee Keeper's confusion can give you precious time to collect yourself and find a safespot while the Lihzahrds and Flying Snakes are stumbling away. The latter behave similarly to the various bats, but will only begin chasing you when you can be physically reached. If they can't get to you, they'll give up and wander to another part of the room. Their large hitbox means you can shoot them down with little difficulty, so your Phoenix Blaster will definitely come in handy here.
Of course, you won't always be in wide open rooms where you can grapple to or build platforms near the ceiling and feel completely safe from the Lihzahrds. Chokepoints are inevitable, and you have to penetrate them eventually... but this doesn't mean you have to take them head-on. Let the power of hoik shine once more!
By walling off approaching enemies and then attaching stairs in the same configuration as the door, you've created a one-way wall. You won't be walking through, of course - your Demon Scythes will! Simply open fire on the stairs and the Scythes will shoot through, piercing the numerous Lihzahrds bunched up on the other side and clearing them out. Once the coast is clear, you can stroll on through.
However, a word of warning: when Lihzahrds get down on all fours, this changes their hitbox and collision detection. When hugging a wall that's one tile thick, it's not impossible for them to clip through, so don't drop your guard. That said, they might also clip through the floor and plummet into the abyss, so...
As you slowly pick your way through the Temple, collecting traps and building bridges over spikes and looting chests, don't forget to wall off rooms as you go! The last thing you want is enemy reinforcements getting the (possibly literal) drop on you when you're low on health or already dealing with enemies from the front in a tight corridor. This will also trap enemies spawning above as you move deeper into the Temple, blocking additional spawns and lowering the amount of hardmode mobs you have to fend off.
Eventually, you'll find your way to the Golem's chamber... and not much to do there. Go ahead and pick up the last few traps or empty the last chests while you're there, but it's simply not possible to summon the Golem right now. That said, you've already mapped out and robbed the Jungle Temple of all its traps, so it'll be a cakewalk the next time you pass through to fight it!
So what did you actually get out of this whole adventure? Bragging rights, mostly. But if you thoroughly scoured the Temple for all its traps and chests, you also got plenty of very strong mechanisms and Solar Tablets. Those will come in very handy come hardmode. For instance, Frozen Wings are in a very strong wing tier, but Ice Golems are such a pain! What do you do? Just set up camp in the Tundra with all your hot new traps and watch as the Frost Cores and Feathers come rolling in. This very same farm can also come in handy for grinding the Solar Eclipse... not that you can do much with it before killing the Mechanical Bosses. But once you do kill them, you can immediately summon an Eclipse the next day (thanks to those Solar Tablets of yours) and head to your farm to churn up some mobs and get yourself delicious toys like the Death Sickle and Terra Blade. That's right, you can kill the Mechanical Trio and easily get yourself a Terra Blade before the next day ends.
As for actually fighting the Mechanical Trio... well, I might do an in-depth on Mecha Mayhem at some point. Then again, you could always farm Duke Fishron...
That marks the end of this silly guide. In the end, the sequence break only goes so far; you can't actually break the scripted sequence of boss fights with it, but it's a very enjoyable experience for you challenge seekers out there, and the journey can teach you quite a bit; it certainly taught me a lot. I hope I was able to pass some of that information to you! Once again, I'm open to discussion and tips or pointers you might have, so feel free to post them below. Thanks for reading!
Last edited:
